🚗 Elevate your ride with sleek protection that’s impossible to ignore!
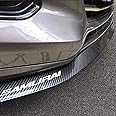
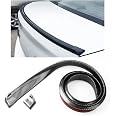
The HENGJIA Carbon Fiber Spoiler Side Skirt is a 2.5-meter long, 100% waterproof rubber bumper lip designed to protect your vehicle from scrapes and collisions while delivering a sporty, aggressive look. Made from durable materials with 3M tape and included screws, it offers easy DIY installation and universal compatibility with most cars, trucks, and SUVs.
| Auto Part Position | Front |
| Installation Type | Screw-In |
| UPC | 736561476366 781930566988 |
| Manufacturer | HengJia Auto Parts |
| Package Dimensions | 25.8 x 11.7 x 7 cm; 780 g |
| Item model number | 10 |
| Manufacturer Part Number | HengJia Auto Parts |
| Water Resistance | Waterproof |
| Country of Origin | USA |
| Item Weight | 780 g |
T**E
価格以下
色が白っぽくカーボン調と言うより2Dの安いプリント模様。折り畳まれた状態でくるので、外で日光に当てて伸ばしたが、軽く波打っている状態。ヒートガンで加熱をしたが最後まで真っ直ぐにならなかった。3Mと表示されている両面テープが貼られているが、こんなに粘着力の無い3Mテープは無い。剥がして本物の3Mテープを使用しました。カーブのところで三角形をいくつも作り曲げていきますが、材質の硬さのせいか曲げた後が突っ張って浮いてしまう。養生テープでガッチリ固定し対応。出来上がりは、カーボン調にも程遠い。艶も無くいかにもプリントしたシルバーぽいものがバンパー下に付いた感じ。パッと見ても安っぽさがすぐわかる。何のために付けたか聞かれたら、リップスポイラーのプロテクター。と、言って自分を納得させるしかない。金銭的にも負担になったが時間と手間を費やした事に頭にくる。購入を考えてある方、クオリティが低いのでやめた方が良いです。
R**.
I’m not angry I’m just disappointed
Adhesive won’t hold, gotta use screws. The material stretches out so much when heat is applied, sunlight should be enough to make it sag and warp. Doesn’t play nice with curves…not at all. Even after cutting many triangles the corners will kink and it looks bad. Even if this was 5 dollars I wouldn’t recommend. :(
J**.
Great for what it is. Use the screws! Looks pretty slick....
You get what you pay for. Once I bought it I was nervous about the angles my bumper has, stupid things like do I make straight cuts, angles, straight once I get to the end point.... HERES THE EASY WAY. Get some rubbing alcohol, dont douse your car but a quick wipe of thick debris with a cloth and quick wipe of alcohol and you'll have a surface ready to stick. These guys use real 3m adhesive. It wont hold on it's own. But start at an end point. Right or left doesnt matter. Dont overthink it. Start going along getting it to stick by pressing hard for a few seconds every 5 or 6 inches as you go along. When you get to crazy angles you gotta take a pair of scissors or razor blade to make a v or angle cut that can overlap. Hold those angles for a few seconds longer to get it to stick as you work across the bumper. When you reach the next side, or the end, make a cut. I matched each end with a 60ish degree angle back to my cars fender at the bottom. Again, dont overthink it. Go back along and really press hard on the strip, especially those angles. Then the MOST important part. The self tapping screws. Its under your bumper. You'll never see them or the holes if you take it off but you chose a 32 dollar roll on bumper. When you go to put them on remember you're under your bumper and a drill may not fit. I only used a small stubby Philips head screwdriver. Press hard at first and the point on the screws will place themself a bit. Press hard towards the bumper and then screw until its pretty snug without snapping the plastic on your bumper. Do the ends. Do the middle. Screw into the angles and even grab 2 or 3 extra to do the same thing and this will not fall off. I recomend unrolling it for a night or half a day maybe inside in a warm house. My only gripe is the straightest part of my bumper is a but curvy because the temp outside I am installing in, the fact it's still new and it's just a rubber strip. I have a 2x4 placed lightly on it to straighten it out until I give it a try driving. I cant imagine it coming off as the screws are more than sufficient and the adhesive seems legit. I would still only use with the screws and they should give you 2 or 4 more in the package. For what this is, it turnt out great. Will post a pic soon and update after driving a bit.
F**E
not bad!
its not bad but not too good, its not easy to install as they say, also its not really visible its too small, i dont know actually, i dont know ist nice or useful, its just barely seen anyway!
M**J
Invest in prep time
Installed on a Subaru Crosstrek. Be advised that it has an obnoxious chemical smell upon opening. Just lay it flat in an unoccupied room for a few days. The smell mostly goes away. The installation instructions were in Thai. Lol But there are pictures tho.Had to clean the underside well with wipes/soap/water/alcohol. The cleaning may take a few rounds, but very important. It won’t stick to a dirty surface so don’t get mad if it falls off later on bc you’re too lazy to spend the extra 5-10 minutes to really clean the underside. (Just saying.)It comes with two adhesive promoters but it should have come with 3. They dry out pretty quick, but are essential for the adhesion process.It does take some time to measure and cut out the “triangles” for the bends. I just used a pen to mark on the red tape to guesstimate where the bends are and marked the triangles from there. Also, you’ll have to force the lip to bend. The lip is rubber, it’s not all that elastic.Would also recommend utility scissors to cut the triangles too. The rubber is thick enough that I’m not sure normal scissors will get the job done. I had to use two hands to clomp down on the scissor handles.It’s been 3 days since the lip application. Hasn’t fallen off so that’s good. Also haven’t used the screws yet but will probably put them on. Haven’t braved sending it thru a car wash just yet so may have to send an update for that later on.All in all I like it so far. Considering buying two more for the side skirts IF the front lip lasts thru a car wash. Lol I do like that it’s rubber bc cracking a real lip kit would make me cry.*Update (4/3/18): Front lip still on after 4 automatic car washes and a couple of thunderstorms later. Still haven’t gotten around to putting the screws on either. 👍**Update (2/4/19): Front lip still on. Eventually had to add 2 screws to one of the bends bc it was starting to fall off at the ‘corner.’ (This was the same place I had to cut “triangles” to make it bend.) The screws were recently installed in Jan. 2019 so the lip held up well with all things considered.Sadly the front lip had an unfortunate run in today with old debris from a blown tire. The car in front of me kicked it up so fast that I didn’t have time to swerve or brake safely at highway speeds. Poor car took it like a champ. =/Oddly enough, the lip is still on. However, the center portion of the lip split horizontally right where the lip and adhesive part meets in the middle. Will probably have to replace it eventually as rubber will degrade making the gap even longer. However, I will be purchasing another three once it’s time. I’ll redo the front lip but also add side skirts.***Update (03/05/20): The original lip is still on! The adhesive is wearing off on one end near the wheel well, but not bad for 2 year application. Got lazy and used Velcro to keep it on for now. The split in the middle has widened, but still safe to drive with. Ran this thru the car wash well over 30+ times. Some of the carbon fiber graphics has worn/scratched off, but still decent shape with all things considered.
Trustpilot
1 month ago
1 day ago