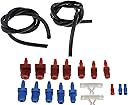
It was great others commented to buy two kits, -- yes, do so. Buy two kits and clear tubing. I used Teflon Tape too, since had it on hand (no issues with leaking). Remember, you may be doing this for about 1 hour. -- Again, 2 kits, Clear tubing, Teflon Tape Dorman's choice of providing the *opaque black tubing is a very strange choice for this IMO. In my opinion as well, Dorman (some supplier), should just a) double the Fittings in this kit, b) supply a 6ft roll of clear tubing to cut to proper length, and a roll of Teflon Tape. For me, that would make it a complete "kit" for the non-pro mechanic project seeking to have it all ready to go. Since this is a product review which involves "method/use" of a product, I'll go further. Dorman (some supplier) should provide their own Video "how-to" (YouTube) since is the OEM expert, and include tips. I try to share too, such as 1) do a dry-run assembly of your MC *first, prior to Bench-bleeding, 2) initially you may want to pinch the tubing on some of the Back-strokes when initially priming; keeping the tube air from returning, and sucking in the reservoir fluid--you need to keep topped up, 3) once really "primed", make sure the tube is ideally only below the fluid surface mid-way in the reservoir (if you can't see it I can't, it may be curled back above the fluid and suck air,--keep it topped up, 3) a "turkey" baster type bulb can adjust a too high level at the end, which I never found to be an issue since bleeding it at the line fittings during installation, then the wheels again, 4) I had 2 Quarts of fluid on hand since this is likely going to be a system fluid change as well anyway, 5) unless you're using DOT 5/Silicone, protect your paint, keep a soapy-water spray bottle on hand and wear eye-protection, mechanics-solvent-gloves -- it is a messy job