
DOWNLOAD THE APP


Customer Services
Copyright © 2025 Desertcart Holdings Limited
DOWNLOAD THE APP
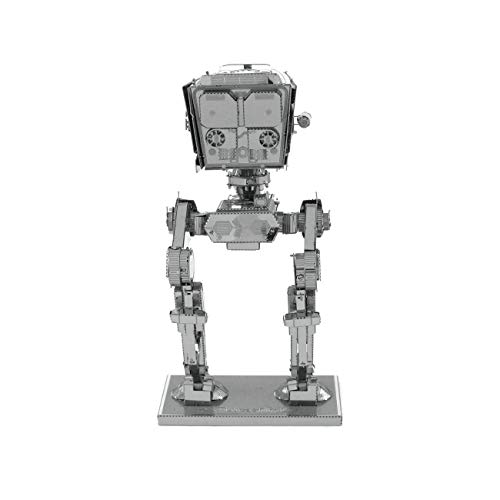

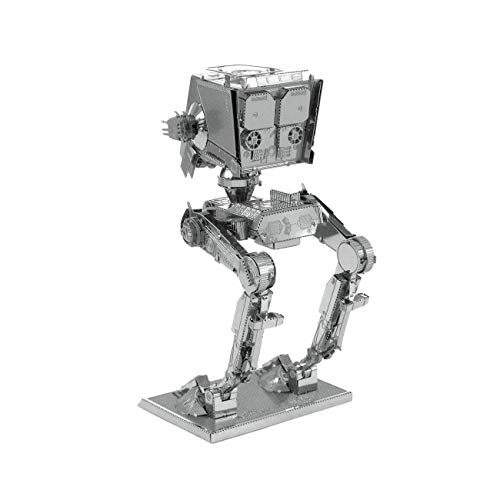
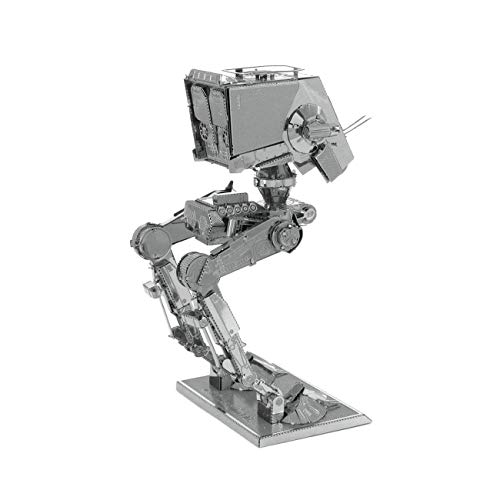


🚀 Build the Empire’s iconic AT-ST—no glue, all glory!
The Metal Earth Star Wars AT-ST 3D Model Kit offers 100 precision-cut steel pieces that assemble into a detailed, museum-quality replica without glue or solder. Designed for an immersive 3-hour build, this compact model (12.2 x 17 cm) challenges hobbyists to craft an iconic Star Wars vehicle using only tabs and holes, making it a perfect collectible for fans and model enthusiasts alike.


| ASIN | B016ADE7TK |
| Anti-Tick Material | Metal |
| Assembly time | 3 Hours |
| Batteries required | No |
| Best Sellers Rank | 195,599 in Toys & Games ( See Top 100 in Toys & Games ) 44 in Robot Model Building Kits |
| Customer Reviews | 4.2 4.2 out of 5 stars (741) |
| Date First Available | 12 Nov. 2015 |
| Included components | 2 Steel Sheets |
| Is assembly required | Yes |
| Item model number | MMS261 |
| Item volume | 40 Millilitres |
| Item weight | 0.05 Kilograms |
| Number of pieces | 100 |
| Product Dimensions | 0.1 x 12.2 x 17 cm; 50 g |
B**B
Fiddly, frustrating and satisfying in equal measure
Wish I'd read the other reviews before attempting to do this model, I would probably have settled with doing one of the others I purchased at the same time. Very fiddly and frustrating to do but the satisfaction at the end with a job done is well worth it. I'd spend 5 minutes trying to line the tabs up, put the job down in annoyance and then come back to it 5 minutes later. I would definitely recommend the use of a magnifying glass. Some of the bits were loose when I finished but I've cheated and used a dab of glue where I need to...hey, it was my first one, don't judge me
E**E
Fantastic little set
Great kit, looks terrific and takes much longer than most of the other sets (took me several nights of sitting down to it for a few hours). Lots of people say it is very difficult and while I don't recommend this as a first metal earth kit, if you take your time and go through the instructions slowly then it's not so bad. Having a small set of pliers and a craft knife is a must though. You just won't be able to do a decent job without them and since you only really get one go to do it right, don't try without.
N**D
Not for a beginner.
This is by far the most difficult and complex Metal Earth model I have made so far. There are over 80 pieces (some of them very small) and the instructions run to 4 sides of A3. The length of the 'legs' mean that when trying to put them together there is a lot of stress on them, and parts will loosen. I had to us a bit of glue to hold some parts firmly together. Believe me when I say that this is not a kit for a novice. You'll want a couple under your belt before you tackle this baby. Very satisfying once it's done though.
S**N
My son loved it
Some pieces were hard to bend/fold and ended up snapping. My son used blue tac to complete the model. Still looked good when finished though.
A**N
Best most fiddling model yet
Loving working on this as it's quite a challenge but looking good at the moment. I'd say you definitely need a few special tools and eyewear to do a good job though.
R**S
very hard but satisfying
This is my second metal earth model I have built, and boy oh boy, hard as anything this was. But I built it in the end. Really pleased
T**S
One of the hardest but most satisfying 3D model
Not suitable for kids and as a first 3D model! this is by far the harder one I've done, this model is ultra complex and full of small and difficult pieces. It took me more than 5 hours to finish it, compared to 1,5 h for the Millenium Falcon. The results is amazing, but a small error can easily prevent you from completing it!
A**N
Fiddly but very nice
Very fiddly and pieces broke when assembling. Bought fof my 26 year old son for christmas
A**E
Dieses Modell ist mit Abstand das schwierigste aller Star Wars Modelle. Als Star Wars Fan musste ich dieses unbedingt haben, da es das schönste und detailgetreuste Modell ist. Das Endwerk stimmt voll zufrieden und es ist das Highlight meiner Star Wars Metallmodelsammlung. Mit viel Geduld bekommt es ganz gut hin, auch Fehlerausbesserungen sind möglich. Habe ein-zwei Mal Teile falsch herum angebaut, vor allem die trichterförmigen. Trotz oder gerade wegen des großen Zeitaufwands macht es riesen Spaß.
K**A
Excelente pieza de colección
E**E
Questo modellino ha moltissimi pezzi, molti dei quali minuscoli, vi consiglio di comprarlo solo se avete una buona vista e avete già fatto altri modellini più semplice. Per il resto mi sento di dire che per dimensione è leggermente sproporzionato ad altri modellini della stessa serie, ma fa la sua porca figura
L**.
The AT-ST is a great little model with lots of detail. However, it’s not for the first time builder of these kits as it has many small parts and is a little complex to build. I encountered several areas during the build that I think will make putting this together easier. The plans call for building the cockpit section and then not attaching it until almost the very end. This presented, at least to me anyway, difficulty in attaching it because some of the tabs (towards the front) are very difficult to align with practically the rest of the model in your way when trying to get them lined up. The legs at that point are not attached to the base yet and middle section (part 24) gets in the way. Here are my suggestions on what to do: 1) Start at the beginning with step one, but fold the tabs on parts 5 and 20 & the lower tabs on parts 12 of the two side assemblies once you get to them. This make putting part 73 on later much easier. 2) After assembling through parts 29, 30, and 31, do not attach them to part 24 as indicated (save for step four below). Skip to near the top of page 7 and start by part 67. However, the order that they have for assembling the guns is not the best, I did them in this order – 68 to 69 (x2), 69 (x2) to 70, then 67, 71, and 72 in that order. 3) Then proceed with assembly of parts 73 through 78. 4) Now, go back to the subassembly of parts 29, 30, and 31 and attach it to part 73, then attach part 73 to the main cockpit. 5) Now go back to page 2 and attach the just completed section to part 24. 6) Now you can follow the plans starting at part 32 and proceed through with the rest of the model with one exception – I would add parts 58 and 27 on page 5 before starting on the legs on page 4. The reason is because parts 34 and 58 are very hard to fold, and its easier to do this now before the left leg gets attached on page 5. 7) The only other change I made was to fold the tabs on part 55 (x2). This makes them sit more flush against the back of the legs. As I said, my reasoning for steps 2 through 5 above was because of the difficulty I had attaching the cockpit until almost all of the rest of the model was complete. Overall a very nice model. One of the harder of the Star Wars series, but the finished model is well worth the effort.
V**I
Je pensais que ça allait avoir un effet boîte de conserve mais en fait c’est beaucoup mieux que je ne le pensais. Par contre n’offrez pas cette maquette à une personne qui commence, c’est repli de petites pièces assez fines et fragiles.
Trustpilot
2 weeks ago
2 months ago