We remain fully operational. Our teams are working around the clock to ensure your deliveries continue safely.

DOWNLOAD THE APP


Customer Services
Copyright © 2025 Desertcart Holdings Limited
DOWNLOAD THE APP


✨ Squeeze, Smooth & Shine: The Ultimate Grout Glow-Up! 🛠️
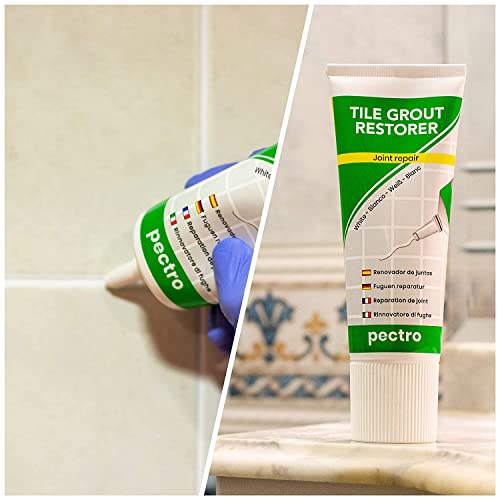
The Tile Grout Repair XL is a 400g white grout filler designed for fast, precise restoration of tile joints in kitchens, bathrooms, and more. Its quick-drying, water-based formula hardens like real sanded grout, providing a durable, waterproof finish without strong odors. The easy-squeeze tube enables mess-free application for both small repairs and full grout line renewals, making it an ideal, safe, and DIY-friendly solution to refresh and protect your tile surfaces.


| ASIN | B08DD3KM8D |
| Brand | PECTRO |
| Colour | White |
| Country of Origin | USA |
| Global Trade Identification Number | 08435196916453 |
| Item Dimensions LxWxH | 9 x 4 x 21 Centimeters |
| Item Form | Paste |
| Item Weight | 400 g |
| Item dimensions L x W x H | 9 x 4 x 21 Centimeters |
| Item model number | 002 |
| Manufacturer | Pectro SL |
| Material | Resin |
| Net Quantity | 400 Grams |
| Number of Items | 1 |
| Product Dimensions | 9 x 4 x 21 cm; 400 g |
| Style | Compact |
| Surface Recommendation | Tile |
| Water Resistance Level | Waterproof |
M**O
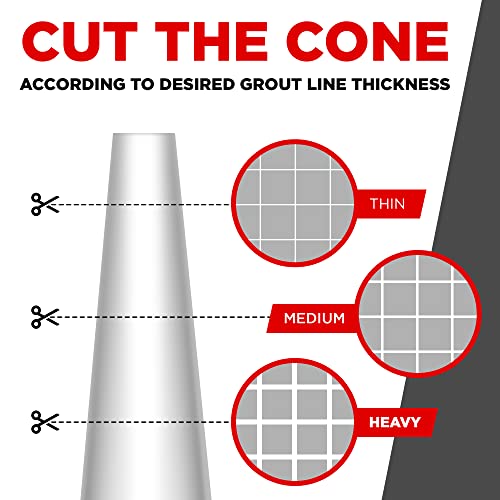
Este es un renovador de juntas similar a la lechada. Entiendo que está más bien pensado para juntas con falta de material y con este sellador puedes tapar los huecos y queda sólido. Otro producto que me gusta más y puedes conseguir en Amazon, es este rotulador: https://amzn.to/4dwHARj Este renovador viene en un tubo, con una cánula que tienes que cortar para para que salga el material. Yo en lugar de cortarla le hice un pequeño taladro con una broca del cinco para que se me adaptará bien a la medida de las juntas que tenía. Si lo cortas y dejas un agujero grande, echarás más cantidad y tendrás más desperdicio a la hora de aplicarlo. Este renovador no es muy cómodo de usar si lo quieres para blanquear las juntas, ya que una vez aplicado tienes que retirar es el exceso y es difícil retirar lo que sobra y que quede la junta perfecta. Como digo, yo utilizaría este renovador solo para tapar agujeros en el sellado. Si lo que quieres es renovar las juntas, yo utilizo el baldosinín o el rotulador que comenté antes. Este producto es como una especie de pintura que se aplica con un pincel dosificador y puedes echarlo por todas las juntas sin miedo, y aunque te quede pintado fuera de la junta no hay problema, casi es mejor. Luego tienes que esperar a que seque toda la pintura y una vez seca con un estropajo fino, puedes pasárselo por encima y ya solo te retira lo que es la pintura del azulejo y te deja la de las grietas y quedan relucientes y nuevas. ✅ CONCLUSIÓN Una sellador con una buena relación calidad/precio aceptable. Yo no lo utilizaría para dejar las juntas pintadas y nuevas. Es una especie de pasta que no es fácil aplicar. 👍 ACEPTABLE ✳️ Espero que mi comentario ✍️ te haya podido servir de ayuda 😃
R**L
It was a bit rinny, smell awful. But it kind of does what it says. It covers holes in the grout and leave a chalky look. It was a bit to white for my walls though.
V**L
Ik ben tevreden van dit product. Je kan het gewoon een streepje spuiten op de te repareren voegen en met je vinger uitsmeren.
J**E
Needed to restore the white tile grout in a 10 year old shower. I noticed the tile gout had lost its original bright white color due to daily shower use. Found this product on amazon, and a word, this is TERRIFIC to restore white tile grout to a bright white. Some thoughts on using it: - the nozzle in the plastic tube has a plastic tip at the end that can be snipped off before using, but after doing this with the first tube, I found it squeezed out far too much material for the grout lines, which I had on my tile which I would guess are somewhere between 1/16 - 1/32 in width. When I used the larger diameter hole, it applied too much grout and I found myself having to clean too much material and also using up more than necessary. I recommend measuring the width of the grout lines in your tile, then using a drill bit that's approx. 1/2 the width of the grout line to make the hole in the nozzle. When I did this with the second tube of grout repair, I had much better results: much less excess material and much less to clean up. - after applying the grout to the tile grout lines, use your finger tip to lightly work it into the grout line itself and smooth it out. Doing this, you'll find yourself having to clean your finger tip allot with a damp cloth. - make sure to have a couple of damp cloths to wipe any excess material off the ceramic tile, as even with a smaller hole in the nozzle I still found myself having the clean the material off the tile. - DO NOT try to do too large an area before smoothing it out with your finger and cleaning any excess off the ceramic tile, as the material sets up rather quickly. Like in 1-2 minutes. I applied the material on the horizontal grout line first, then the vertical grout lines, then smoothed out the material and wiped the excess off the ceramic tile with a damp cloth. As for the clean-up cloth, use something like small pieces of an old t-shirt, which is smooth to the touch. DO NOT use a cleaning cloth made of terry cloth material: the loops in the terry cloth will "dig into" the just repaired grout line and remove the material you just applied. - The material is not like caulk in its consistency - it's more like a grout material. With that said, it will be dull in appearance - not shiny - which is what you would want. - the only complaint I have with the product is that if you try to use this product to do a small repair to some grout lines like I did (tried to fill in where some holes had formed in the original grout), the contrast in the very white new repaired area was very different in appearance (far whiter in color), that found myself having to do the whole wall. However, if you didn't know, you'd think the shower tile was just installed. VERY impressed with how this product will made the shower walls look brand new. - Lastly - be sure to wait at least 24 hours before exposing the repaired area to water, such as using the shower again. Ideally I would even wait 48 hours if you can.
D**B
I really like the effect it gave my very very old rental kitchen. I did not follow the instructions though. It is much much better to apply, wait for it to dry after a couple of hours and then simply scrape the excess from the tile. Now, the only thing I am not so sure of is if it will actually stay once it’s wet. Being in the kitchen area, I will eventually have to clean the splash wall. I hope it does not “melt” away with water. Otherwise, it is reallly wonderful! I did this in a couple of hours.
Trustpilot
3 weeks ago
3 weeks ago