🚀 Elevate Your RPM Game!
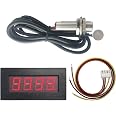
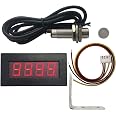
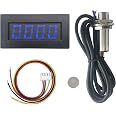
The DIGITEN 4 Digital Red LED Tachometer is a high-performance RPM speed meter designed for precision measurement in various applications, including lathes and conveyor belts. With a measurement range of 5-9999 RPM and a bright 0.56" LED display, it ensures optimal performance and easy readability. The device operates on a DC 8-15V power supply and comes complete with a Hall proximity switch magnet sensor for effortless installation.
U**R
Works Perfectly and Very Inexpensively
We have installed more than 10 of these on Fuel/Oil delivery trucks. These are mainly expensive new delivery trucks and we must stand behind them - so far no problems at all. We have supplied our own rectangular magnets to fit our purpose better: 1/8" x 1/4" x 1/2" that we install in an existing keyway, or we mill a 1/4" keyway into an accessible part, then epoxy in place. The sensor is installed in an existing part by drilling and tapping a 12mm x 1.0 thread (tap purchased from McMaster-Carr), or we fabricate a bracket and use the double nut method. The magnet must have North & South on the big flat side, and South must be out. We buy the magnets from K&J Magnetics (Part# B842), and they have a nice little iPhone and Android app available for identifying North and South. If the app gets confused, the magnet is probably not "pole"ed correctly. The wiring colors make it less than perfect for hooking it up, but the diagram included is correct. The tach reads 1 to 1: 1 magnet sensed = 1 full turn. No setup or programming required.
J**H
Nice upgrade for the mill.
Installed this on my knee mill. I now can see the exact spindle speed. It was super easy to install and wire.
D**S
Cheap, seems accurate and works well
I wanted a direct readout of spindle speed on my metal lathe, and this little gauge/sensor fit the bill perfectly. It uses a magnetic sensor to detect a magnet attached to the shaft spinning past it. You need to tape, glue or otherwise affix the small disc magnet to the shaft you're monitoring, so make sure you attach it securely if your machine will be spinning at high RPMs. (It claims to measure speeds up to 9,999 rpm; I'd be a little nervous about the magnet flying off under those conditions. I don't know if you could use a stainless steel (non-magnetic) strap to attach it and still have the sensor "see" the magnet, but it wasn't a concern for my usage. Just a heads-up to others who might need to use it in a higher-rpm range. (Probably better to use a reflective vs magnetic sensor for high shaft speeds...)
L**R
Did not work for me. Twice! Good luck if you get it.
I tried before installed this item. Worked fine. Installed on my drill press and stopped working after third time using press. I took it off and worked for an hour trying to diagnose and only got it to work intermittently on my bench. Ordered another. It did the same thing. Sent them both back.
J**S
Just What I Needed
Saw a lot of questions on this tach so I thought I would review it and hopefully answer some of the many questions but before I get too far along remember the old adage "You get what you pay for" most of the time. This is a very inexpensive device, something you could pay several $100 for if it were a laboratory grade piece of electronics so keep that in mind if you buy one.The Review:I needed an RPM meter for a grinder I am building on the CHEAP. It will be a 2x72 belt grinder made mainly from a couple of used treadmills. I am using the treadmill motor to drive the belt and needed to know the speed of the belt so I figured a tach on the motor shaft would give me a good idea of belt speed. Bought this inexpensive kit and am very well pleased with it. If it had had some wiring instructions(pic attached) I would have given it 5 stars. I deducted a star for having to figure it out myself. I am powering it with a 9VDC AC-DC converter that plugs into a wall receptacle, one of the little devices that power our calculators and laptops, charge our phones etc. They are commonly referred to as "WALL WARTS". I have about 20 of the things thrown in a box form over the years. This one is "rated" at 9VDC at 210ma(mili amps). Some of the pics show it hooked up to two meters and the tach kit. If you look at the meters closely you will see that the digital is reading 11.87VDC, the no-load voltage for this WW(wall-wart) is 13.2DC by my measurement. Electronics folks will understand this but for the non-electronics folks, when the power supply is loaded the voltage drops, per the rating data if it had a 210ma load it would drop to 9VDC. That brings me to the actual load, note the old analog meter, it is set on the 60mili amp scale and is reading about half scale or about 30mili amps. That means that the tach kit is only loading the WW to ~30ma there by only dropping the output voltage to the 11.87VDC Based on this the minimum rated WW could be as low as 9VDC at 50ma, a very small WW indeed. The take away here is that most any 6-9VDC WW would do the job. I am saying 6-9 and not 8-15 because of the low loading effect the tack has on the WW power supply. I say start with 6 because I have four 6VDC WWs and all of them show a no-load voltage of 8VDC or more. One of my 12VDC WWs has a no load voltage of 17.8VDC. You would not want to apply that much voltage to this unit. Check out the pics for answers to other questions such as how to wire it up.Finally I highly recommend this and the similar other color tachs for non-critical applications. Great inexpensive hobby stuff.
C**.
Invaluable accessory for the Smithy
I've been using this on my Smithy CB-1220 XL for about three months now, and am very pleased with it's performance. It certainly beats checking the belts to see how fast I'm going. The meter is designed to snap into a rectangular opening for an almost flush mount, but I didn't have enough clearance inside the gear box, so I whipped up a little case out of an old aluminum license plate. The circuit board is exposed from the back, anyway, and it probably would end up getting splattered with oil and chips if I had mounted it directly. I added a power switch on top, and used a surplus wall wart to supply it with 12 v. The magnet must pass very close to the sensor, and the only spot available was the face of the spindle pulley, so I mounted the sensor on a bracket that can easily be swung out of the way when I need to change a belt. I used epoxy to attach the magnet. The instructions were brief but to the point. I am considering getting another unit for my Shopsmith, if I can figure out where to put the sensor. A very good item!
Trustpilot
1 day ago
1 week ago