🚀 Elevate your 3D printing game with the DELACK Enclosure — where precision meets style.
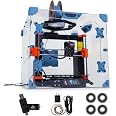
The DELACK 3D Printer Enclosure Kit is a precision-engineered acrylic enclosure tailored for Prusa MK4, Mini, and MK3 models, perfectly sized to fit IKEA LACK tables. It features integrated LED lighting, advanced ventilation compatibility including HEPA filters and ducting, and supports remote monitoring with WYZE CAM V3. Designed for safety and convenience, it includes removable corner guards and full MMU3 compatibility with easy access for maintenance.


| Connectivity Technology | USB |
| Compatible Devices | Laptop, Smartphone |
| File Format | STEP |
| Item Weight | 8.5 Pounds |
| Item Dimensions D x W x H | 21.7"D x 19.1"W x 17.7"H |
| Enclosure Material | Acrylic |
J**K
Beautiful enclosure, great price, excellent configurability
I purchased the Delack enclosure kit when 3DSourcerer was offering their Black Friday discount for $99. In my opinion the price was excellent considering what you are getting. As with most things related to 3D printing, you need to be prepared for a significant amount of do-it-yourself: You have several hours of parts that need printing and then assembly. This is one of the strengths of the kit though. While there is one base/generic build, there are many alternative ways to build the Delack depending on your printer and personal preference. The best place to go for the alternate builds is printables dot com where all the SLC files can be had for free. The kit is awesome because it comes with far more parts than are required for the base build. Especially for people just building up their supply of builder parts this is great: lots of extra nuts, screws, magnets, dowels and rubber feet. This will allow you to build the Delack and many other items that you can dream up. Once assembled you will have an aesthetically pleasing enclosure for your 3D printer, good lighting, reduced print noise and more effectively controlled heating.Another reviewer mentioned that the enclosure was weak. I don’t know what they were talking about. Once fully assembled it is quite robust. For example placing your filament spools on top to feed from there is no problem.Pros: affordable price, beautiful, minimal foot print for tight spaces, included led lighting, many ways to configure & build, reduced noise levels, extremely responsive staff.Things you should consider before buying: the enclosure is designed to be as small as reasonably possible which is great, but some printer configurations will require non-standard builds to fully fit. For example I run my Prusa MK4 with a 2” cement paver underneath. This creates problems for the vertical headspace of the system when you try to print near the maximum z-height. You will need to print alternative feet to fit properly. This won’t be an issue if you have a smaller printer or don’t use a paver in your enclosure.
A**R
Pretty easy assembly, good parts and features, looks cool
* Feature set: I was looking for an enclosure supporting loading from filament placed on top, using plexiglass panelling, that would fit on a LACK, would enclose a Prusa MK4, and supported attaching some sort of duct or port for ventilation. I asked the creator if there was any way to cut his LACK enclosure to add ventilation, and he said something to the effect of "no, but I'll have DELACK out in a bit, and that should serve you well." It did!* Ease of building: I mostly built this out of Overture PLA+, using Prusament PETG for the light enclosure (why not add it?). I printed the parts with the MK4 0.2mm SPEED preset with input shaping (and with gyroid infill): it was *significantly faster* than using the reference QUALITY preset, and that's what you should probably be doing if you're printing with a MK4 today. I didn't add up all the numbers but it was something like half the advertised print time. Get the print files on Printables; the assembly manual is available on the site indicated on the QR code.I used a ratcheting screwdriver with an appropriate hex bit instead of the included Allen key. I would highly recommend doing that if you have one handy; you're probably going to end up going through ~50 nut/bolt pairs over the whole project. It's all the same bit. Save yourself some future RSI risk.I also modified the faceplate on my build to instead be my printer's name, just for fun. The Printables site included F3D files for everything, so it was pretty easy once I got my bearings. It's a nice added touch!* Manual: the manual's okay. Some of the renders inside are a little bit low-res or have some somewhat confusing angles, so you might occasionally want to refer to the assembly video. Not all the examples are what I'd bet would be the most common configs (e.g. the examples put the hinge on the right, but I would assume most users would prefer to mount their hinge on the left). It's good enough, but it might need a little more finesse in places.* Extras: the package comes with four bearings to print a spool holder to sit on/behind the enclosure. Make sure to print those parts too before you set the enclosure up if you need that holder; I almost forgot. (It works pretty well, and you can print parts for larger spools if needed.) The included flash drive is a nice extra; I didn't really need it, but I guess it'd be nice to have a dual-port flash drive knocking around, I guess--frankly, I'd rather have just had an extra set of 4 more bearings. There are also loads of extra magnets and fasteners; maybe you can reuse 'em for something even if you don't care about doing any big expansions.* Function: I don't have any special requirements beyond the capability to ventilate the thing and to prevent cold drafts. I'm running a PETG print as I type this, and my thermometer in there reads 31.5C, 33% humidity (it's probably 50-60% humidity in the room, given the last couple weeks). It also looks pretty cool, according to everyone I've had stick their head in my print room since I finished the build. The light is a fun touch (and maybe practical if you want to stick a webcam in/at the enclosure). I also noticed a ~10-15dB(A) reduction in noise in the room with the enclosure in place and the door closed; YMMV but that made a surprising and huge difference in how pleasant it is to be anywhere near the thing while it's printing. I've had no functional issues so far: if all you need is what I need, this may be a good option for you.
Trustpilot
4 days ago
2 weeks ago