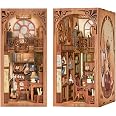
🏡 Build Magic, Display Wonder – Your Bookshelf’s New Best Friend!
The CUTEBEE Book Nook Kit is a DIY miniature wooden house kit designed for teens and adults, featuring over 100 precision-cut pieces that assemble into a charming bookshelf insert. It offers 4-6 hours of immersive crafting, perfect for stress relief and creative bonding, while doubling as a unique home decor piece and thoughtful gift.


E**N
Neat thing
This is pretty ok. It took me about a total of 4 hours I'd say. I took my time. I applied small amount of glue and I would tear up little pieces of paper towels to wipe away the extra glue. I used tweezers for that. I would suggest tweezers and a good light. I bought a portable clip light after the first day because I couldn't see. I would also suggest getting a really tiny tip for the glue. I used tacky glue and I also bought some.craft glue that had a panda on it. Im sure it will come up on an Amazon search. The panda glue came with perfect tips. You can also buy like 100 small tips that will fit over your tacky glue. Which I also bought. The plan was for the wife and I to work on it together. I ended up doing the whole thing. She's going to help on the next one. I would say it can be a good project for you and a partner. Just take your time. Don't rush. The instructions were ok but it's translated to English. So its important to think about what your doing. I was able to figure it out because i build things but it took me a minute to think and understand the purpose of some of it. Mainly the latch for the battery door. It was the first thing I didn't understand because it has a mechanical function more than a visual function. It's meant to spin and lock the door. You also don't want to pop out that wood. You will see it's cut but then it's like an accordion on one side. It's meant to be flexible. So its weird. You need one side to open and the accordion side is like the hinge for the door to slide out the battery pack. The wheel and "L" shape wood is meant to be the latch. Wheel on outside the L goes through the hole so when you spin the wheel it latches the door. I hope that helps someone if you choose this model. Overall, I really enjoyed it. I purchased others and intend to build more. Just make sure.you have the proper tools, be careful punching out the pieces, have proper light, and take your time. It's worth it in the end. I'm also going to purchase a few of those vise crimper you can squeeze wood together. You can glue some pieces and if you vise it down, it Will come out better. I have one 3 inch vise and I used it to close the housing at the end. I need another and 2 4inch ones. I think it will help. It doesn't hurt to glue things the night before to add the next day. I did this in 3 days. First time I spent an hour. Second time I spent 3 hours. Last time I got up in the morning and spent about 20 minutes getting the doors on.
S**T
Very nice
Good quality book nook. Clear instructions and well made components. Be gentle with the chandelier!! Overall, this was a really fun build! Enjoyed it enough that I purchased another book nook made by the same company.
T**S
Hard but totally worth it!
Took me about 16 hours (over 4 days), this is the first one I’ve built (could probably go faster next time) and I used some tools that didn’t come with the kit but were vital in making it. I didn’t document it but I watched a lot of others do it, which helped a lot. The cauldron was the only part that broke (needed lots of scoring the lines with a blade) but I only broke part of the siding and was able to hide the mistake towards the back so you can’t see it. Follow directions exactly, double check everything! Front plexiglass didn’t fit properly, not that big a deal to me, it still looks amazing. I made a kit of tools I had to use to complete this, including fabric glue and a rasp (both of which are vital). If you want a detailed explanation of the kit I made and why, let me know, I added a picture of it. I also added some customization by adding finely cut up pieces of colored lens filters for a camera into the potion bottles (they come empty, you just put a sticker on them). You can get a free sample of 100 or so camera lens filters and it comes with lots of colors, textures, mirrored, sparkly, and other assortments of fabric and such. You get about 100 2” by 4” free samples and can use it to color the lights or add color to the potion bottles. NEXT TIME I would put clear nail polish on all the wooden potion bottles and some other things to give them more shine. I would also score the bendable piece's more. Hope this helps someone! The sticky notes were also VERY helpful in keeping track of all the built pieces, I just wrote whatever # or letter I was building on the note then put the completed piece on it for later use. Lots of patience, attention to detail and organization but worth it! ~Summer Mills
D**D
I messed up..
I was somewhat excited to surprise my girlfriend with one of these puzzle books. They look adorable and would be a fun but challenging experience for her. The problem is this puzzle specifically requires some strong glue and unfortunately does not come with. I had to place a separate order on Amazon for some glue, waiting even longer for her to start her puzzle process. The next big turn off would be putting it together with glue. I am aware there are some puzzles out there that don't involve glue and my girlfriend would much rather prefer those. Working with glue, especially scary strong ones, can be more frustrating than fun for some people. If it didn't involve using glue, I'm sure this would be a blast to put together. Maybe that's on me for not researching enough on this product, so I'll give it 4 stars
Trustpilot
4 days ago
5 days ago