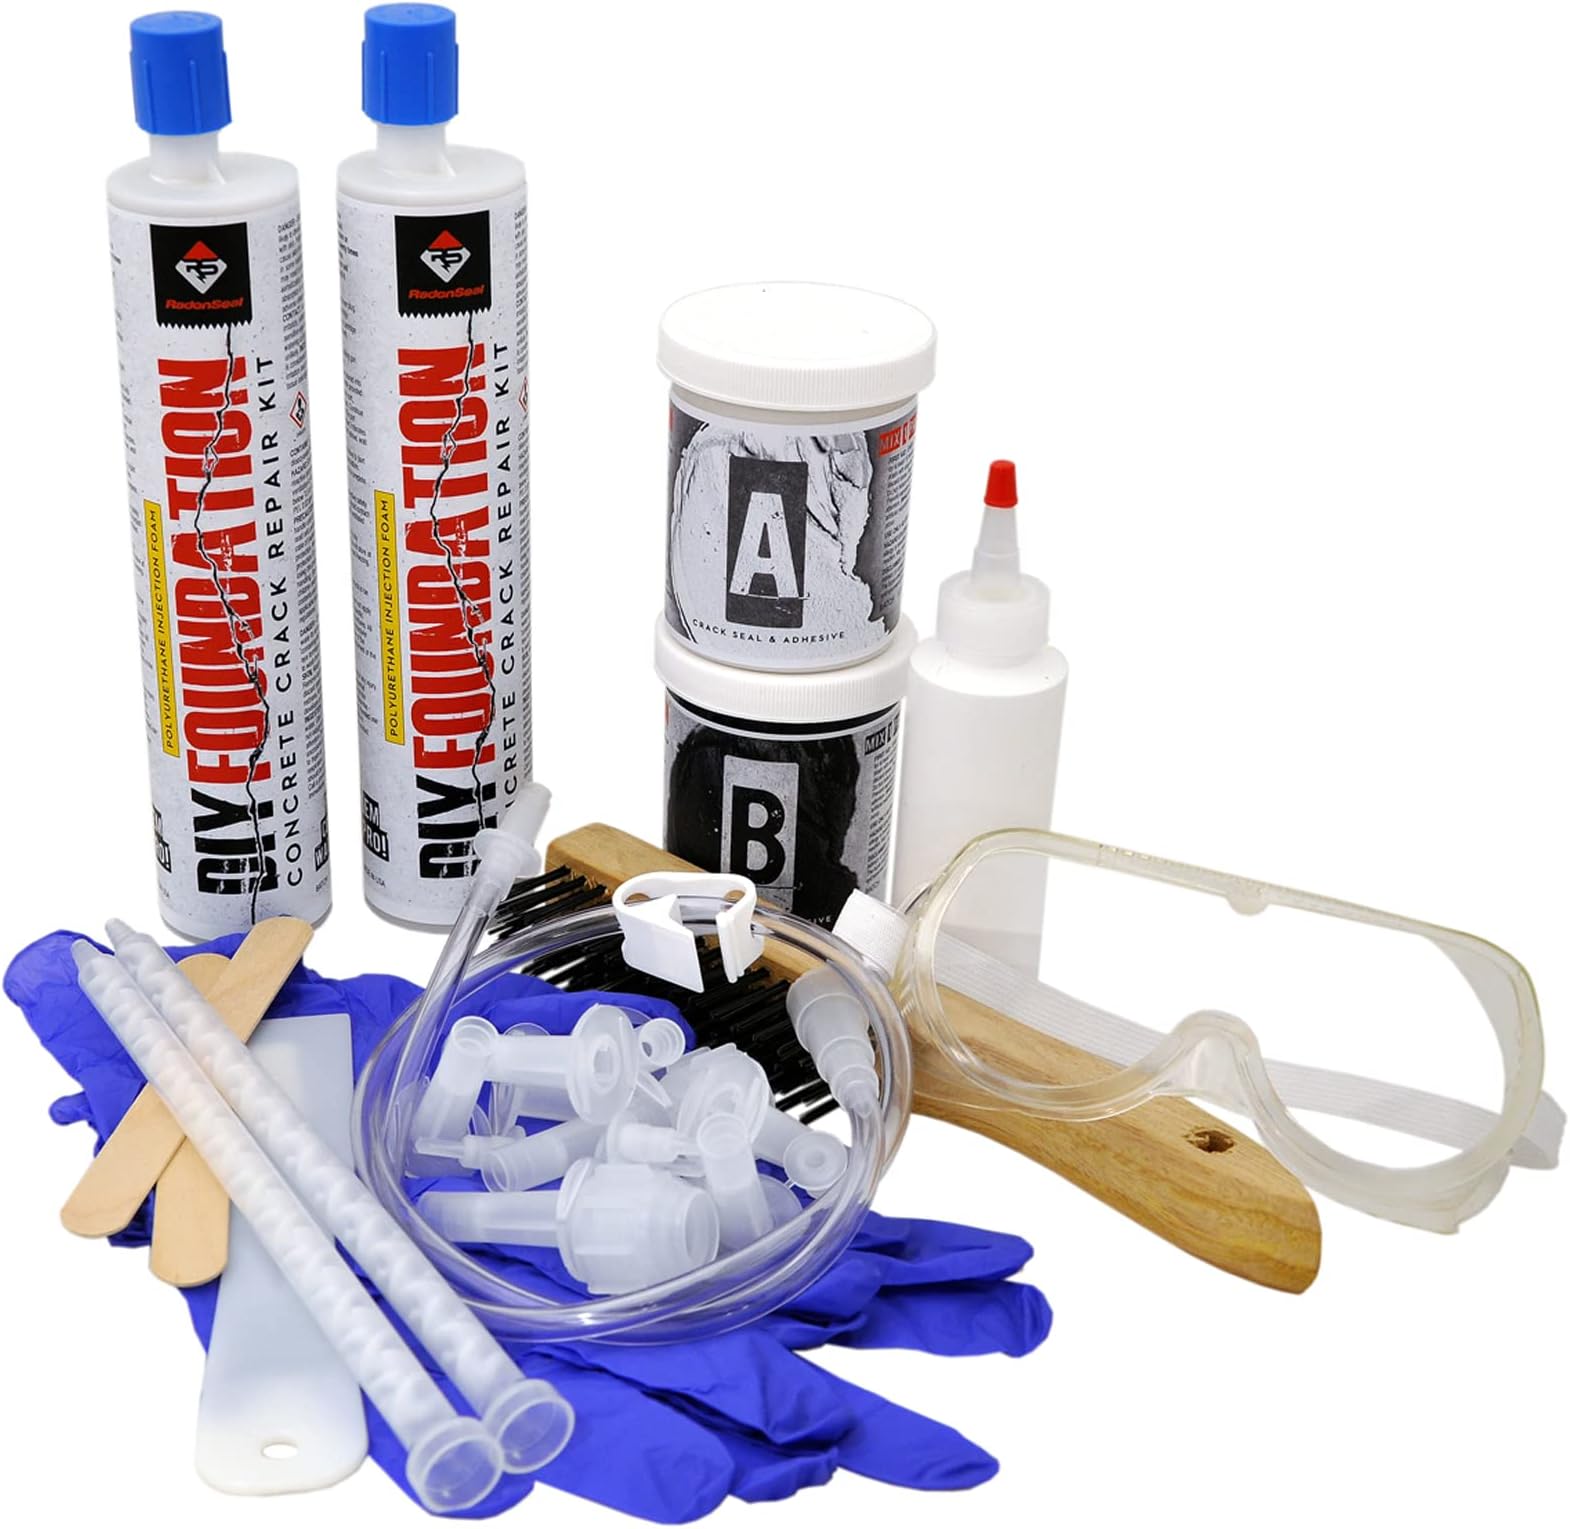
Deliver to South Africa
IFor best experience Get the App
🔧 Seal smart, live dry — the pro’s choice for foundation peace of mind!
RadonSeal Complete DIY Foundation Crack Repair Kit offers a drill-free, two-component low-viscosity urethane injection that permanently seals hairline cracks up to 0.5 inches in concrete walls and crawl spaces. Its waterproof, flexible formula blocks water, soil gases, and radon, ensuring durable protection and professional-grade results without the need for expensive repairs or specialized tools.
Color | Grey |
Brand | RadonSeal |
Liquid Volume | 22 Fluid Ounces |
Item Form | Foam |
Maximum Gap Fill | 0.5 Inches |
Surface Recommendation | Poured Concrete Walls |
Tensile Strength | 180 PSI |
Water Resistance Level | Waterproof |
Number of Items | 1 |
Manufacturer | Novion |
UPC | 856255006058 |
Unit Count | 1.0 Count |
Material | 2-Part Expanding Urethane Foam |
Part Number | 301 |
Item model number | 301 |
Is Discontinued By Manufacturer | No |
Item Package Quantity | 1 |
Included Components | repair kit |
Batteries Included? | No |
Batteries Required? | No |
F**4
Take the time to get it right. This stuff works! No more leaking basement.
Had a hairline crack in basement wall that seeped every time it rained--and it rains a lot in our PA location. Selected Radonseal polyurethane based on a lot of research and the recommendation of a friend who is in heavy construction (highway overpasses, bridges, etc.) He knew exactly what I told him about (Oh yea. We use that @#$% all the time!") A couple of key things I focused on prior to using the product was prepping the wall. I removed all of the material applied by the previous owner (without success), including epoxy paint, hydraulic cement, roofing tar, caulking, and whatever else--about 15 pounds of material from a bulge of repeated attempts. It looked so bad I originally thought the form blew out, only to find he just put more material on top of the old. Took it all the way down to the original poured wall which was flat, including grinding (a mess) to make sure I removed everything that was stuck on from before. I washed the,are with Dawn (a miracle product) dish soap and water, and when that dried, I washed it down with a sponge and rubbing alcohol to get it as clean as possible. In the area where it leaked the most, I took a small concrete drill bit, set the bit two inches from the crack and drilled 45 degrees every eight inches to intersect the crack (I know you don't have to do this, but I thought I could get more of the polyurethane back into the crack. Since the crack was not the entire height of the wall, I figured I would take advantage of the extra nozzles available.Before I started, I made ten 8" X8" mixing boards for the epoxy. You can only use about a 1/2 teaspoon each of the black/white epoxy before it hardens, so better to use less and mix more often. As mentioned by others, the wooden spreaders that come with the kit are too flimsy, so I used plastic knives (picnic utensils) that worked much better. Mixed it up, set the nozzles, then pasted the crack as directed. Waited a full two hours for the epoxy to set.I glued the nozzle to those ports that I had drilled over 2-1/2 feet of the crack, and placed nozzles over the crack as directed. Prior to gluing the nozzles to the wall, I washed it down again with rubbing alcohol, and used a heat gun to get it dry as possible.Used the water bottle provided, and flushed each nozzle and crack from top-to-bottom until clear water flowed. (Note, not all nozzles would communicate to the nozzle below it, but made sure every nozzle took a lot of water (the water is what causes the polyurethane to expand--so don't skimp on the water flushing). I must have used six bottles of water to get al 15 nozzles flushed. I know some people mentioned they had problems with the injection tube leaking. My set up worked flawlessly following the directions provided. Started at the bottom nozzle as directed--figuring a minimum of four (4) minutes at each nozzle. The flex tube attaches very tightly to the nozzle--so that all worked well.At each nozzle I would pump first for 30 seconds, then wait 30 seconds, then pumped again for ~15 seconds until I could no longer pump into the crack. I held constant pressure on the gun the entire time. I figured this would allow the polyurethane to penetrate and begin to set before I pumped again. In some cases I could pump after the second time. In the part of the crack that seeped the most, it took a lot of poly during the first 30 second pump. After the first 30 seconds of pumping and ten waiting 30 seconds, it surprised me at how much more material it would take (I wonder how much poly set up on the outside of the wall?). After the second 30 second pumping it began to be more difficult to pump. Pump 30-Wait 30-Pump 30....and then it tightened-up significantly. I barely got a third pump into the nozzle, and then held pressure on it for about another 2 minutes. Tried to pump again but could not do it. Moved up to the next nozzle. Same process for the next nozzle in the high seep area, but couldn't pump into it for as long as the first, and the poly fluid started to seep from the nozzle above (I considered this good). Finished up the balance of the nozzles, drained all of he hoses, cleaned-up and called it good. I had about 3/4 of a tube remaining that I decided to save in the event I need to repeat the process.Note: I had a couple of nozzles "blow out" at the edge where the nozzle is attached to the wall. Looks as if I did not get the epoxy spread thick enough. Then again, when the poly begins to expand, it's extremely dense and it has to go some where. I also had poly push out the nozzle cap on two nozzles. I thought this was a positive, in that I had enough poly in the crack that it had no where to go but out towards the nozzle (the weakest point).Next day I removed the nozzles and started to remove the epoxy from the crack as shown in the video CD. After about 15 minutes, and a lot of hammering and chiseling, I called it for the day (or life?) Stuff is damn tough to remove, a lot of work, and a huge mess. Cancelled! Done! I thought about grinding it off (for about 10 seconds) but the epoxy dust is not something I want in my home, so that won't happen either. Per the recommendations of other users on here, use the gloves and lay down a large sheet of plastic. As for the gloves. I would put two pairs on at one time, that way when the outside pair gets nasty you just peel them off and the new pair is there. I used a couple of extra sets of gloves (two pairs to apply the epoxy, another two pairs to apply the polyurethane (as you get the polyurethane on your hands when inserting the plug into the nozzle as they drip when you remove the injection tube.) Give yourself plenty of room to work, and take your time.BTW, the epoxy and hardener when mixing is extremely foul-smelling. Make sure you are in an area that is ventilated as it is pretty nauseous.Report after three weeks. We have had three major storms of 3", 2.5" and 2 inches and some minor rains of 1/2" or more. Previously, the wall would have seeped with each and every rain. Since I used the Radonseal product--nothing. No seeping, not even a sweating where the crack is. I can tell you from past experience I would have had some water puddle on the floor, or in the lighter rains some sweating on the crack --but after the treatment, nothing. The wall is completely dry from top to bottom.
N**B
Quality product
Had plenty of epoxy to cover an 8’ wall as well as ports. I only used a little over half of the epoxy. Just be careful not to mix up too much since it does set up so fast. It does have an odor to it but not terrible. Helps if you can ventilate with a window. The epoxy set up in about 2 hours to be able to inject. Once I started to fill the ports with water to saturate I noticed I had a little weep through the epoxy so I mixed up a little more and covered it again. Once that hardened I saturated with water again and started injecting the polyurethane. It does take some patience and constant low pressure on the caulk gun to get it to flow through the cracks. Once I was done and it all set up I found the polyurethane traveled all the way to the outside of the wall at the top to effectively seal it all off. Wouldn’t hesitate to buy the kit again if another crack starts leaking. Very easy to do.
B**.
Allow plenty of time
Haven't used it yet but instructions are straightforward and easy to follow. Proper preparation seems to be the key to effective results.
D**J
Includes everything you need, not difficult, but potentially really messy
Our home had an addition put on by the prior owners. There is a section where the 2 foundations meet at a corner and when it rains heavily, if the gutters outside aren't directed properly and dump water right at the foundation, water will come through the seam like a river. I've been wanting to seal it up and decided to use this product based on reviews.Essentially what you are doing here is sealing up the seam by creating a dam with a 2 part epoxy (very similar to JB Weld) then injecting a very low viscosity urethane foam which should flow into the small gaps, expand then cure. The foam is very similar to Great Stuff when expanded, but has a very low viscosity on injection.First, EVERYTHING is included in the kit. When it says to mix the epoxy, it includes stir sticks. It includes gloves and even trash bags.My application was a corner seam, and in checking the reviews many people said the injector nozzles had bendable tabs on the sides for this application. I called RadonSeal directly and was told that they can't provide "true" corner injectors (right angled) as the design is patented, so they get around it by making the sides bendy. The issue with this is that it was rather difficult to get the injectors to stick, especially since the seam I was working with wasn't perfect on both sides. Instead I kind of had to find places where I could jam the injector in between the concrete.Also, in my application I wound up only being able to do about 5 feet of an 8 foot seam before running out of the epoxy. The instructions say to not press the epoxy into the seam but basically gloss over it - and that might work for really thin, even cracks or seams, but not in my application. Even though there is an included plastic putty knife, the epoxy is difficult to work with and smooth out (it's a lot like working with marshmallow Fluff), so you wind up using more in spots.That said, the foam injection portion went OK - realize that when using a caulking gun for this, the piston will only go about halfway down the tube not the entire way. I thought that the issues I had with ensuring good coverage would mean the seam would leak out all the foam but the bottom 2-3 injectors worked exactly as described - injected slow until the liquid started coming out the next injector up, then capped that injector and moved to the next one. It was only further up the seam that I started getting small holes in the epoxy which led to leaks, but as my application wasn't that sensitive to appearance, I didn't really care. I've worked with Great Stuff a lot and it's easy to trim after it cures, and this foam is no exception.As I mentioned, in my application I can actually prevent water from coming through the seam by appropriately directing it using gutter downspouts, so we'll see if the seam is actually waterproof but I can't see this product making it worse.Lastly, it's kind of pricey, but as I said the kit includes everything you need. Also, epoxy is expensive. I had thought of getting a couple tubes of JB Weld to shore up areas where I had run out of the included resin but 10 oz of JB Weld is $20 - it seems this kit includes roughly 1.5-2 times that, so $30-40 in epoxy alone not considering all the other pieces/parts.
R**G
Works! Good Results
Vertical foundation crack that (very occassionally) leaked when we had very saturated ground. Kit advertises it will handle a 10 foot crack - easily handled the 8+ feet I had to treat. Good instructions and included everything needed, except the caulk gun. Before and after photos give you a good idea. I didn't do the work myself (relied on trusted contractor), but probably could have. The "crack guys" typically charge about $500+ per 10 foot crack for pretty much the same result. Kit was about $180 and if you do it yourself, I thnk you'll be pretty darn happy.
Trustpilot
2 days ago
1 month ago