

🔋 Power Up Your Adventures with Confidence!
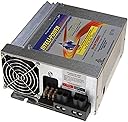
The Progressive International Dynamics PD9260CV Inteli-Power 9200 Series Converter/Charger is a robust 60 Amp power solution designed for universal fit. It features advanced Charge Wizard technology, reverse battery protection, and low voltage safeguards, ensuring safe and efficient power delivery for all your needs.
| ASIN | B000GASX9O |
| Amperage | 60 A |
| Best Sellers Rank | #1,166,454 in Automotive ( See Top 100 in Automotive ) #1,061 in Power Inverters |
| Brand | Progressive |
| Built-In Media | Converter |
| Color | Grey |
| Compatible Devices | Monitors |
| Connector Type Used on Cable | barrel connector |
| Current Rating | 60 A |
| Customer Reviews | 4.7 out of 5 stars 1,425 Reviews |
| Global Trade Identification Number | 00675566926011 |
| Item Dimensions D x W x H | 11.88"D x 11.13"W x 5.38"H |
| Item Type Name | Progressive Dynamics PD9260CV Inteli-Power 9200 Series Converter/Charger with Charge Wizard - 60 Amp |
| Item Weight | 6.4 pounds |
| Manufacturer | Progressive International |
| Mfr Part Number | PD9260CV |
| Model Number | PD9260CV |
| Number of Items | 1 |
| Number of Ports | 2 |
| Output Voltage | 12 volts |
| Product Dimensions | 11.88"D x 11.13"W x 5.38"H |
| Specification Met | UL, CE, FCC |
| UPC | 675566926011 |
| Unit Count | 1 Count |
J**D
Reliable and Efficient Converter/Charger!
The Progressive International Dynamics PD9260CV Inteli-Power 9200 Series Converter/Charger is a fantastic addition to my RV setup! The 60-amp capacity handles my power needs effortlessly, and the built-in Charge Wizard ensures my batteries are always charged properly and efficiently without overcharging. The installation was straightforward, and it works quietly, which is a big plus. I’ve noticed a significant improvement in my battery performance since using this device. The build quality is excellent, and it feels like a product designed to last. If you’re looking for a reliable and efficient power converter/charger for your RV, this one is a top-notch choice. Highly recommend!
S**E
Smart charging is extreemly important to extend battery life
Most people just take RV/vehicle battery charging for granted. But in today's world, batteries are extremely expensive and there are many chemistries that should be a concern when charging. Lead acid batteries are still the cheapest, and what I will be using till the Lithium type's price becomes reasonable. To get the most life out of a lead acid battery, how they are charged can make/break their value (also important is to avoid discharging below 12.1V). Using a multi-phase smart charger can DOUBLE the life of these older style batteries. OId-school chargers installed in RVs (mostly before 2010 or so, but some makers still use the cheapest they can find) just put out 13.6 volts (what is needed to properly charge a 12V battery) continuously, at whatever wattage the battery pulls up to the max rated wattage. This is great to bring a battery up to full charge when it is significantly discharged, but not a good thing for continuous charging as it WILL boil out water over a few short months. These multi-phase "smart" chargers actively monitor the battery and load, adjusting the output as needed. When the battery needs recharging, it outputs the full wattage at 14+ volts, making the recharge period very quick. When the battery is at full charge, they go into "float" charge, keeping the battery at its full 12.6 charge. If it senses a load (something gets turned on), it switches to 13.6v to cover the load. During those times when nothing is using the batteries for extended periods of time (winterized RVs, boats, ATVs, riding mowers, etc), these do a periodical (usually every 24 hours of idle use) "desulfation", an operation that purges voltage to keep sulfate from building up on the plates, which reduces the battery's ability to hold a charge. These are designed to be plugged in and charging continuously, never unplugging until needed. My boat batteries are now 10 years old, and they still hold a 12.6 volt charge 24 hours after unplugging the charger. If you own an RV, and the charger is not a "smart" charger, do yourself a favor and replace it with one of these type chargers. This is especially true to protect new batteries that have no sulfate on the plates.
L**E
Great replacement for 1996 converter
My 1996 National Dolphin motorhome was having 12v battery issues. My old converter wasn't able to keep the batteries charged to 12.7 or higher. Knowing very little, I changed the batteries and kept the old converter. Once I realized the converter was bad, I looked around and found this one. Pulled the old converter out, rewired the RV to this new one, and now I"m in business! Batteries are always at least 13.2 as they should be. Easy to wire, especially if you have an old one you're taking out, and works like a champ.
B**H
Great product!!
Purchased this converter/charger to replace the manufacturer installed WFCO unit that does not do very good job of maintaining my coach batteries. The install was literally plug and play. My installation was under my master bed so it was very easy to unplug the old unit, remove the positive and negative terminals and install the new unit. The directions were very good. My only complaint was with the remote pendant that came with the unit. The cord for the pendant is only 3-4 feet long. Was not long enough for my application. I called PD customer service for help. They recommended I try ShowMe cables for an extension cord with the correct connections. I was able to order a 42 foot cable which allowed me to mount the pendant with other components near my main entrance. The pendant allows me to see exactly what stage the charger is in and allows me to change the charging mode!! Overall I’m very happy with this product!!
C**K
Progessive Dynamics PD9260CV Converter/charger
I will start out with reason why I purchased this one: My 2006 Magnatec Parallax 500 series converter that was installed in my RV had failed to charge the batteries. I researched and find that its reliability is very poor - approximately between 3 to 8 years. Further more, it is a "dumb" charger, because it will keep charging approx 13.5 volts and not shut off very well. It wont desulfate the batteries either. As such your batteries will be boiled over if you don't keep a small load on it. I could not even upgrade this converter because there is nothing out there that can easily swap out converter section. I took off the converter section and drilled out the rivets from the cover and find that there is sticker that says "made in china" on the board and various parts. It is basically very simple non microprocessor controlled charger with two large heat sinks and capacitors. I wanted smart charger and I researched and found this one Progressive Dynamics Intellipower charger with smart charger wizard computer built in. It had good reputation and and reasonable price so I bit the bullet and bought it along with remote pendant. Package arrived 5 days after order. When I opened the shipping carton, I found that its just wrapped in a plastic bubble wrap. No retail packaging. It is definitely for OEM installers not retail. What I mean by that is that when the factory ships components (in bulk) to RV manufacturers for installing on RV's before being delivered to customers, they do not include pendants or other hardware items or even put into a nice retail packages. Retail version of this is what you as customers see on store shelves, they include pendant as part of the retail version so keep that in mind when you shop through Amazon and your local RV parts store. In my case, thankfully I had a set of instructions included inside the shipping carton but its minimal at best. Since the new charger had 3 prongs 120V plug at end, that was complete surprise to me since I expected to hardwired charger to 120V circuit just like any other charger. I removed the guts of the charger converter and threw in the trash and put the metal "shell" of the converter back into the power distribution panel because I need to reuse the DC fuse holder panel back on. I ran new romex wire from the back of power distributor to the front of the RV where the batteries were at. I put in 120VAC outlet for the charger plug to plug in. I observed correct wiring polarity of the new outlet (black wire to short prong hole (brass screw), white wire to wider prong hole (silver screw) and ground to ground terminal). The power is fed from circuit breaker that was used to power the old charger. I mounted the new charger next to the battery compartment (not inside) with self tapping metal screws into steel plates. I ran 2 foot long #6 cable from battery shut off switch to the positive leg of charger. I ran 2 foot long #6 cable from other leg to the main 30 Amp 12VDC circuit breakers. In other words, I installed it in between the battery cut off switch and the main 12VDC circuit breakers. Finally, I ran a short #6 black cable from negative to the chassis ground since my batteries negative posts are grounded to chassis already. The charger positive and negative DC lugs requires allen wrench (not phillips or slot screws) to secure the cables - a testament to thoughtful design of this charger. The charger housing is grounded and I didn't need to run ground cable from the ground lug to chassis because I had three metal mounting screws that mount the charger to steel plate (its part of RV chassis). If you going to mount this on wood, you need to run ground wire from the ground lug to metal chassis for safety reason. Now, you might be wondering why I didn't just put this new charger in place of old charger, I could do that but for the best and fastest charging efficiency, you want to locate the charger close to the battery as much as possible and keep the battery cables short as possible so that generator does not have to spend more time charging up the batteries when you do camp out without hook ups. 2ndly, its much easier for me to keep the new charger cool and service it if I locate it in storage compartment if need to than if I had it locate it in old spot next to propane furnace which can keep it too warm. The remote pendant is plugged in to the charger, it looks like a telephone jack but little narrower than standard jack. The wiring length is about 6 feet long - much too short for my needs. I will have to take old telephone wire and splice in longer wire in place so that I can mount the remote pendant on the battery monitor panel. I have not done that yet so I can't comment on this one yet. The new battery charger works well. And it is quite heavy and best of all, its an American made. Here is the instructions: [...]%20english%20manual.pdf
M**S
Worth the money
I always thought by sticking to an OEM product was always the best way to go. When my converter went out the first time I literally just purchased the same one that came with the 5th wheel. That was a bad idea. After doing a ton of research, reading blog sites, and watching many, many you tube videos I decided to move to this converter and I'm glad I did. More consistent charging, cleaner power, just an all around better converter.
R**P
Easy to install.
My trailer is at a remote location. It was broken into and the power converter was stolen once I realized that I ordered this unit. I looked at the trailer power diagram and the unit. The process was obvious. I was done I. Less than five minutes. My only complaint is that the fob needed a better description
A**Y
Charges Four Times Faster
This converter worked well on first installation. I replaced an IOTA 55 converter with the PD9260CV. It took a little bit of thinking and a couple of extra lengths of 6 gauge wire but it now works well. The IOTA 55 required 10 hours to charge my two 6 volt Trojan T105 batteries to 90% and this took less than 2. A full charge is not over 13v instead of the old 12.65v from the IOTA. The Power Dynamics converter has a burst mode where it delivers over 14 volts until the batteries are at 90%, and then it drops to 13.6 until they reach 100%. The wizard lets you know whether it is burst mode or standard charging or desulfation. It comes with two positive and two negative connections. I will use the second to charge the spare AGM battery independently. Replacing the IOTA 55 required removing 8-10 screws to separate the old converter, disconnecting 4 wires and removing the unit. I screwed he PDI converter to the floor and ran two longer 6 gauge stranded wires up to replace the old 12 volt power cables. I then cut the wall connector from the power cord of the PDI and wired it into the 110V AC power connectors inside the power panel. I did this while at camp during some down time. Then started the generator and the 14v+ charge started immediately. Works great.
B**.
Excellent converter and built in charger
This product is a perfect upgrade from the 9100 series since it has the automatic stages for charging. I installed this converter in 20 minutes. The instructions are very helpful. The converter was priced fairly and works exactly as it is supposed to work. I highly recommend this converter. Thanks.
E**O
Calidad muy bien, excelente precio, fantastico producto y envÃo rápido
Es segunda vez yo compra para una otro casa rodante. Fabuloso y no problema installar
R**C
Perfect replacement for failed original.
Fits right in ( similar footprint to the original ) 3 screws to hold it down, flat or vertical, floor or wall. Connect the two cables to your distribution panel ( black and red) and plug it in to a 120 volt outlet. My distribution panel has an outlet on the back for this purpose. Piece of cake! Works like a hot damn ! It comes with a small LED tattle-tale that sticks to a cabinet side or door panel which indicates what the convertor is doing. The convertor has 3 automatic stages to equalize , charge, and maintain the batteries. Delivery was 3 days. Very happy!
A**H
Nice unit.
My 2011 5th wheel Rv has had two 55amp WFCO converters go bad. Dim to very bright lights, constant cycling of the fan and poor battery charging. I decided to look for an alternative to avoid future problems. Amazon had this 60amp unit that got really good reviews, and, was built in the U.S. Ordered on Monday and at my door Wednesday morning. Unit was simple to hook up, one positive and one negative wire to load centre plus a three prong plug-in power cord. My unit also included the little remote pendant which gives a visual signal regarding the condition of the usually hidden converter and battery. This also plugs into bottom of unit via a small telephone style jack. I mounted the little pendant immediately above load centre on outside of cabinet with the supplied sticky backer. Bingo! No noisy annoying fan or cycling light system. My unit is new, but We use trailer fairly extensively, allowing me to monitor system this season. Will update this post in the fall.
K**R
Easy to install exellent wire terminals constant 13.6 volt output.
Used on Open road 5 th wheel trailer easy to install wire terminals are excellent 13.6 volt constent output you just have to find a place to mount it and get some #6 wire to wire it to the existing fuse panel mutch better than the original one.what is vey good that the heat sink with the cooling fan is outside the unit and not like on the original or other units blowing the dust all over the electronic components and plugs them up.looks well built has no problem to power everything in the trailer.will update review if there is any problems.
Trustpilot
2 months ago
2 weeks ago