Desertcart purchases this item on your behalf and handles shipping, customs, and support to South Africa.
🚪 Seal smart, live smarter — don’t let drafts or noise crash your vibe!
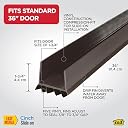
The MD Building Cinch® U-Shape Slide-On Under Door Seal is a 36-inch durable vinyl strip designed to slide onto the bottom of standard doors, providing superior weatherproofing by blocking drafts, dust, and noise. Its easy, tool-free installation and robust construction improve home energy efficiency, reduce noise pollution, and enhance indoor comfort, making it a must-have upgrade for any modern, eco-conscious space.


| ASIN | B00PKSFEAI |
| Best Sellers Rank | #1,731 in Tools & Home Improvement ( See Top 100 in Tools & Home Improvement ) #47 in Door Hardware & Locks |
| Brand | M-D Building Products |
| Brand Name | M-D Building Products |
| Color | Brown |
| Customer Reviews | 4.2 out of 5 stars 7,304 Reviews |
| Global Trade Identification Number | 00043374433371 |
| Included Components | MD Building - 43337 |
| Item Dimensions L x W | 36"L x 2"W |
| Item Thickness | 1.75 inches |
| Item Type Name | MD Building - 43337 |
| Item Weight | 11.36 ounces |
| Manufacturer | M-D Building Products |
| Manufacturer Part Number | 43337 |
| Manufacturer Warranty Description | Warranty |
| Material | Vinyl |
| Material Type | Vinyl |
| Model Number | MD Building - 43337 |
| Number of Items | 1 |
| Product Dimensions | 36"L x 2"W |
| Recommended Uses For Product | door |
| UPC | 043374433371 |
| Unit Count | 1 Count |
G**N
Easy Fix for Drafty Doors
Installed this M-D Building Products door bottom seal on my exterior door to help block drafts, and it made a noticeable difference right away. The cold air coming in under the door was getting annoying, especially at night, and this solved the problem without needing a complicated install. The slide-on design made installation very simple. I only had to trim a little off the length for a perfect fit, and it slid onto the bottom of the door securely without needing a bunch of tools. The flexible vinyl seals nicely against the floor without making the door hard to open or close. I also like that it covers a fairly wide gap range, which helped on my older door that wasn’t perfectly even. It looks clean once installed and blends in well with the black door trim. For the price, this is an easy and effective upgrade if you want to reduce drafts, dust, or even bugs coming in under the door. Definitely worth picking up.
J**N
Best seal you can buy (price is great also). Installation can be tough.
This gasket is the best you can buy out there (IMHO). I find it is best used if the gap is ½” to ¾”. Less will possibly work, but you may quickly shave off the dangling legs. These can be somewhat hard to install on a 1 ¾” door as the fit is super tight (compression fit). That is why there are no holes for screws. Here is the installation that worked for me (second one installed and lessons learned). 1) The Mark: (if required. Yes, I know it is 36” and so is your door, but trust me). Lay at base of door, flush at one end and mark opposite end at end of door. Trim as below - if length is perfect, skip to 3). 2) The Trim: (lesson learned from installing as is - ¼” extended past the door edge hitting the side frame. Not fun to remove). Use anything you are skilled with: Hack saw, band saw, chain saw or whatever. Here is what I used/did. I used the heavy duty scissors to snip both upstanding legs (as far as I could). I then snipped each dangling leg at the same distance as the upstanding legs. I then used a sharp blade against a small section of 2x4 to cut the bottom – was tough and takes patience / great force. (see cut piece in pics – yes, my door is 36” and I still trimmed off about a ¼”. 3) The Install: Spray Windex on both sides of the lower sides of the door along with a shot that length of the seal (insides). Yes, Windex – as any avid dirt biker knows – lubricates for install and evaporates for a extremely tight seal (like grips on your dirt bike!) Should have bought this stock in the 70’s. 4) The Slide: Before the Windex evaporates, slide the seal from outer end of door (as if you could install any other way). It will be easy for the first 6”, then you will need a gloved (leather preferably) hand to pound it on most of the way. I got it to about to 3-4” left before my palm gave out. From there I used a block of wood (to protect the seal) and a small hammer (yea, the one shown is a tiny tike hammer, but the one I use the most) to tap the seal flush to the door. Now you are almost done. 5) The Pop: More than likely, the seal is up to the bottom of the door. I couldn’t even move my door as it was sealed to the floor. I used a rigid scraper (metal as shown – I have rigid and flexible and had to use the rigid one) sliding under the seal (gently not to damage the dangling fingers) in 6” increments and pulling up (you will hear the pop as it seats with the bottom of your door. I did this to both inside and outside of door. Key: From the Windex spray to the end was done before the Windex dried. Hopefully this helped with the installation.
G**D
Draft stopper door sweep
Fits doors up to 1.5” thick, which is a common thickness for exterior doors. I purchased two to replace on metal clad Stanley exterior doors (4/8/24) and they have worked well for 2 weeks so far. The material is a soft flexible rubber. It fills the gap at the bottom of the door to stop drafts and bugs. One of the thresholds is slightly angled, so the rubber gets squeezed harder on one side, but so far it is holding up. If you don’t have the minimum clearance at the threshold, you may tear it. Cutting the soft rubber to the width of the door is easy. I used a chop saw, but you could use scissors if you want to.
K**O
Good product
Fix the door 36 inches perfectly. Easy to install
H**.
Good Fit and Smooth Glide
I used Tin Snips to cut off the excess as my door is measured 35.5". It cuts well and I had to use rubber mallet to pound the cinch fit onto the door base. My door threshold has almost the same height as the floor and thus the fins rubs on the floor. Regardless, while the switching from opening to closing has a bit of resistance, once the fins faced the other side, the door glides close smoothly. This solution works better than my previous solution of one layer of adhesive sweep on the outside. The adhesive doesn't stay too long. But this particular solution is very secure and I have the confidence that it won't detach for any reason. My only concern is taking it off if the sweep degraded because of the friction with the floor. But hopefully it won't need to be done. Regardless, the fins seal pretty well and I'm happy with the purchase. Update: The inside fins are very flimsy. Our floor scrape the bottom of the sweeps as the door is very low to the ground. The fins outside are fine but the fins inside get dragged and pinned to the outside fins and ripped them out and left an ugly trail that I need to cut off or it will keep peeling off.
M**Y
Issues installing but so far works
I received it today and just installed it. I dont know if the clear one is a different material than the others but it was horrible to install. 1) I would get a non clear version because it would hide spaces, gaps, blemishes, and future dirt and bugs. The clear doesnt give it a clean look. 2) measure and cut before install. I ordered a 36inch for a 36 inch door. Make sure the side facing the doorframe/outside doesnt have a lip. If it does you will need to cut a notch for that lip so the door will close. 3) Do a little at a time. As you push the plastic, check the edge is fully on both sides of the door before pushing more. First attempt, the other end came off the door. Second attempt I had to use a putty knife on the side it came off of and a hammer with towel on the opposite side to get it back on the door. At this point the strip was on the door and would not budge to even come off the door to try again. 4) when the strip was on half way it would not go further. I had to use a block of wood on top of a towel and hammer it the rest of the way. The instructions do say to use a mallet and block of wood if it gets stuck. 5) if you have finishing molding for your flooring by the door be careful - it pulled my quarter round right off. 6) That strip the water coming off the door is supposed to glide over and go away from the house - it gets pushed in towards the house and gets stuck that way when closing the door. 7) I just installed it so dont know if opening and closing the door will get better. I have to use my body and force it. For now the molding is to the side. I am going to wait and see how using the door goes for a few days. Then see if I need it tweaked. Today is an extremely windy day and I feel no air coming through the door anymore. But it may be too tight. It was not a quick nor easy install. With a cream inside paint and maroon outside paint I thought clear would look better. Now I believe something opaque would look more finished.
F**B
Easy install, flexible cutting options (hacksaw OR tin snips)
These replacement door sweeps were much easier to install than I expected 👍 🔧 Installation • Pulled the old sweeps off and used them as a length guide • New ones slid right on with no fuss • Took just a few minutes per door ✂️ Cutting options (worked great for French doors) • We cut one with a hacksaw, as recommended • For the second sweep, we used tin snips instead and it worked perfectly • Tin snips were especially helpful because this was a French door where the trim between the doors doesn’t touch the ground • The outside piece fit neatly over the trim, while the inside covered the gap 🚪 Fit & function • Covered gaps well • Sealed nicely at the bottom • Everything lined up cleanly once installed Overall, these are very easy to use, forgiving if your door setup isn’t perfectly standard, and worked well with both a hacksaw and tin snips. If you’re replacing worn door sweeps, this is a straightforward, DIY-friendly option.
A**T
Sturdy, Keeps Roaches Out!
This is amazing! It was long enough that it fit our door with a little trimming as needed. Once installed, it completely stopped the air flow coming from under our front door. It's nice and stiff, but not so stiff that it's hard to open the door. We honestly didn't buy this for noise reduction or air flow, we bought it to keep roaches out of our home. It's worked amazingly for that purpose, but it's nice to have the added perks of the noise reduction and draft protection. If I had one bad thing to say about this product, it's a little irrelevant to how the sweep works. In the summer, it was nice and snug on our wooden door when it was swollen, now it's just a tad more loose since the door shrunk from the cold. It's a nice, thick and sturdy door sweep. I would buy it again!
M**K
Draft free
Item as described and keeps draft out
L**A
Great product!
So easy - slides on to bottom of door (Use a hammer to tap it along, into place). It was a little too long - Instructions recommend trimming with saw, but I managed to use a kitchen knife to make a groove, and then I twisted off the extra plastic with a wrench. Just be innovative! Now door closes perfectly and no gap under the door. Once I took off my old door stop piece to replace with this new one, I saw why there was a gap - the old one had all the vinyl flaps worn off. Seems we need to replace every 3 years or so. Worth it for 20$ and so easy! This one has lots of vinyl flaps to keep the cold out.
A**Y
Excellent!🇨🇦😘
Excellent product! Easy to cut to the length size-was able to do the both double doors and just looks incredible. I may have to order more. Thank you!
Z**Z
Fácil de adaptar y colocar
Altamente recomendado. La pieza llega de un tamaño estándar a lo largo en el que se puede ajustar al tamaño de la puerta donde se desea colocar. Es fácil de cortar a la medida deseada y, una vez colocada en la puerta hace un cierre hermético que no permite el paso del polvo. La instalación en la puerta es superior sencillo.
M**A
Bueno al principio.
Es muy bueno no entra ni el agua ni los bichos. Desafortunadamente con el uso se le están cayendo las bandas internas. Mira la foto.
Trustpilot
2 weeks ago
2 months ago