


Buy anything from 5,000+ international stores. One checkout price. No surprise fees. Join 2M+ shoppers on Desertcart.
Desertcart purchases this item on your behalf and handles shipping, customs, and support to South Africa.
๐ค Level up your PS5 Edge with style and precision โ because ordinary controllers are so last season!
The eXtremeRate Full Set Shell with Buttons and Touchpad Cover is a premium, matte black replacement kit designed exclusively for the PS5 Edge controller. Made from durable ABS plastic, it offers a perfect, gap-free fit with all necessary tools included for a DIY upgrade. This kit transforms your controllerโs look and feel, providing a sleek, personalized aesthetic while maintaining original performance standards.


| ASIN | B0CL45YF17 |
| Best Sellers Rank | #3,750 in Video Games ( See Top 100 in Video Games ) #9 in PlayStation 5 Faceplates |
| Brand | eXtremeRate |
| Color | Black |
| Customer Reviews | 4.2 out of 5 stars 296 Reviews |
| Enclosure Material | Acrylonitrile Butadiene Styrene (ABS) |
| Finish | Matte |
| Finish Type | Matte |
| Hardware Platform | PlayStation 5, playstation_5 |
| Item Dimensions W x H | 3.94"W x 0.59"H |
| Item Weight | 50 Grams |
| Manufacturer | Extremerate |
| Material | Acrylonitrile Butadiene Styrene (ABS) |
| Mfr Part Number | QRHEGP006 |
| Model Number | QRHEGP006 |
| Product Dimensions | 3.94"W x 0.59"H |
G**S
Shell and button upgrades came together nicely!
After mixing โHope Grayโ, โBlackโ, and โScarlet Redโ complete shell kits and buttons for the Dualsense Edge controller, I was pleasantly surprised to discover the pieces all fit very well together. I had never did this before and found the instructional video was nearly sufficient to completely explain the process. There were 3 points in the installation video that became difficult. So I had searched for other videos and pieced together these other sources of information in order to solve the problems I was having. 1) The shoulder (trigger buttons L2 &R2) had springs that popped off when disassembled. These springs were not mentioned in the video at all, probably due to my Edge Controller being a different model than the one in the video. I was able to find another video source that completely described the installation of these springs. 2) The shoulder (trigger L2 & R2) buttons have a part inside the button that needs to be removed, but the video doesnโt completely describe how to remove these parts. I was able to piece together information from other videos to remove these parts from the buttons. 3) There were several occasions where the pieces would not fit together and I had to take them apart and reassemble them over and over until they finally fit. Patience was key here. These shell kits do not come with all the tools you may need, such as tweezers for electronics, hairdryer/heat gun for the touch control pad, and a magnetic pad for organizing all the screws that are removed in the disassembly process, and a magnetic screwdriver is a huge bonus. The installation process took me just about 3 hours to complete. I did not replace the touchpad. Had I replaced the touchpad, I assume the installation process wouldโve taken another half hour. These complete shell kits are a great value when you consider the cost to have someone build a custom controller. I wouldโve easily spent an additional $100-$200 dollars more if I had this custom built. Overall the look is great. I got everything I was looking for in controller with a customized shell. The pieces fit well together, (admittedly) after several attempts of reassembling them. I was fortunate not to have any unsightly gaps in between the pieces. The quality is great and is similar if not equal to the strength, thickness and durability of plastics used in a controller directly from PlayStation. Much like the original plastics that came with the controller, I found the grip of this shell to be rather slick. So I installed some thin, rubberized grip, which makes for a very nice non-slip grip. This grip also helps with keeping the controller from sliding around on a hard surface like a table. Now Iโm very happy to have a controller that I love the look of!
Y**O
Good looking and easy to assemble if you know what youโre doing.
Fits great, easily installed if you have the skills. Comes with a tool kit that does everything you need but you will need tweezers. Everything functions as intended after assembly. Feels better than the original shell. Seems as if it will hold up just as well as the original shell. Nothing makes it seem like the durability has been compromised. A win for me
J**T
Looks great, but anxiety inducing when doing it yourself
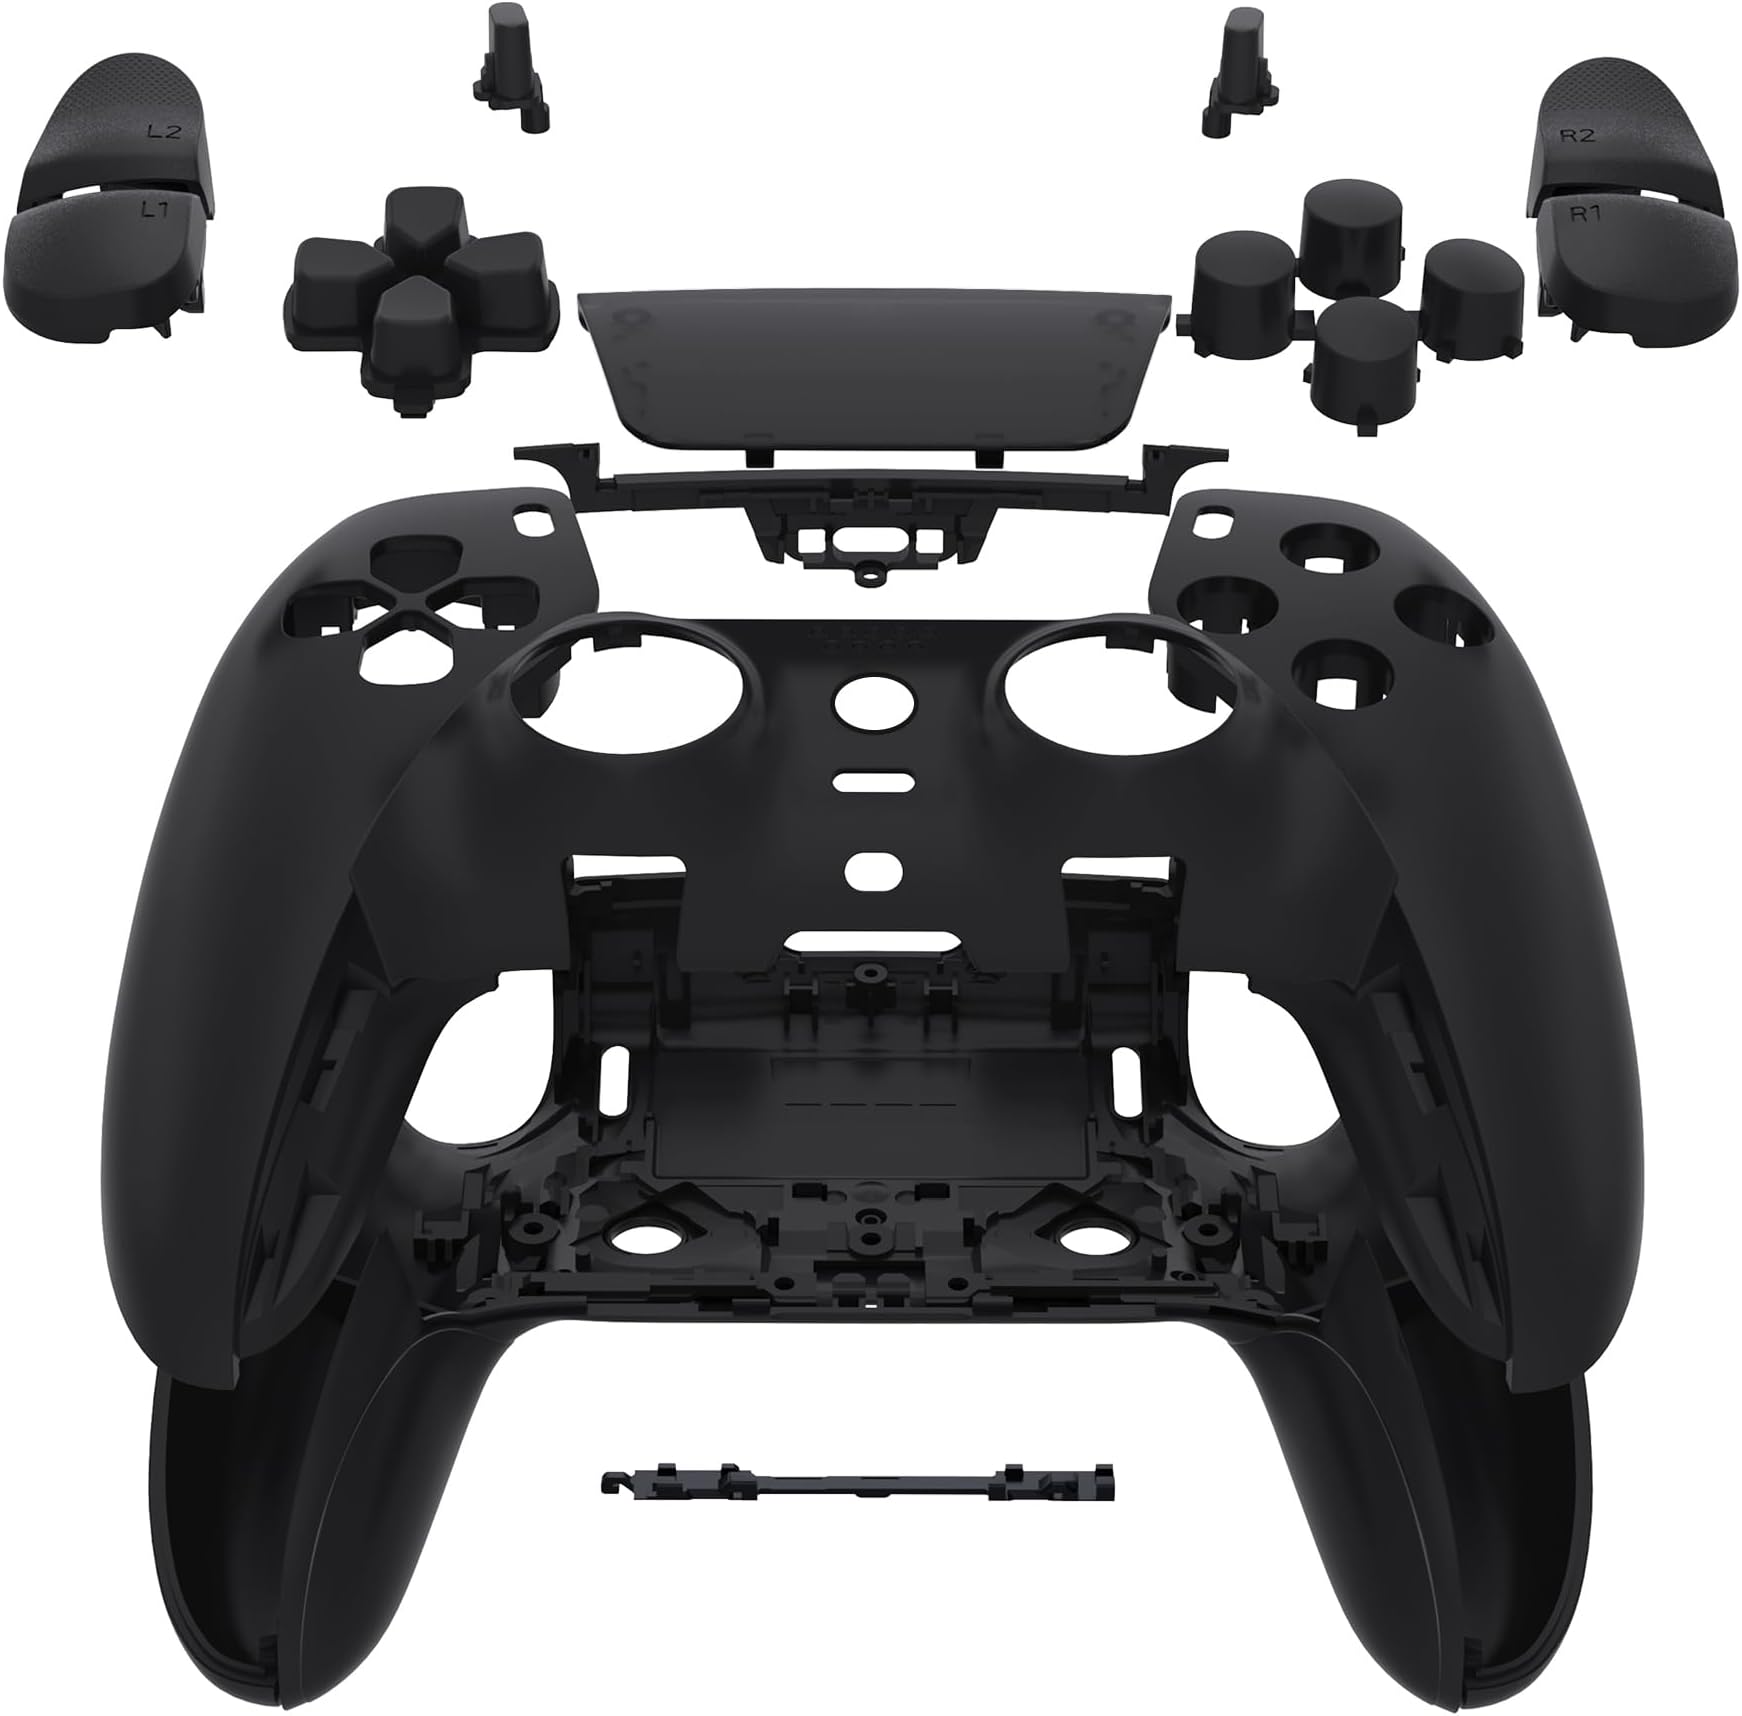
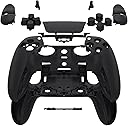
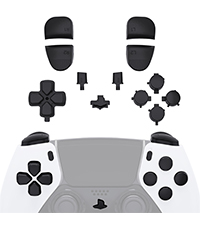
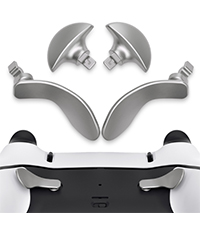
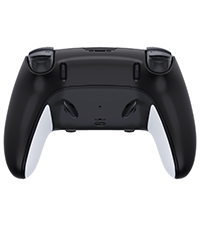
This is a 2-in-1 review. I purchased both the Full Set Shells (black) and the Full Set Buttons (red) at the same time. The red shells (front and back) and red thumb sticks were separate purchases. My reasoning for purchasing the red shells was because anyone who owns the DualSense Edge knows that the original grips of the controller will eventually begin to bubble and discolor over time. However, after I got the red shells, I began dreaming of further customizing the whole controller. The only problem was I had begun to watch a bit of the DIY YouTube video of the whole process and it looked pretty detailed. When I finally decided to attempt the full process, I somewhat kicked myself that I didn't just get a full set instead of a full and partial set. Despite costing a bit more, I did like how the two colors complimented each other. That said, the problem is doing it yourself. I highly recommend (and I cannot stress this enough) making sure that you keep all screws and parts you remove labeled from step 1 until the end and then you can put it back together in reverse. The kit comes with both a plastic tool to separate the controller and a screwdriver. The screwdriver works well. However, I found that using a file works better than the piece of crap tool they provide you with. Additionally, the YouTube video mentions a tweezers, but the kit they provide doesn't include one. Thankfully, it's not a big issue, but there are certain parts that you may benefit from using one, so keep that in mind beforehand. Once the controller is completely taken apart, the YouTube video misses a few steps in reassembling it. Namely, it forgets how many screws you removed for certain parts and there's a thick padded sticker (provided with the replacement kit) that they forget to tell you to use. Thankfully, one of the comments mentions this. The sticker is used to make the controller battery fit more snugly into its housing. During disassembly, I would be gentle with the ribbon cables and moving other parts out of the way. It is an expensive controller after all. However, during reassembly, try and jam the ribbon cables as hard as possible into their slots to ensure they fit properly. Elsewise, you might end up like me and have to take it apart again. With that in mind, before you completely put everything back together (i.e. with the images I provided, before putting the red back shell on or the screws) test your controller and make sure it works. After I put mine back together, I turned on my PS5 and while the controller worked on the menu, it wouldn't work with any game. This forced me to disassemble it nearly completely again and check the ribbon cables. Second time's a charm in my case. The red buttons on the black shell look sick and the plastic has a cool metal feel to the touch. For the most part, everything fits together like the original parts, but I do notice some minor imperfections. It might be how I put it back together and these issues are very minor. Most other gamers may not even notice them, but considering I know the feeling of the original parts versus the replacement parts, I personally felt a slight difference. That's not to say I don't like it as I absolutely love the look and feel of it now. My one complaint regarding the buttons is they don't have the symbols on them, but someone else said that may be due to copyright. Additionally, while the L2/R2 buttons don't have the tiny symbols as "grips" they do have bumps to simulate the same type of texture. I'm giving it 4-stars because of just how anxiety inducing the entire procedure is to take it apart, especially if you have to take it apart a second time because it didn't work right the first time, and because the video they provide to help assist omits some key elements when reassembling it.
V**N
Top notch
I can honestly say that this kit is amazing and I must have if you don't like the stock dual sense colors I'm not going to lie it is quite an undertaking to completely strip the controller all the way down to replace things like the front face plates and buttons I didn't replace the touchpad or the L2 and R2 buttons because I like the way they were and that does add an even deeper level of complexity but despite just how much Tech is crammed into this tiny controller and how difficult of a takedown it is if you watch their video on their YouTube channel it's extremely helpful I honestly probably couldn't have done it without that video but they make it very clear and easy exactly what to do and how to do it the kid itself is very nice and all the parts are very nice high quality and they give you a ton of extra parts such as screws and Springs even more than you would need if you didn't have any of them at all but since you're changing in existing controller you actually already have all the screws and springs you need anyway so all of the ones given are technically extra so you don't even have to worry about dropping or missing pieces which you almost certainly probably will especially the tiny little Springs near the PlayStation logo button luckily I found mine and didn't have to use the ones provided but they are tricky everything fit absolutely perfectly in any of the reviews claiming otherwise or showing large gaps or broken clips we're almost 100% certainly user error you have to be very careful with what you're doing as those clips especially are easy to break and when snapping everything back together it has to go a very specific way and if it's not lined up correctly and you force it that's how things break or don't line up or create gaps if you're careful and do everything correctly everything fits perfectly the way it should I bought this kit mainly because I wanted a matte black front face plate but with all of the people I have seen gripe about the rubber pads peeling away from the back I thought this controller would be perfect for stippling so I did a very nice super fine stipple job over most of the parts of the controller that you hold on to I ended up keeping the main back plate as it has a slight more texture to it then the one that comes with this kit due to the tiny little microscopic X triangle Circle and square pattern molded into it overall I'm extremely happy and this is well worth every penny and I honestly can't believe that it is cheap as it is with how nice it is and what a major change it makes to the controller
J**F
Why did I do this, why.... ๐ฉ
Images 1&2 is what I had in mind the second is what I ended up. Purchased two full kits ended up being able to use two pieces of each kit. So here we go.... First of all they have an excellent online resource in their YouTube video as it does incrementally go through the entire tear down and rebuild however this wasn't as useful as I thought it would be simply because the pace at which the reassembly occurs is much on screen is faster than I, a novice at doing such things could go and therefore found myself constantly having to go back and forth in the video trying to make sure I didn't miss a screw or a piece which I did several times. Then when I got it all together with the new casing it did not align correctly ๐ก the option button and share button recessed to the point where it was difficult to press them the faceplate also did not align correctly and constantly wanted to pop off ๐ฉ (Now this could have been due to my inability to resemble the controller as intended it is trickier than it may seem) Ultimately after three teardowns and two failed reassemblies is I decided I would just go back to the factory prices. And luckily I was able to eventually get it reassembled and aligned correctly in the end was even able to use the backplate and the faceplate just not in conjunction with the other shell pieces.
M**N
Great Replacement
I love the look and feel of this. It was very easy to switch over, as long as you watch a step by step replacement video on YouTube (eXtremeRate Purple). I wasn't able to buy a Black Edge, so this was a great replacement. The color, matte black looks so good.
D**G
Good looking and easy to assemble if you know what youโre doing.
Itโs made pretty well for the price like all of their other shells. The soft touch feel is also nice when holding and still allows you to grip the handles without worrying about it slipping or dropping. My biggest problem is how flimsy the back piece is when clipping in because I snapped two of them (one of them was a replacement) and after I finally got it to go on it still didnโt sit flush like it shouldโve. Another issue that all of eXtremeRateโs shells have is the paint has already started rubbing off on the grip areas and Iโve barely even used it for maybe less than 5 hours total.
A**S
Simple
I could not find any OEM replacements, probably because Sony would rather sell brand new controllers instead of replacement parts. I received everything listed packaged in a box and plastic bags marked "made in China" (as if that was in question). Most of the parts aren't marked or complex in any meaningful way. The biggest disappointment was easily the pathetic raised plastic that is substituted for the rubber on the original controller. The controller feels very smooth in stark contrast to all the texture Sony provides with the original. There are no symbols on the touchpad, just a solid matte color. The entire shell feels like it could slip very easily from one's grip if their palms were sweating. The PS button is solid, not grooved like the original. There are some texture bumps on the trigger buttons, but I prefer the original trigger buttons. Installation is simple if you can follow instructions. There is an instructional video narrated by an annoying robot voice that is obviously reading a script written in Chinese and translated to English. The video is very helpful when determining which screws go where. The clips are very delicate, so using the least force possible is recommended. Overall this kit saves users from having to buy an entirely new controller if they want a different color or their controller has broken pieces. The price isn't terrible, but personally I would have preferred a more substantial feel in the plastic closer to OEM standards.
A**D
ุฑุฏูุฆ ุฌุฏุงู
ู ูุชุฌ ุฑุฏูุฆ ุฌุฏุงู ูุง ุงูุตุญ ุจู
J**Y
Perfect Fit and Visuals
My base white version started to wear down on the back handles (like alot of people have reported). Ordered this black version and followed the YouTube videos, so easy to follow just like their other ps5 kits. Everything was in the box and fit perfectly, no defects. Couldn't be happier with the new black look.
L**D
Es ist perfekt
PERFEKT
R**N
Matte finish replacement
The bottom back shell grips on the official dualsense edge starts to yellow with age and peel off, so I was looking for a solution, eXtremeRate fixed the problem with easy to follow YouTube videos showing you how to install the parts. I only did the bottom part as I wanted to retain its original look.
A**.
(Fixed) Decent quality, but the material is slightly warped.
I followed all of the instructions to the letter (taking 5 hours to disassemble and reassemble), I found that the pieces don't snap together perfectly. At first I thought it was user error, so I redid everything from scratch, to ensure that no screw was loose, or piece ajar, but unfortunately the gap caused by the material warping (I believe?) remained. Aside from this, it is decent. Though thankfully this was meant as a gift, as it would bother me to a high extent to look at constantly! There's no good grip cover that hides it, while still displaying the changes. Update: The manufacturer reached out to assist, and were able to help me fix it, so that there is no longer any gap. Much appreciated!
Trustpilot
2 months ago
4 days ago