

Desertcart purchases this item on your behalf and handles shipping, customs, and support to South Africa.
🚪 Upgrade your garage safety with zero hassle—because your peace of mind can’t wait!
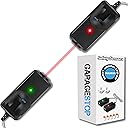
This Safety Sensor Beam Eyes kit is a direct aftermarket replacement for Liftmaster, Sears, Chamberlain, and Craftsman garage door openers from 1997 to present. Featuring a modern plug-in wire design that reduces failure risk, it includes two sensors, mounting brackets, hardware, and instructions for easy DIY installation. Essential for maintaining safety compliance, this durable plastic sensor kit ensures reliable garage door operation and peace of mind.


| ASIN | B09GW795XF |
| Assembly Required | Yes |
| Brand | Garage Stop |
| Brand Name | Garage Stop |
| Colour | One |
| Country of Publication | USA |
| Customer Reviews | 3.9 out of 5 stars 2,060 Reviews |
| Is Assembly Required? | Yes |
| Item Weight | 3.88 Ounces |
| Manufacturer | Garage Stop |
| Manufacturer Part Number | 785-09222025 |
| Material | Plastic |
| Material Type | Plastic |
| Model Number | 785-09222025 |
| Style | Modern |
| Style Name | Modern |
| UPC | 650079930786 |
V**R
Sirvieron!!
Muy bueno. Eso soluciono mi problema y no tuve que gastar en un tecnico. Yo solito los puse y soy bien burro para lo electrico. 1 año despues y siguen funcionando.
R**.
Good product
Easy to install. Works well with the wires from the old sensor
T**R
Great replacement for what could be an expensive repair
A garage sensor malfunction can be an anxiety-inducing experience. Do I need a new opener? Did the entire device fail? Did Alexa destroy it? A lot of times, it could be that the two sensors near the garage door base have failed. This will do the trick. You don't need to replace the entire wiring to do this. TIPS - Make sure you cut the power first...you can do this by removing the sensor wires from the garage door opener housing (no need to power down the house). Unscrew the sensors from the brackets. Before you start cutting, make sure you measure how much line you need to connect the new sensor to the old wire. Always leave way more than you need, since you can always bind the wires with a zip line. Now, using wire strippers, you will need to remove about one inch of the coating on both sets of wires (the new sensor and the old wiring). Here is where it's tricky - one part of the wire is white, and one is striped. if you match them up, they should work, but I know some people had to flip them. Once the wires are connected, you can then go ahead and plug the wires back into the opener housing. What I found was only one of the sensors lit up, and I could never get the other one to stay lit. DUH!!!!! You will need to line them up for them both to get full power. Once they both light up, reattach the, to the bracket, and you should be good to go. Works perfectly...
K**R
REVERSE WIRE CODING- TRUE ALSO- REPLACES LIFTMASTER 41A4373A
These worked out- I was gambling since the liftmaster was from Aug 1997, and the instruction manual parts indicated 41A4373A for the safety sensor kit, There was no reference in the item description for that part number, and I just wanted people in the same situation to know that they can save the $20+ by getting these over the item that is described as a direct 41A4373A replacement. You do need to switch the wires' coding during connection as everyone else noted, and the brackets we had were on the same side as the LED, which blocked it a bit, but you can still marginally see the light status. As for the push and pray wire connectors, you do need a strong finger push or better yet a pair of pliers to get the connector landed all the way home on the wires, or they will pull out. Use the tips of your strippers to get that orange button seated into the clear body all the way. Good stuff to save my 25 +yr old opener on an 18X7 heavy door. Problem was repeated failure to close especially on cold mornings. door would cycle rapidly at various points of travel and return to open, blinking light, to indicate safety sensor circuit issues. 41A4373A only had 1 green LED on each side that would do nothing to indicate activation, this set has an effective indicator so that you can align the beam/receivers.
J**.
Fácil de instalar
Este sensor le queda a las marcas que señala el vendedor y a otras cuyo instructivo indique que se conecta en dos entradas (positivo y tierra) del panel del abrepuertas. De fácil conexión por sólo necesitar dos cables cada sensor.
Trustpilot
1 month ago
3 weeks ago