Buy anything from 5,000+ international stores. One checkout price. No surprise fees. Join 2M+ shoppers on Desertcart.
Desertcart purchases this item on your behalf and handles shipping, customs, and support to South Africa.
🔧 Elevate your woodworking game with precision that speaks volumes!
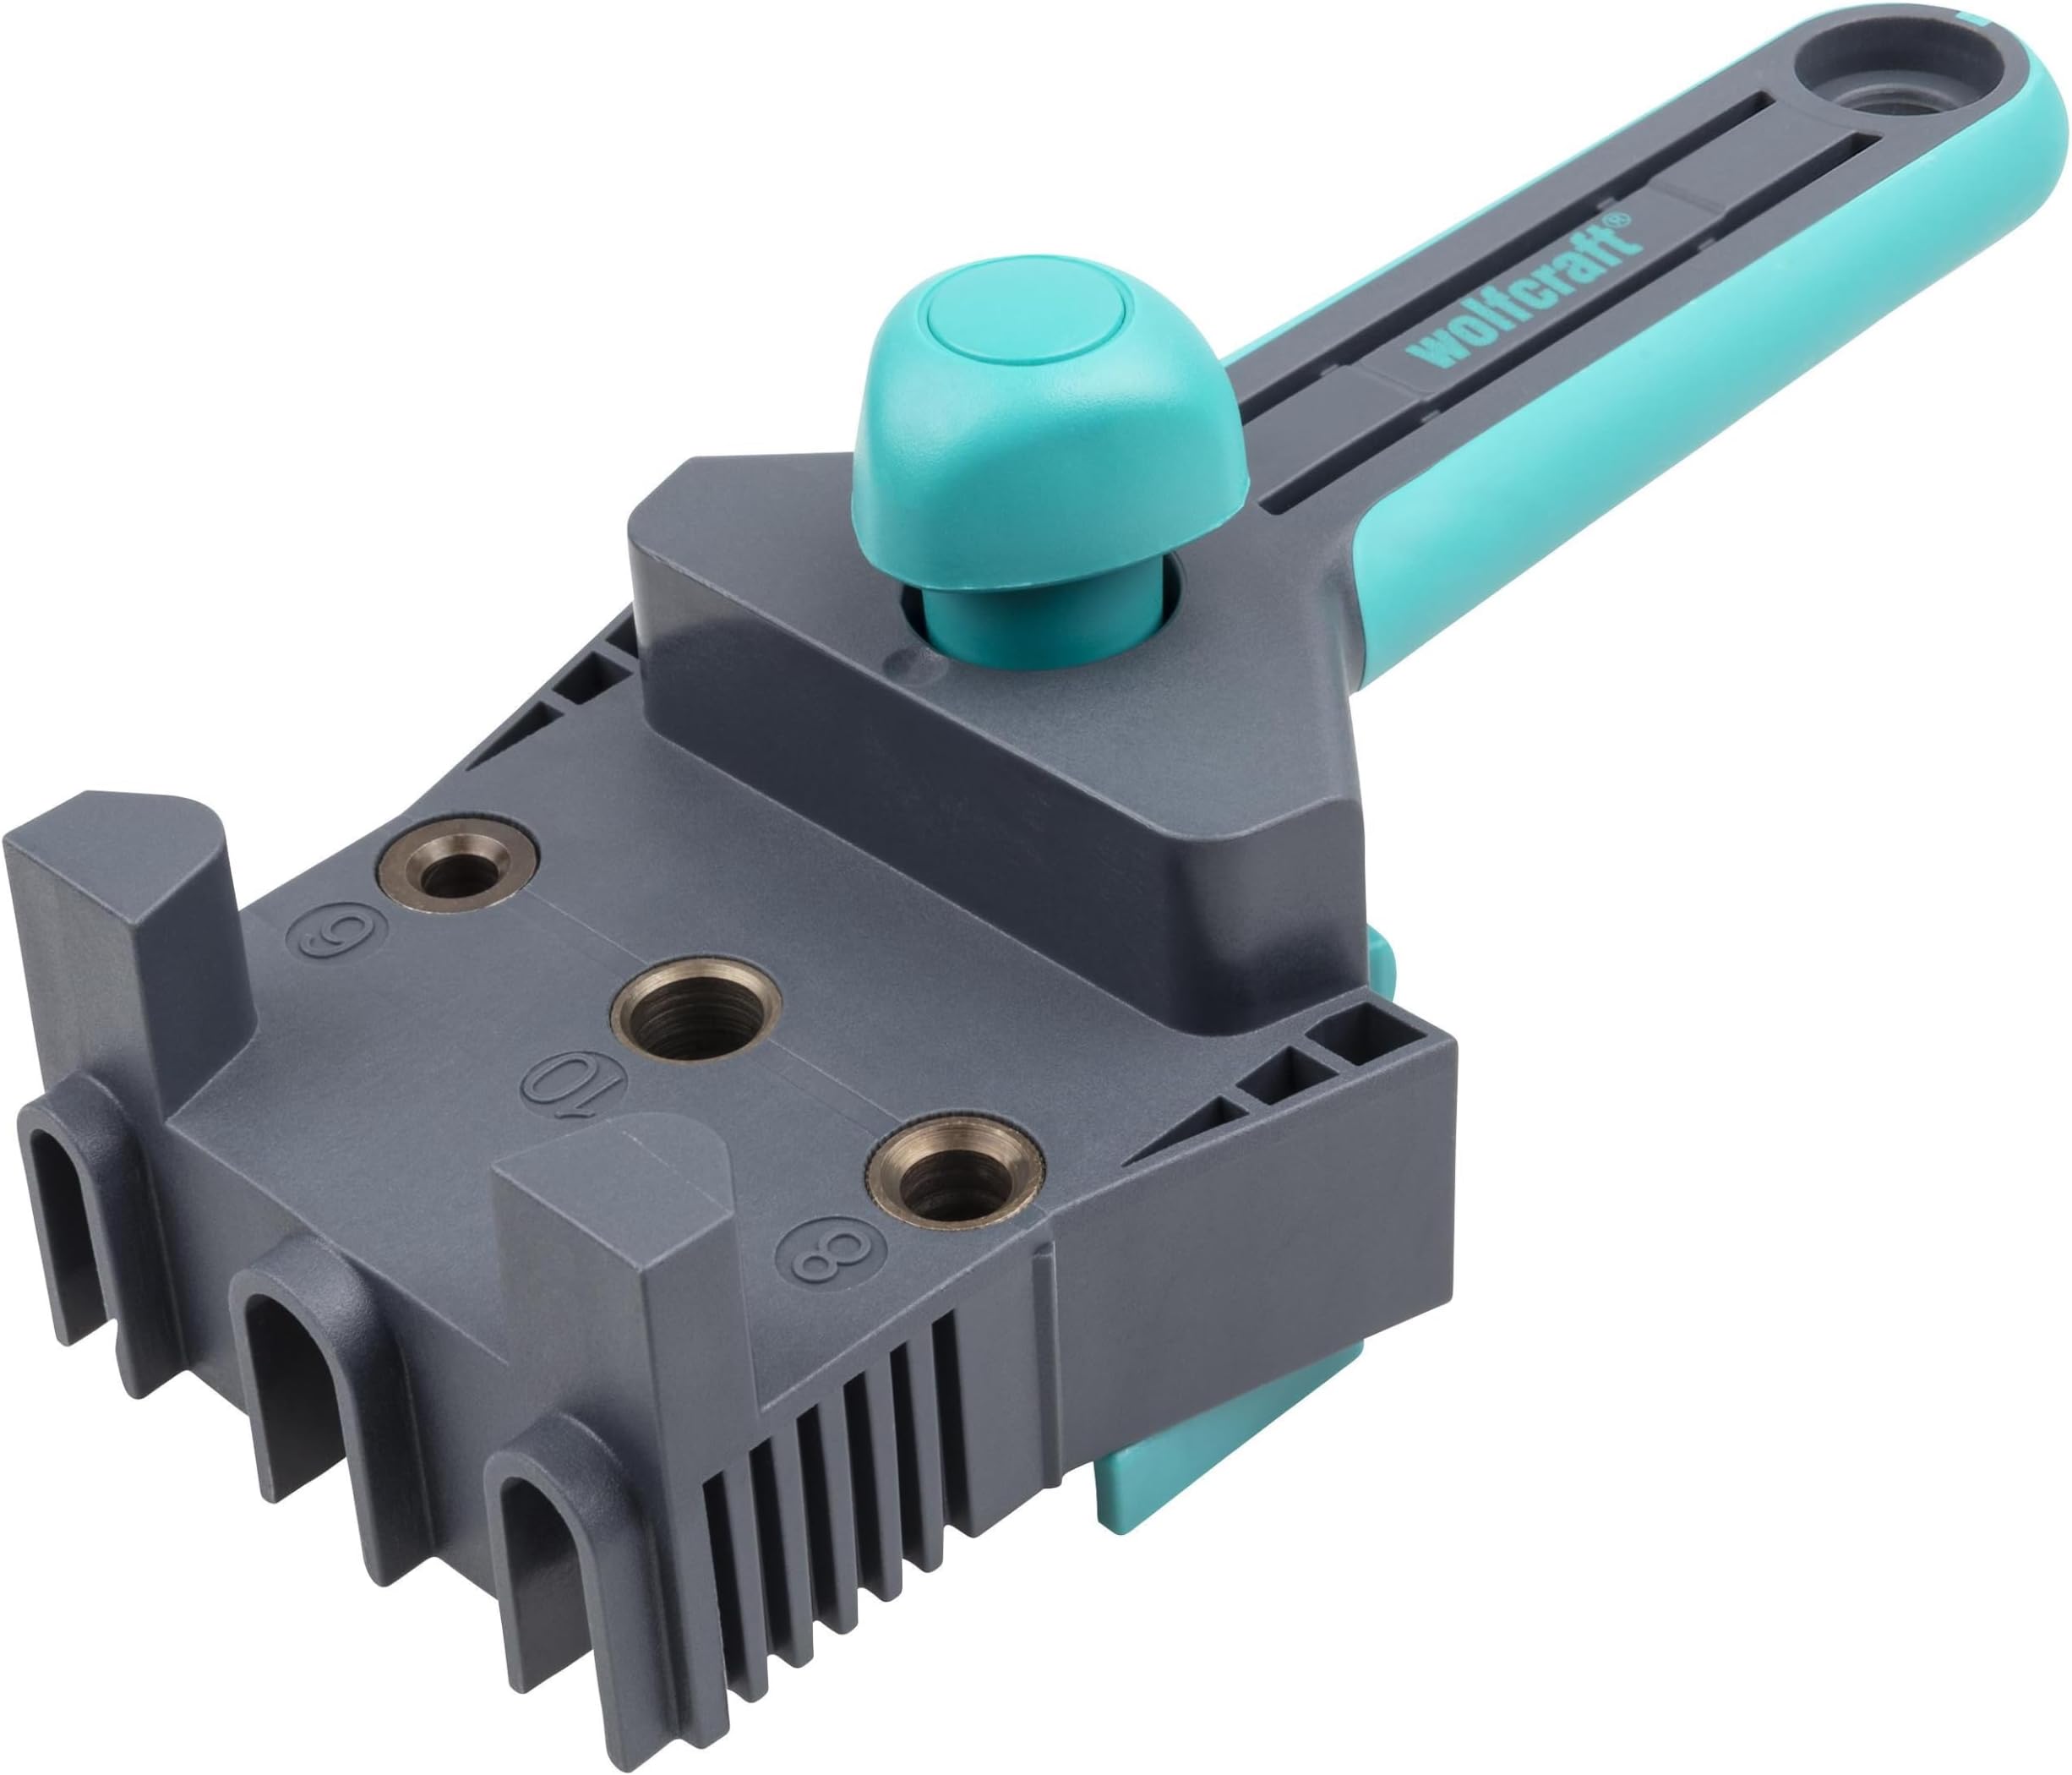
The wolfcraft Dowelmaster is a versatile, adjustable dowel gauge designed for perfect wood joints in boards 12-30mm thick. It supports 6, 8, and 10mm dowel diameters and features integrated drill guides and a stop pin to ensure error-free, precise hole placement for corner, T-butt, and edge-to-edge joints. Lightweight and easy to use, it’s a must-have for both hobbyists and professionals seeking flawless, durable wood connections.


| ASIN | B0001P19PY |
| Best Sellers Rank | 8,251 in DIY & Tools ( See Top 100 in DIY & Tools ) 3 in Woodworking Project Kits |
| Brand | Wolfcraft |
| Country Of Origin | Slovakia |
| Customer Reviews | 4.5 out of 5 stars 23,299 Reviews |
| Cutting Angle String | 6E+1 Degrees |
| Cutting Diameter | 10 Millimetres |
| Cutting angle string | 6E+1 Degrees |
| Cutting diameter | 10 Millimetres |
| Finish Types | Titanium |
| Finish type | Titanium |
| Global Trade Identification Number | 04006885464001 |
| Included Components | 1 dowelmaster |
| Item Dimensions | 8.7 x 20.5 x 37 centimetres |
| Item Type Name | wolfcraft Universal Dowel Jig (practical dowel jig for clean corner, T-butt and edge-to-edge connections, and the accurate alignment of dowel holes) 4640000 |
| Item Weight | 0.35 Ounces |
| Manufacturer | Wolfcraft |
| Manufacturer Part Number | 7119-20 |
| Material | plastic |
| Minimum Bore Diameter | 6 Millimetres |
| Model Number | 4640000 |
| Number of Flutes | 3 |
| Number of Pieces | 1 |
| Point Style | Countersink Point" or "Flat Point |
| Set Name | Universal Dowel Jig |
| Shank Type | Round |
| Shank type | Round |
| Surface Recommendation | Wood |
| Tool Flute Type | Spiral |
| UPC | 798256168260 756655387514 732454766408 |
| Unit Count | 1.0 count |
S**L
Best dowel kit by far
What a brilliant kit, virtually idiot proof, even I can now do dowels with ease, the only issue I have is tightening the depth stops on the drill but that'll become easier with more use. Instructions are very clear. Order yourselves more dowels if you are doing a big job as there's about 16-20 dowels in this set, there's also dowels markers which is a bonus. If you're doing a build that requires dowels look no further than this kit.
M**N
Great piece of kit
Great tool if you do like dowels and very accurate.
M**.
Very useful jig
For £18 I figured I couldn't go far wrong with this jig. It's surprisingly accurate and easy to use, just make sure you read the instructions and watch the plentiful videos available on using it. Once you get your head around its features and operation it's really nice to use. Make sure you pay attention to the drill depths for different types of joint (all explained in the manual) to avoid drilling holes too deep. It's a pity the guide didn't come with any depth stops but they're available separately. I would suggest getting the clamp style depth stops rather than the slide/screw depth stops as they look more substantial and less likely to slip. Personally, I use masking tape on the drills, reserving the depth stops for really precise work. In use I found the drill guides well formed and accurate. Clamping the work piece is advised. The jig handle can interfere with clamps in certain configurations, but nothing that can't be fixed by moving the clamps. I did notice the jig cannot drill holes extremely close to the edge of the wood, so this jig isn't for you if you want dowels closer than 35-40mm from the edge. This is due to the placement of the moulded pins of the jig. Using the jig I quickly used it to put together an Xmas tree base cover that can be dismantled for storage (limited storage space). The end result was excellent and quickly achieved, with the short end of the dowels glued in place and the long ends slotting into place to hold it together over Xmas periods. Overall I recommend this dowel jig to anyone with a need to use dowels occasionally.
R**S
I've never drilled better dowel
I recently purchased the wolfcraft Dowelmaster and I have to say, I am thoroughly impressed with its capabilities. As someone who enjoys woodworking as a hobby, I have struggled with achieving perfect joints in my projects. But with the dowel gauge, I am able to easily create corner, T-butt, and edge-to-edge joints in my boards without any hassle. First of all, the quality of the tool itself is top-notch. It is made of durable materials and feels sturdy in my hand. The markings on the gauge are clear and easy to read, making it simple to use even for a beginner like myself. The dowelmaster also comes with a drill gauge, which has been extremely helpful in ensuring that my holes are drilled at the correct angle and depth. But the best part about this tool is its precision. I have used it on various types of wood and the joints have always come out perfectly aligned. It has greatly improved the overall look and strength of my projects. I no longer have to worry about my joints being uneven or weak. The dowelmaster is also very versatile. It can be used for different types of joints and with different sizes of dowels. This has made it a staple in my woodworking toolbox, and I can't imagine completing a project without it. In terms of value for money, I believe the wolfcraft Dowelmaster is worth every penny. It has saved me time and frustration, and has greatly improved the quality of my work. I highly recommend it to anyone who is looking to achieve professional-looking joints in their woodworking projects. Overall, I am extremely satisfied with my purchase of the wolfcraft Dowelmaster. It is a must-have tool for any woodworker, whether amateur or professional. I can confidently say that this tool has taken my woodworking skills to the next level, and I am excited to continue using it in my future projects.
M**E
Better way to use this jig?
Several reviewers have commented that it is difficult to hold this jig steady especially when doing the first drilling into the end of your wood or panel. Several complaints about the jig moving slightly and the dowels not being quite vertical. The trouble is we might have been watching the wrong You Tube video, the English version where you clamp the wood vertically and try to drill down for into the wood while trying to hold the jig firm and steady at the same time which is very difficult. By accident I came across a Spanish video where the wood is clamped horizontally or at a slight upward slope towards the user and then you drill from the front. Assuming most of us are using the 8 mm dowels you can now use your weight pushing down on the handle of the jig and at the same time pushing forward with your thumb to keep the jig pressed squarely and firmly against the edge the the edge of the wood. You are also drilling forward which is slightly more comfortable than drilling down. Try this method and see what you think - I am sure like me you will find it to be a better and easier way. EDIT : having used this jig quite extensively on 18 mm melamine faced boards to make kitchen units here are my further comments. The first picture shows my inclined workmate raised about 2 inches at the front. This was easier than making an inclined ramp on my fixed workbench. It is weighted down by a heavy tool box which is also pushed hard up against a scrap piece of MDF to make the workmate really firm and solid. The MDF is just hung on the the workmate frame with a couple of cup hooks and is easily removable. The second picture shows me using the dowelmaster. You will see that I am not only bearing down on the handle to make sure the dowel enters the centre of the panel but also pushing with my thumb to make sure the jig remains square on to the board. The drill is a very old 300 watt Black & Decker which is not too heavy and does the job fine. You will notice it will be easier to remove build of wood chips when you are drilling your 28 mm hole as the exit path for the chippings is now almost horizontal rather than being vertical. The blue pads off cuts of these silicone type non slip mats. Even with strong clamps I found that because the melamine surface is so slippy there was a tendency for the board to move when pushing hard on the drill. The last picture is a few tips which you might find useful. I had to think of some easy way to provide depth stops to drill 28 mm into edges but only 14 mm into faces of boards. In my odds and end boxes I came across these black nylon spacers which were unused bits from fixing a wall mounted TV bracket and they have a 8 mm hole. The larger ones are 15 mm high and the smaller ones are 5 mm high. Using steel washers as well I can make up any length drill stop. The red one I use for drilling 28 mm edge holes and I just add the blue one to it as well to reduce the drilling depth to 14 mm for face drilling. The adavantage of these spacers are that they are very cheap and the nylon will not cause any wear on your jig. The other thing I noticed is that when the spacer stops spinning you have drilled down to the correct depth! You might be wondering why there is a piece of green and yellow earthing tape stuck on the top corner of the jig. Well I noticed that this angle was almost exactly over where the dowel hole is made in the edge. So if you want to be more precise where you put your dowel holes then just line up the middle green line over where you want your dowel! I was not impressed with the video recommending that you move the board 40 mm, using a ruler, when making T joints. I could see looking down the holes that I was a little bit out. I decided to use instead to use the raised edge on the side of the dowel master. The trouble is that it is grey plastic on grey plastic so not easy to line up. Just rub the edge with white chalk and blow off the excess and now makes lining up really easy. Last thing. I strongly recommend the 50 mm long confirmat screws in between your dowels if you can't glue your joints, which you can't easily do with melamine boards.
M**K
Need to keep checking the edge offset fence position
Not a bad set, but I found that it's hard to get the offset guide fence to stay in place. Ended up drifting by 2-3mm before I noticed the probem. It would be better if the jig was made from metal instead of plastic so it can 'clamp' together.
A**T
Excellent but not perfect
Overall this has been excellent and I couldn’t have completed a project without it. It allows you to drill dowel holes accurately and perpendicular very quickly. An easy and strong alternative to mortise & tenon joints. It is a bit fiddly and can wobble a bit but you get used to it with very good results. One issue is that I was putting so much rotational force into it to keep it stable that I was denting the wood face (see pic). I would suggest putting strips of thin wood either side to protect it. Also it is not designed to drill holes more than a few mm from the edge of a post. This can be overcome by unscrewing the torx screws and taking the entire thing apart which allows you to move the slider further than designed. This is not a design feature and probably invalidates the warranty but it is a decent work around if you want to drill further from the edge.
J**S
Well I never dowelled before but this made it work.
I just bought a new LG C1 48" OLED TV, It is bigger than my old 48" Plasma including the surround, so if I placed it on the plinth that I made years ago, which had room on each side in which to stand my front L/R surround sound speakers, the bottom corners of the new frameless TV would be cut off by said speakers. A new design was needed that fitted inside the alcove from side to side, and with just enough height to place the speakers on their sides below it, along with my Mini PC and Bluray Player (which are currently nested under the old one. This would leave the top of the 'plinth' free just for the TV and an unobstructed view of the screen. Unlike the old one which was screwed together, I wanted this one to be smooth and sleek, with an uninterrupted expanse of black-ash on the top. I never liked that the old one had the screws that I could see each time I dusted. So I decided to use dowels. Practicing on spare bits of wood, carefully measuring, drilling and dowelling proved fruitless as nonmatter how careful I was I could not get the holes perfectly vertical, and so could not get the pieces to go together as they should. This is where Amazon came to mind and how I came to buy this set. There are no English instructions but to be honest the images tell you all you need to know on how to use this. That being said, I never used the extra part that can slide back and forth when drilling holes in a flat piece, I used the hand-held part for it all. It is simple to use but to drill into edges you will need a vice or a workbench to hold the work. There's none of this putting a line down the pieces and measuring meticulously where the dowels are to go, it basically lines the holes perfectly in the centre for you, you just have to drill. The drill collar is not at all well designed, It had one small Allen screw on one side so on a wood bit it is impossible to get level. I used size 8 (40mm) dowels for my project, as the timber was 20mm thick I put 15mm into the top and 25mm into the uprights. careful measuring is required whilst the drill is slotted through the guide. It can be awkward as at the same time one has to tighten the screw of the collar. Once done though it is a cinch to do. Once all the holes were drilled then putting the spikes in the holes it came time to marking the corresponding points on the underside of the top of the plinth. This was the only time measuring was needed, and that was so that the uprights would be perfectly distanced and so that I could kick them back 3mm from the front edge. Line then up by eye or by using a spare piece of timber - bang with a rubber mallet and presto, perfect marks to drill the receiving end for the dowels. Simply adjust depth of drill bit (whilst in the guide) again, and carefully put the point of the bit in the hole, hold the guide down flat on the piece and drill away. First time I have ever used dowels in my life, seriously. Always wanted to but unlike my father who was a cabinet maker and could do it by hand, I could never attempt to do the dead-on accurate measuring and drilling required. This piece of kit made it easy. The crunch came when it came time to fit it all together and it did fit all together, perfectly. I have my 3mm kick in on the front and a 1mm kick on the sides, perfect right-angles between the uprights and the top, and smack-on equal measurements each side of centre. The first image is one I took after primer had been applied and sanded down. The second once painted with Black satin oil based paint I am chuffed with the way it turned out and I'm sure my father would not be shouting at me for doing a shoddy job of it. As an aside: I ended up returning the TV as it has serious issues with brightness and it has an awful soft picture with motion smoothing on, and if it's off the picture jags like crazy in HDR...but this tool at least helped me make my unit look fantastic - even for my old TV.
S**A
Tutto ok
Tutto ok
Ö**.
Ett bra set
Det kunde varit 4 st märkpiggar av varje dimension Men annars bra sats
M**U
Perfecte starterset
Alles wat je nodig hebt om te starten.
F**F
Test - positiv
Vorab, ich empfehle das Produkt und bin damit zufrieden. Im Detail, begründe ich es wie folgt: Lieferung: Artikel wurde binnen wenigen Tagen unbeschädigt geliefert. Artikel/Produkt: Dübel-set Material/Qualität: qualität vom Koffer super, Qualität von den holzdübeln und dazugehörigen Hilfsmitteln bzw. Werkzeug auch super Funktionalität: es funktioniert alles wie beschrieben und es ist echt leicht damitbzu arbeiten und vorallem sehr hilfreich. Damit kann man super Löcher für Dübel bohren, ohne schief oder daneben zu bohren. Super! Extras/Zusatz: Minuspunkt: ich muss jedoch auch einen kleinen Aspekt bzw. Tatsache als Minuspunkt bewerten, Mein FAZIT: Ich bin im ganzen sehr zufrieden mit dem Produkt und würde es wieder kaufen. Ich kann es definitiv empfehlen. Das Preis-leistungsverhältnis finde ich gut. Wie immer werde ich diese Rezension umgehend überarbeiten, sollte sich ein Mangel oder Defekt, insbesondere nach längerer Zeit, bemerkbar machen. Lg euer F ! Anm.: bei dieser Bewertung handelt es sich um meine eigenen Erfahrungswerte und persönliche Meinung zu dem Produkt und kann sich von anderen unterscheiden.
J**W
Good product
Value for money
Trustpilot
1 month ago
2 months ago