Desertcart purchases this item on your behalf and handles shipping, customs, and support to South Africa.
๐โจ See and be seen: Restore your headlights, restore your drive!
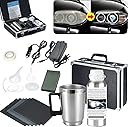
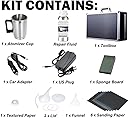
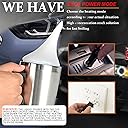
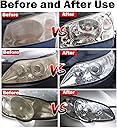
The VCTSELITY Car Headlight Restoration Kit is a professional-grade, all-inclusive solution designed to quickly and effectively eliminate yellowing, haze, oxidation, scratches, and cracks from vehicle headlights. Featuring a powerful atomizing cup with rapid heating, dual power supply compatibility (110V and car power), and a comprehensive set of 12 accessories including 6 sandpapers and 200ml of repair liquid, this kit delivers a showroom-quality finish without the need for headlight removal or baking. Perfect for millennial professionals seeking a quick, safe, and convenient way to maintain their carโs aesthetic and safety.


| ASIN | B0BBG2R315 |
| Best Sellers Rank | #4,802 in Automotive ( See Top 100 in Automotive ) #16 in Automotive Headlight Restoration Kits |
| Brand | VCTSELITY |
| Customer Reviews | 4.4 4.4 out of 5 stars (796) |
| Date First Available | August 22, 2022 |
| Item Weight | 2.81 pounds |
| Item model number | ADas |
| Manufacturer | VCTSELITY |
| Manufacturer Part Number | dcd00 |
| Model | DX-01 |
| Package Dimensions | 11.22 x 8.07 x 4.49 inches |
R**N
Works fantastic
Works great! and my headlights are clear. Of course with any type of job as clearing your headlights 90% of the job is prepping the surface. Iโd recommend using higher quality masking tape thats a little thicker for wet-sanding. Other than that Iโd recommend it, maybe even to people that arent mechanically inclined, and itโs way better than those all-in-one kits from autozone etc.
E**A
Good
A very good and quite practical product.
A**R
Excellent Restoration Kit!
The Car Headlight Restoration Kit, Auto Headlight Lens Polish Repair Kit Atomizing Cup worked perfectly on my foggy, yellowed headlights. The kit is easy to use and delivers professional-looking results right at home. The atomizing cup evenly applies the solution, and within minutes, my headlights were crystal clear again โ almost like brand new. What I really appreciate is how smooth the process is. The instructions are simple, the finish is long-lasting, and the headlights have a bright, clean look. It also saves a lot of money compared to professional services.
J**Z
Great value for the product
I picked up a second one of these, and it's been performing really well. I've been using it on my car and a few others since 2022. The restoration effect holds up for about six months, especially if the car is parked outside. It's a solid investment for keeping things looking sharp. Definitely worth grabbing if you need it.
S**C
Impressive Result
I was initially skeptical and worried that I might ruin my headlights, but I was mistaken. This kit transformed my foggy headlights into crystal-clear, almost new ones. The kit provided comprehensive instructions, and YouTube videos are excellent at explaining the steps. The process is very straightforward, so just trust the process. It includes everything you need to complete the job correctly. Overall very impressive results. Make sure to tape off very well or better yet remove the headlight assembly to provide a better result.
T**R
Bad cup
Cup doesnโt get hot enough leaving me with an even more foggy headlight lol
J**O
Must have headlight Restoration kit
Loved the kit! Instructions are easy to follow great for headlight restoration leaves them bright and looking brand new.
D**D
Sin duda bueno
Bueno confiable y me encanta estarรฉ pendiente para ver si vender el respuesto del polรญmeros gracias
J**Y
Excellent Kit! Well worth the time/effort for en exceptional end result!
It may take a little bit of time and elbow grease but this kit works wonders. Would absolutely recommend for heavily oxidized / UV damaged headlights. My only suggestion of those starting the process is the skip the first step of sanding (180 grit) and jump straight to the 280 grit to avoid difficult to remove scratches in the lens.
R**.
It works
It did exactly what it says. I went thru all the sand papers and then used the mug and it looks like new.
P**L
Works as advertised! Amazing results.
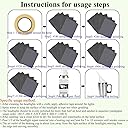
I see a lot of negative reviews, and there are some that I feel did not do a proper prep prior to using this product. There are lots of youtube videos that show just how to use this product properly. The way I did it was to sand in the following order: Mask car body surrounding the headlights so as to not damage your paint. I wet sanded the headlights with the following grits: 400 / 600 / 800 / 1000 / 1500 / 2000 as this is what I had on hand. While sanding I sprayed water to keep the headlights wet. Using the 400 grit I got it down to a haze where the headlight looks like it's frosted and cannot see through. I sanded left to right, up and down, counter clockwise, then clockwise circular motion. I then stepped up to the next grit as I go. Each time making sure it gets smoother. I kept it wet constantly as I sanded. Once I completed the 2000 grit, I sprayed water to clean the headlight and used a microfibre cloth to dry it. I took out the mug, the cone shaped top and 1 o-ring (mine came with 2). I shook the solution bottle, opened it and poured 1/2 of the bottle into the mug. Put the o-ring onto the cone shaped top and placed it onto the mug. I plugged in the mug to the power adapter (i got the one with the power brick). I then let it heat up till the content got hot and vapour coming out of the nozzle. (You must keep it plugged in so that it constantly heats the content in the mug) I moved the nozzle in a slow manner and about 3/4" away from the headlight. Starting from the top and working from left to right, or right to left ending at the bottom of the headlight. (It's easier to start from the top so if you accidentally hit the headlight with the mug, you're not smearing the product). I realized this was better after doing it a different way on the 1st headlight and added small smudges. I would highly recommend you do this in an area that does not have strong wind as the product will not get onto the headlight as I had encountered. I kind of resolved this by using a piece of cardboard blocking the wind. If you are in your garage and are applying this product, PLEASE WEAR A MASK. The one that filters chemicals!! Tip: I noticed that if the product in the mug is running low, you can lightly swash the liquid in the mug by moving it around and it produces more vapour. This helped a lot. Remember, SLOW and STEADY. Don't rush this. As I applied the product, I checked from different angles to make sure I didn't miss a spot. There were many spots that I had to go back and touch up. Overall, this product does what it was intended to do.
M**H
Great for about 90% Clarity
Pretty good kit. Wish it came with a coating for the headlights after the whole process is completed. Also some of the sandpapers sheets are pretty low quality and rip easily. Cables on both attachments are way too short to run from you cigarette lighter.
A**D
Before and after
Kit will do more than 2 headlights. Included sanding block does not hold provided sandpaper efficiently. I used one from a drywall sanding kit to secure the Sandpaper and then I was good to go. The directions do not explain what the extra parts included in the kit are used for or how they are used. That being said.. I was able to find Solutions and improvise and once I completed all the sanding steps my mind was blown to see how amazing this product worked!
Trustpilot
5 days ago
2 weeks ago