Desertcart purchases this item on your behalf and handles shipping, customs, and support to South Africa.
🎨 Elevate your DIY game with pro-level spray precision!
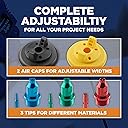
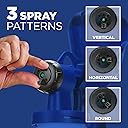
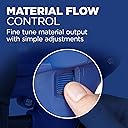
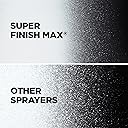
The HomeRight Super Finish Max is a corded electric HVLP paint sprayer featuring a powerful 450W turbine motor that requires no air compressor. It includes three brass spray tips (1.5mm, 2.0mm, 4.0mm) and three adjustable spray patterns (horizontal, vertical, round) for versatile application of chalk, milk, latex paints, enamels, primers, stains, sealers, and polyurethane. With a 39-40 oz container capacity and easy-to-clean design, it’s ideal for furniture, cabinets, trim, fences, and more, delivering professional finishes with less thinning and overspray control.


| ASIN | B071X9FZ7R |
| Best Sellers Rank | #2,304 in Tools & Home Improvement ( See Top 100 in Tools & Home Improvement ) #3 in Power Paint & HVLP Sprayers |
| Brand | HomeRight |
| Brand Name | HomeRight |
| Color | Multi |
| Customer Reviews | 4.4 out of 5 stars 10,591 Reviews |
| Global Trade Identification Number | 00012564009719 |
| Included Components | Nozzle Adaptor, Cleaning Kit, Instruction Guide, Wrench, 1.5mm Spray Tip, 2.0mm 4.0mm Tip |
| Item Dimensions W x H | 12"W x 13.5"H |
| Item Type Name | Paint Sprayer |
| Item Weight | 3.3 pounds |
| Manufacturer | HomeRight |
| Manufacturer Part Number | C800971.A |
| Material | Brass , Plastic |
| Material Type | Brass, Plastic |
| Model Name | Super Finish Max |
| Model Number | Finish Max C800971 |
| Power Source | Corded Electric |
| Recommended Uses For Product | Painting |
| Style Name | Super Finish Max |
| Tank Volume | 40 fluid ounces |
| UPC | 012564009719 |
| Unit Count | 1 Count |
L**E
Spraying Tutorial
This is more of a "lessons learned" than a review. I'm an experienced, DIY painter - not a professional, but I have painted easily 10k sq' in my lifetime. Switching to a sprayer was not as user friendly as you think. I watched a few YouTube videos and read some blogs to get a "real life" review of using a sprayer, and that was really helpful, but there were still thing that were not covered. I'm going to try to capture my "lessons learned," and write my review at the bottom. In no particular order: 1. Buy two extra containers. It's handy when you are painting a room, and you may have two colors for the room or the trim, or primer and paint, but instead of emptying them, and cleaning them, you can just put a lid on them and screw them back on the sprayer - just make sure to stir/shake. The third container is to use when you are cleaning the sprayer (more on that later). 2. Yes, you do have to screw on a full container of paint on to the sprayer - it's awkward, and I always was afraid that I'd drop it, but I didn't. I suppose that you could put the container on a surface and spin the sprayer around on top - the cord is very short, so that is possible, but seemed more awkward to me, so I lift the container up to the sprayer and turn it to secure. 3. You don't need a viscosity cup, but you do need to buy good paint. This model claims that you don't have to thin the paint. I didn't - I bought Benjamin Moore primer and paint. I got good coverage with the paint using the larger (red) nozzle. I had to experiment on how to hold it and the flow. Ceiling paint is made to be thicker to avoid drips, so I was nervous about that. I did find that it was "spitting" instead of spraying. I made sure that the intake valve was on tight - but it did not resolve it. I ended up dry-rolling the paint after I sprayed it so it wouldn't look like texture. I think it was worth it. So far, I've used the BM Fresh Start Primer, Ceiling, Aura Bath and Spa, and an old gallon of Pratt and Lambert Redseal, and they have all sprayed very well. 4. Make sure that you tape down any drop cloths or plastic covering items that you don't want painted. The sprayer creates a blowing that will move even a heavy drop cloth when you get near to it. I laid a drop cloth in a closet to protect the floors, but when I got near the baseboards, the sprayer would blow the drop cloth away. It's pretty powerful 5. I bought the fast cleaner kit, but I failed to realize that our kitchen faucet has a sprayer head, so it won't work with it. It will have to wait until we have garden hose weather. 6. Get a good face mask. You *will* breath in the fine particles, and that is really bad for you. A bandana or a cloth mask doesn't cut it. I started out wearing an N95 that I have due to the pandemic, but I switched to this: https://smile.amazon.com/gp/product/B0915XFDN5/ref=ppx_yo_dt_b_asin_title_o03_s00?ie=UTF8&psc=1 when it arrived. 7. Speaking of the dust - yes, there's overspray, and yes, it's more than you would think. I mentioned that I sprayed a closet, and I had laid a drop cloth. When I sprayed over the door frame, the door was open. I found paint spray 5-6' away. Also, when I finally sprayed color on the walls - I had cut in the edges, thinking that I could spray within the edges - not possible. The overspray sprayed on my nicely painted ceiling. I don't know how professional painters do this - my husband works in the trades, and he says that all the painters he sees still roll everything. Well, it's true that with rolling you have more control, but it definitely takes longer. I guess you could do your ceilings last and tape and drape 1-2' of your walls, that's how much you'd need for the overspray. 8. You can do ceilings - I wasn't sure how this would work since the directions very specifically tell you to keep the sprayer parallel to the wall at all times. So, that would mean tipping it on it's side to do a ceiling, that's exactly what you do. Point the intake tub to the back of the sprayer so that when the container is on, and it's pointed upwards, it will be pulling from the paint that has moved there. Ok, here's the review part: Overall, I like it, and I will use it a lot. I'm already excited about painting some other rooms and hallways in the house. The price is fantastic. You can't get a painter to show up for $100. Is it better than brushing and rolling? For some things, yes. But, there's a lot of the same work if you were brushing or rolling (some would say more). One of the things that I hate about painting is all the waste. So much paint down the drain as you clean brushes, rollers, paint trays. Well, it's not too much different with the sprayer. You have to empty and clean the container (if you are going to save the paint in it, make sure to wipe around the threads so that the cover doesn't stick), you have to clean the sprayer and it's parts, and you have to clean any other miscellaneous brushes or painting paraphernalia that you still use. I think the sprayer is a little less wasteful, if that's all you have to use, but I found with painting a room, I still needed a brush and a roller and a edge pad and a roller tray - so, in some ways the waste was double. But, that brings me to the use of paint by the sprayer. I was warned that the sprayer uses more paint. I can't say that has been my experience. I got paint for my bathroom ceiling, the guy said that I should be able to do it with a quart. I put the whole quart into the sprayer, but ended up with a quarter of it left. I did use 1.5 gallons of primer on 2 closets and a bathroom (including ceilings - we are doing a renovation, so it was new sheetrock). I think that seems reasonable. I also wonder - if you feel you have to thin the paint, aren't you going to get more out of gallon? Anyway, time will tell, and I'll try to update this if I feel like it's a real paint hog. You still have to do all the prep. Thoroughly clean any surface that you're painting, and you'll want to tape/protect areas from overspray, you'll still have to cut in and around edges. It doesn't eliminate that. So far with my experiences, I feel that the sprayer really excels on trim and doors. I sprayed a door using BM Advance, and the finish looks like it was done in a factory. I know that it's 85% the paint, but the sprayer gives it a sheen, and no brush strokes! I also painted some indoor shutters, and there's really no other way to paint shutters than with a spray gun - so much easier with better result. I am very happy that I purchased this. It has already returned the investment 100%, and I will use it many times and recommend it to my friends and family.
J**N
Stop wasting time reading reviews and purchase it!
This spray gun is amazing! So easy to use and very good results. So far I have used it to spray 1,700 ft of trim, 2 coats of stain, sealer, and 2 coats of polyurethane. Amazing results and because of the even spray there was almost no need for sanding between coats. I still did some sanding but that’s only because every time I thought about skipping it, my dad was living rent free in my head. If you are like me and reading through several reviews, just stop reading and get it. Unless you’re a professional painter and can justify the cost of an expensive machine, there’s no reason to not buy this product.
A**R
Did a good job, but hard to clean
This little inexpensive sprayer did a very good job on two projects. Staining an old fence went quickly and it sprayed the thicker stain very evenly. The paint reservoir is a little challenging, going thru 5 gallons a quart at a time, but I knew that going in. The second project was priming and painting some kitchen cabinets. The sprayer did a good job on both primer and paint, good coverage, even coverage. Turned out really well. The only real downside is cleaning the sprayer. I had to clean it between sides on the cabinet doors and between primer paint. The nozzles, etc clean up the same as other sprayers, but the body of the sprayer takes a lot of wrangling and you have to be careful to not get the electronics wet. Also, the plastics used on some parts doesn’t seem to release the paint during clean up like some sprayers. Still overall very superior job painting job over some of the other sprayers at this price point (that I have used): better and more even coverage, less overspray, smoother finish. For my next project I will get the rapid clean accessory and see if that helps. Would recommend to friends if they have similar paint jobs to do.
M**.
Profitable Tool For Handyman
I am a small handyman/remodel contractor and this sprayer has been my most profitable tool so far. And It is now cheaper than the first one I bought. The sprayer is easy to use and the results are professional. I've painted dozens of cabinets, doors, hundreds of feet of baseboard and trim. I've sprayed stain and poly without issues (I do recommend getting the additional spray tips that are available for a finer spray when staining). Paint clean-up is always a pain but overall this sprayer is easy to clean. All the important parts disassemble for cleaning. During use, you will need to wipe the spray tip because paint can build up. No big deal. I haven't seen any sprayers that don't have this issue. I bough my first super finish max sprayer in 2020 and used it until my own laziness trashed the sprayer and now I am buying the same sprayer to replace it. All I will say is...Clean your tools after each use!! Final note...for best results, learn to thin and strain your paint/stain materials properly. Enjoy!
H**Y
Excellent sprayer. Well worth the money.
Absolutely worth every penny!! This is by far the easiest and best sprayer I've come into contact with. Clean up is a breeze! Took me roughly 10 mins to cleanup between paint colors. As an added note, I use "pump armor" to clean my sprayers between colors and before storage. It cleans thoroughly and keeps the sprayers from getting stuck while in storage essentially. (Warm soapy water is rarely ever enough to clean out a sprayer but I digress). I was able to paint 5 outdoor benches (in 4 different colors) in roughly 4 hours (this includes dry time between coats and having to flip them) so that says a lot. I spent maybe an accumulative 20 mins painting each bench in total. It was fast. The easy turning of the head instead of having the change heads to change direction and speed controls were excellent features. Highly recommend! I love this sprayer!!
J**K
Wonderful little airless sprayer and a recommended stain
I used this airless sprayer in northern Minnesota to stain the outside of our 5-room cabin, a small shed, and some assorted small wooden pieces. The majority of the siding on the cabin and shed consisted of ~4-5 inch diameter logs (pine or spruce) cut lengthwise that were at least 50-years old and had been last painted ~25 years ago with a high VOC oil-based stain. This older type of stain is now banned in many states because of the high VOC (volatile organic compound) content, but can still be custom ordered in areas, like MN, where it is still legal. It is a wonderful product for durability and application, but I chose to use a more environmnetally friendly, water-based, acryilc stain. Needless to say, this was a challenging staining project for both the sprayer (it's a bigger project than this sprayer is designed for) and the stain (applying a water-based stain over an aged oil-based stain on a difficult surface). I was delighted with the initial results and with the results 3-months later. I will update my review next year, if there are any significant changes. The stain I used was the Sherwin Williams Woodscapes acrylic stain. I used the dark opaque base stain that was tinted to the desired color (a Navajo red-like color). This is a self-priming stain that is moderately viscous and designed for siding. It has some mold and mildew resistance built in. I greatly appreciated the self-priming nature of the stain, because it meant that I did not need to apply a primer, let it dry, and then apply the stain, so it saved a lot of time. The stain was also a great thickness that was easy to apply and gave great coverage and penetration with a brush in the places where using a brush, not the sprayer, was simpler or more practical. When using the sprayer the stain also went on well, penetrated the numerous cracks & grooves in the siding, and gave good coverage. I highly recommend this stain for these types of projects. It's a great product-at least after 3-months. I'll update my review if this changes in a year. On to the "HomeRight C800971.A Super Finish Max Extra Power Painter, Home Sprayer Hvlp Spray Gun for Painting Projects"! I boght the somewhat more expensive "extra power" version of this sprayer for 2 reasons. First, I knew I would be using a stain with a moderate viscosity and I was concerned that the "regular power" version of this sprayer, might not be able to manage the viscosity of the stain I was going to use. And second, this sprayer had a wider range of droplet sizes to which it could be adjusted. I'm glad I spent the extra $30 for the "extra power" version. This sprayer allows the user to choose between 3 included color-coded tips that provide flexibility beyond the droplet size "adjustment dial" built into the sprayer. The combination of tip selection and the "adjustmetnt dial" allows the user to use a essentially any common paint or stain and to produce different spray patterns and droplet size to adjust the quality of the finish. If the three included tips don't provide you with the desired finish, you can buy a kit that includes 3 additional tips (Homeright C900110 Spray Tip Multi Pack for Super Finish Max (Orange, Yellow, Black)) . I used the red tip designed to give a courser finish, but quicker application. I think one of the tips designed to provide a "finer" finish would likely have stuggled to use this stain, but I did not test them with the stain. The first day I applied 3.5-4 gallons of stain to finish the outside of the cabin. I had to refill the reservoir on the sprayer 15 or 16 times to complete the task and applying the stain took about 4-hours, so a full reservoir is good for about 10-15 minutes of spraying-including brief pauses to move the ladder, adjust my grip, or change the spray pattern and longer breaks to occasionally clean the tip assembly. The reservoir is easy to refill, so I was fine with the sprayer's limited volume. If you have a bigger job or are in more of a hurry, I suggest going with a higher capacity sprayer with a hose that you insert directly into the 5-gallon container of stain/paint. I regularly changed the spray pattern from a horizontal line to a veritcal line (a circular pattern is the third option avaiable) depending on the orientation of the surface I was staining-switching between spray patterns only took a few seconds. I needed to stop after each 5-6 fills of the reservoir to partially disassemble the tip assembly on the sprayer and clear it when it became clogged with drying stain. This process took ~5 minutes each time, but most sparyers require periodic clearing of the tip during use, so this was not a problem for me for this project. Gradul plugging of the tip also required that I periodically increased the droplet size and courseness of the finish by rotating the "adjustment dial" in order to keep working. Again, this was not a problem for this project., but may be a problem for larger projects. Cleaning the sprayer after the days work took me more than an hour, but I only had cold water form a hand pump (no, the cabin does not have indoor plumbing, but it does have electricity!) to clean the sprayer parts and to clean out the reservoir. Cleaning would have been much faster if I had access to an unlimited supply of warm soapy water. It is eesential to thoroughly clean the internal parts of the sprayer after each use to prevent problems in the future. If you are planning to change colors of paint or stain frequently, be sure to allow time for cleaning the sprayer for each change. The next weekend I spent the second day staining the shed and the smaller wooden pieces. These pieces were again pretty old and the wood well cracked from drying. I used 2-2.5 gallons for these projects. Pretty much everything I said above was true for this day also, however, these types of smaller projects are really what this sprayer is designed for. It worked superbly. I had to stop once to clear the red tip after the 5th fill of the reservoir. Clean-up was still a time-consuming step, but well worth the time saving of using a brush or roller. Other comments: 1. Overspray was not a significant problem with this sprayer. Just don't spray on a super windy day. You still must tape or cover any surfaces (like windows) that you don't want paint/stain droplets on and wear appropriate personal protective equipment-especially to protect your eyes and respiratory tract. 2. Be sure to wear proper personal protective equipment when using ANY sprayer. For me, this included a hat (kept the spray out of my hair and parts of my head), safety glasses (when I looked at mine during the work I saw tiny droplets of stain on them,so I was glad to have the safety glasses), and a respirator that covers your nose and mouth. A cheap paper dust mask does NOT provide adequate protection from the fine mist produced by a sprayer. Spend $25-30 to get a decent respirator with replaceable cartridges. Your nose, mouth and lungs will appreciate it! You could add gloves and a long-sleeve shirt if desired. I skipped the gloves and shirt and got some wind-blown spray on my hands, but less on my arms. Both my hands and arms cleaned up pretty quickly-even with just cold water. I suggest safety glasses like these (https://www.amazon.com/Pyramex-Fortress-Safety-Eyewear-Clear/dp/B003UY9C0C/ref=sr_1_32?s=hi&ie=UTF8&qid=1533890807&sr=1-32&keywords=safety+glasses) that don't easily fog up and a respirator like this (https://www.amazon.com/dp/B0009F5KDS/ref=twister_B01MUGE5FK?_encoding=UTF8&psc=1). 3. It is ESSENTIAL that you properly prepare the surface before applying the stain/paint. Failing to prepare the surface properly will give you poor results, REGARDLESS of the paint/stain you use and regardless of whether you use a sprayer, brush, or roller. You will likely spend at least as much time preparing the surface as applying the stain/paint, so plan accordingly. For this project, I used a scrub broom to knock down cobwebs, spider egg cases, etc. I then scrubbed the wooden surfaces with bleach water (using a deck wash or borax would also work), then rinsed the surfaces with plain water, and finally let the surface dry for a few days. I couldn't use a pressure washer, because I didn't have access to pressurized water, but that would have saved time. There were several pieces of siding that had areas where dry rot, insects, or lichens had decayed the wood under the old stain. I removed as much of these "spungy" areas as possible with the scrub prush and for particularly bad areas a wood chisel and had to replace some of the siding boards completely. The prep took a lot of time, but I cannot emphasize how important it is to apply stain/paint to clean, dry, decay-free surface. As mentioned above, skipping the prep step will give you poor results including stain/paint coming up within weeks, months, or possibly a year. 4. The sprayer is pretty light weight, so almost anyone can use it. 5. One negative with the sprayer is the small wrench they provide to install and remove the 2 metal parts of each tip. In a word, the wrench sucks. It's too small to provide much leverage (which does prevent you from over-tightening the two pieces of the tip when you're installing the tips) and it "stripped" out pretty quickly making it useless for removing the tips once a lttle stain/paint had started to dry in the tip. I quickly resorted to using a pair of wrenches with a longer handle to loosen the tip pieces. Summary: I pushed the limits of this sprayer with this project, but so far the results are fantastic. Cleaning the sprayer is a bit of a pain, but the prep work is the same regardless of whether you use a brush, roller, or sprayer. In less than 2 afternoons I stained an area that would probably have taken 4 or 5 full days to do with a brush and the brush would probably not have provided as good of coverage. I expect that completing smaller projects with this sprayer could give great finishes. I highly recommend this sprayer (and the stain).
C**E
great sprayer
This sprayer is awesome! I never sprayed paint before, and I had an 1100sq foot new contruction shed exterior to paint. It was T11 plywood, doesnt take roller or brush well. I had ten yr old latex from our house paint job leftover. Bought Floetrol additive, 190micron mesh strainers. 8oz Floetrol to one gallon ratio. Used my drill and mixer to blend. Follow the instructions testing with water. For me, the best tip was green with black head. Spraying from 6 inch away level strokes. Its a workout for sure, but it lays down even coat paint very well. Cleanup is not bad either. I highly recommend this little sprayer. Not bad for under $80. you only get red tip, green tip and blue tip. The instructions show orange, yellow, and black..not in the box.
T**O
Excellent purchased, I will now rely on it, mostly.
So I had a pretty big job with 12 interior, unfinished slab doors that needed to be stained and sealed. I don’t do this enough as in regularly having this volume to treat that would justify a full commercial sprayer system and this job was big enough to not having the time or inclination to hand finish with a brush, sponge, etc... I was looking for a reliable sprayer that wasn’t going to create more work and be effective and reliable since it was going to take 3 - 4 days just to spray the top coat layers on that many doors and produce a good quality, finished product. I was working out of the client’s garage that I made a temp spray booth with plastic. This sprayer worked great, was reliable and repeatable across the layers to produce a good poly top coat on the doors. The poly that is used is an important factor as well so it’s only on the sprayer. I cut the poly, water based, 10-15% in the jar prior to spraying. It took a little testing to get the pattern consistency to what I wanted and to get the speed and overlap to match the conditions. The conditions were not ideal out of the garage with it being very dry mostly and afternoon temps in the mid 90’s. I was surprised for as late in the season to still be in those temps so thinning was absolutely necessary. I wrapped the nozzle with a plastic bag between spraying sessions and rotating stock. It was about 20 - 30 min. Before it was dry enough to rotate door stock. In those temps. I would then unscrew the nozzle and tip for a quick clean just before starting to spray the next batch. Test spray into paper or cardboard or something disposable to clear and adjust product volume and then back to the doors. I can see me keeping this one sprayer for sealants only and getting another for paint. Even if it was a throwaway at the end of the job it would have been worth it for the time savings. It finished strong so I plan on using for the next job. This can make even my smaller jobs easier, quicker and more consistent so I’ll be using it more often following this experience. Do practice if you’re not familiar with spraying and if you are familiar, practice on cardboard anyway. There’s a difference between spraying topcoats or paint from water and it will give you good experience on what to look for on consistency and seeing the spray for overlap. This was a challenge in the garage. One noticing was that there was a transition on the product control volume being sprayed that “jumped” from a too small a spread to a wider spread with more product right at that sweet spot for me. I wanted the spread only with a little less product ideally for my situation and ended up adjusting my speed to compensate to maintain the size of spread I was looking for. There were places that droopped some with the sealer where there was too much build up. Thinning and temp changes were at play as well. The application was easy, the sprayer was easy to use and understand how it worked, very easy to unscrew the nozzle and clean the tip while keeping product in the jar, and screw jar back to the bottom with the feed.l when refilling. The directions were included for suggested spray tips. This one had 3 different sized tips and 2 nozzle sizes. I do recommend this homeright sprayer. I ordered a second jar with lid which is handy for cutting product and securing with the lid until ready to use. Just can make it easier if spraying lot of surface area in a pass.
A**R
Doesn't work in UK
Has anybody from UK managed to use the sprayer with adapter plug? As it is at the moment it's unusable with U.S plug. Any help or advice much appreciated.
J**E
Perfect for beginners!
I used this to prime and paint my kitchen cabinets. Prior to this I had no experience in using a paint sprayer gun. This was very beginner friendly! I made sure to practice with water outside before using paint. Do it a few times to get used to the amount of spray and different nozzles. For the first application of paint do a test surface, or paint on surface that is not too notable, like the backside of a cabinet door. You will need a long extension cord for your outlet too. Also to note, you can’t paint with this gun aimed at the floor because it will splatter big splotches. The sprayer needs to be held upright or slightly on an angle. There is very fine overspray too so make sure you cover up for floors and any areas you don’t have to get painted! Sprayer is easy to clean. I didn’t have any issues with it after cleaning and reusing again. The finish is really smooth and professional looking! I didn’t have to thin any of the paint either. For context I used benjamin moore Stix primer and benjamin moore chantilly lace in semi gloss. Overall very happy with this purchase and the results I got. I don’t have any complaints, but take with a grain of salt because I also don’t have anything to compare it to :)
A**O
Excelente relación costo/beneficio
Esta pistola de pintura llevo casi 8 meses usándola y es EXTRAORDINARIA. Soy entusiasta DIY y la he utilizado con pintura acrílica base agua, pintura para madera con poliuretano base agua y primer y funcionan extraordinariamente bien. Recomiendo comprar el kit de puntas adicionales. Su limpieza es muy simple y aunque la pistola viene integrada con la boquilla esta viene sellada y no hay problema que se moje porque el motor y partes eléctricas vienen selladas a prueba de humedad. La relación costo/beneficio es de lo mejor que hay. He probado otras marcas como Wagner y definitivamente me quedo con esta
A**O
Muy buena opción
Me pase buscando cual me convenía mas para pintar muros en casa, ya he tenido este tipo de pulverizadoras pero de mas bajo precio, la desventaja de las otras es que tienes que rebajar mucho la pintura y por lo tanto dar mas capas, ademas de que las mas baratas salpican gotas medianas que te manchan el piso y otras cosas al rededor, aparte de que son propensas e taparse mas fácilmente porque limpiarlas no es tan fácil. Después de ver vídeos y comparar con otras marcas me decidí por esta ya que aunque cuesta el doble o triple que las económicas, pienso usarla continuamente, para mi sorpresa estoy muy contento con el resultado, para pintura vinilica en muros no tira ni una sola gota, y la dilusión la hice solo al 20%, es decir la pintura estaba casi espesa y trabajo de maravilla, estoy muy contento ya que si me ahorro mas de la mitad del tiempo que tarda una persona con el método tradicional de rodillo y brocha, lo que si recomiendo mucho es tener un trapo húmedo mientras se maneja la pistola para poder limpiar lo que se llegue a manchar con la casi invisible briza que escapa de la misma, es decir que la briza alcanza aveces la pistola y al terminar de trabajar tu pistola esta con una capa muy finita de pintura, pero con el trapo lo vas limpiando para que siempre este reluciente y bien presentable para usarla de nuevo.
C**I
Does not work in Ireland
This product comes with 110 Watt and does not work in Uk or Europe. I have bought a adaptor, but still does not work.
Trustpilot
1 month ago
1 month ago