Desertcart purchases this item on your behalf and handles shipping, customs, and support to South Africa.
🏡 Elevate your outdoor lifestyle with the Kozyard Alexander — where strength meets style!
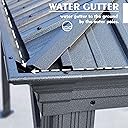
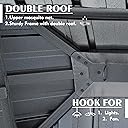
The Kozyard Alexander 10' x 12' Hardtop Gazebo features a robust aluminum frame with reinforced beams and a galvanized steel double roof designed to endure up to 2,500 lbs of snow and 60 MPH winds. Its spacious design accommodates outdoor furniture comfortably, while included curtains and mesh provide privacy, UV protection, and ventilation. The integrated gutter system efficiently channels rainwater, and a built-in ceiling hook allows for customizable lighting or fans. Backed by a 1-year warranty and U.S.-based support, this modern, water-resistant gazebo is a durable, stylish addition to any patio or backyard.


| ASIN | B09XGQZWLH |
| Best Sellers Rank | #80,002 in Patio, Lawn & Garden ( See Top 100 in Patio, Lawn & Garden ) #158 in Gazebos |
| Brand | Kozyard |
| Brand Name | Kozyard |
| Color | Gray |
| Customer Reviews | 4.6 out of 5 stars 1,544 Reviews |
| Floor Area | 120 square_feet |
| Frame Material | Metal |
| Item Dimensions L x W x H | 144"L x 120"W x 115.2"H |
| Item Weight | 320 pounds |
| Manufacturer | Kozyard LLC |
| Manufacturer Part Number | KZAHG1012GRA |
| Material | Aluminum |
| Material Type | Aluminum |
| Model Number | KZAHG1012GRA |
| Number of Items | 1 |
| Number of Packs | 1 |
| Product Dimensions | 144"L x 120"W x 115.2"H |
| Shape | Rectangular |
| Style | Modern |
| Style Name | Modern |
| Ultraviolet Light Protection | UV protection, level not specified |
| Unit Count | 1 Count |
| Water Resistance Level | Water Resistant |
J**R
Perfect Gazebo For Our Deck
We wanted a cover for our deck so we could enjoy eating more often outdoors and to enjoy a nice evening thunder storm. This Gazebo fit our deck almost to the inch, perfect fit. It was easy to schedule the delivery, they put the 5 boxes it comes in exactly where we asked them. The fun part was assembling, which took a few weekend to finish. I had watched a video online for an older version of this gazebo and it looked pretty simple. Most of it can be put up with one person assembling, but there are a few parts that require the help of another person. The base part was simple, all parts fit perfect, screws went in easily, no bad parts and didn't have to struggle to make things fit together. The directions were mostly understandable, only a few parts were confusing, especially when we got to putting on the roof parts. Sometimes it is easier to leave the screws loose until you get each step completed, and then tighten them. The assembly of the roof was the hardest and most time consuming. The top-top roof was difficult to put on the roof panels as the edge clips that you have to put on each panel kept coming off when pushing them into place. I found a tip later in the instructions to use the two-sided tape to hold these in place for the lower roof panels, would have been nice to have that tip earlier. The framing went pretty easily. Putting on the roof panels was the hardest. Make sure everything is square, do not tighten the screws so you can jimmy the sheets around so the holes line up. I had a few where a screwdriver was used in a few screw holes to shift the panels so the screws holes would line up. It was an adventurous assembly, and sometimes frightening, but overall it wasn't too hard to do. Prior reviews gave a lot of tips that Kozyard seems to have addressed as those tips were not needed. It is super sturdy and solid. I really enjoyed the experience and look forward to enjoying the outdoors a little more. Very happy with this purchase and would recommend to those that are looking for something similar.
B**K
Wow! Super strong, looks awesome.
First the con's: There are literally hundreds of screws nuts and bolts that one has to stick into places. This is probably the most time consuming part of the project. I think it took me an hour just to assemble the 4 cross beams with the curtain rails. It would have gone a lot quicker if I'd had someone helping me. One of the screws had a sharp edge and I cut myself a couple of times. I would have eliminated it, but I was concerned I would need all the screws I got. One of the screws had a messed up Allen hole... or what ever it's called. I couldn't get the Allen Wrench to go into it. I put it aside and intended to use it as the last screw. Not all of the pieces had identifying labels. Only one of the M1 pieces had a label. I used it last so that I would remember which pieces where M1. Half of the curtain rails had labels... you have to identify duplicate pieces by their appearance. At first, this was troubling as I thought I was missing parts. It turned out, I was not. Pros: With literally hundreds of screws, nuts, and bolts, I was surprised that I had issues with only 2. What's more, there were enough extra screws, nuts, and bolts that I could have tossed those 2 in the trash and wasted no more time on them. I eventually did loose one of the nuts, but again, there were so many extra that loosing one nut wasn't an issue. I gave it 4 stars for assembly simply because there were so many screws, nuts, and bolts. Assembly was actually very painless. I did most of the assembly by myself... with the help of ladders and lawn furniture, in about 10 hours. There were a couple of places where I had tightened a screw or bolt prematurely, and aligning a latter screw or bolt was more difficult. But I quickly learned to wait to tighten the screws and bolts until everything is assembled.... which it says clearly in the assembly instructions. Speaking of assembly instructions... I found them to be easy to follow. There were sufficient detailed pictures. Each step clearly stated which parts, and which screws, or bolts you would need for that step. For the most part, I used only one tool. There were a dozen or so screws that require a Philips head screw driver, but everything else required just the allen wrench. With literally hundreds of holes for screws and bolts to go through and match up with a nut or threaded hole on the other side, I was surprised that none of them had any real alignment issues. I thought I read reviews that said people had to re-drill holes. When I did run into an alignment issue, I looked for the neighboring screw or bolt that was binding, loosened it, and adjusted the piece until my alignment was fixed. The roof was a particularly interesting section for assembly. I used four #2 Philips head screw drivers to help hold pieces in place and align the holes. As there was frequently an edge that was binding somewhere, the screw drivers acted as several extra hands. With literally hundreds of pieces, I was originally worried that I'd get to the end and find that I had lost a screw, nut, or bolt, and that I'd have to run to the hardware store and buy one that doesn't quite match the others. I got to the end... put in my last nut and bolt and saw that I had about 20 extra.... extra spaces, etc. Loosing one, breaking one, stripping an nut or bolt... wouldn't have been a problem. The coating goes around the edges. Having worked with standing seam steal roofs before, I know they are quite dangerous to work with... for the installer. The edges are usually very sharp, and you have to be very careful not to touch them with your bare skin... lest you wind up with a big cut. But... on these roof panels, the entire piece is coated, including the edges. As far as I can tell, none of the edges was sharp. Because I was working alone, I had to man-handle the pieces, frequently touching the edges with my hands, arms... even my neck. Except for the one screw above that I've already mentioned, I didn't suffer any injuries.
A**R
Lot of work worth it in the end
I ordered the 12x16 version of this joker. If you think you can attempt to put something like this together by yourself it can be done but don’t. I did and what a pain it was, which isn’t a knock on this gazebo they clearly advise in the instructions to ask for help and are surprisingly clear. To start the little plastic clips that are sent to hold the roof pieces in the upright channel(s) flat out suck, like I’d like to fight the person responsible for such a dismal idea. My particular example came pre dented in two different spots despite the exceptionally okay packaging job performed by our chinese comrades. Luckily these imperfections were placed where one can not see them unless purposefully looking for them. Other than that there are no less than 1000 pieces of hardware to put in. I advise getting yourself an impact driver and running it on an appropriate torque level. I did and had I not I’d still be out there fooling with this thing. The gazebo itself seems okay now that it’s together. I did have the thoughts what in the world did I buy because some of the pieces seem flimsy by themselves, but once together stiffen up with a little confidence. Time will tell how it holds up but so far so good and everyone that’s seen it seems like it. I don’t know that I would buy it again, but hey life is all about learning and trying new things and next time I’ll build a red iron shop. TLDR: It’s an okay piece of chinese metal. Get yourself an electric impact and some help. It goes together semi smoothly if you have three hands. It looks nice once it’s together and serves it purpose.
J**S
Very nice kit, a bear to put together, but very happy with the final result and quality
Ships as 5 (heavy) boxes, we previously had a soft top gazebo and wanted to try a hard top. This is the same size 12x12 as our previous gazebo, it sits on our elevated (wood) deck. We (wife and I) watched some installs online (youtube), lots of good tips, there are some irritating things, (double sided tape to hold some plastic brackets on the solid top pieces that just doesn't work, probably should have glued them), but watch some youtube installs (none are perfect, some are for what look like older versions of the gazebo), it was very helpful to get hints from the installation videos. Most of the instructions were correct, although its sometimes hard to figure out exactly how pieces are oriented (there are soooo many). Very important to have a clutch capable electric drill for screwing in pieces, (but don't tighten until after you get them all in, so you can still wrangle the pieces over the pre-drilled holes). TONS OF SCREWS TO MANAGE, certainly wouldn't want to install them manually, definitely want to prepare for handling the many many screws, sort them, label them, etc. We put labels on cups and kept the different screws being used for a given phase of installation in unique (and labelled) cups. Final product is high quality in my opinion (for the price), although manual says the gazebo will only withstand 40mph, and we still haven't figured out exactly how to lock it down to our deck (instructions only talk about installing on cement). Took us 4 days all in, starting from carrying the packages onto our deck (one or two of them needed two of us to move them). We avoided the full sun hours (1-4PM) as our deck is full sun and we would be burnt to crisps, so say 9:30 to 12P, then after 4P until dusk sort of deal, (two of us working), a ladder and two varied height step stools, multiple electric drills. The parts were packed very well, with material between the parts in each box to keep them from scratching each other. The screws were all high quality, they went in without too much wrangling, although fitting the many many solid top pieces to the frame takes some man handling. Still, very do-able, just a big time commitment. Its up, beautiful, and we are enjoying sitting under it on our sunny deck, screens are installed, but we haven't tried to use them yet.
W**E
BEAUTIFUL~ Rich and Very High End Quality!
Amazing Quality for the price. Couldn't be happier, a real game changer for my deck. 2 men 42/75 (ages) put this together in about 8 hours, including opening all the boxes (5) and laying out the pieces in order. Every piece marked, making it easy to assemble. I haven't put the netting or curtains on yet, but will be easy, and both seem very high quality as well. I highly recommend this product for anyone looking for a do it yourself gazebo. Comes in several sizes as well. Mine is 10x12. I am looking forward to many years of enjoyment. Especially listening to rain on the metal rooftop in spring and fall. Shade in Summer!
T**N
Sturdy Product - I love it! - Takes at least two people to assemble
Let me start by saying that I absolutely LOVE this product! I like the design and the multiple ways the joints everything were reinforced to make it even more sturdy. My husband and I are used to doing assembly projects like this (and my dad was a contractor who taught me everything!) so this wasn't our first rodeo! We originally purchased a "package" to have someone assemble the product after it was delivered to our home. However, within a day or two of ordering, we received an email stating there was no one in our area that could put it together for us --- that actually saved us the additional $352.00 but we for sure then had to assemble it on our own. The following points are meant to be helpful feedback to the manufacturer and tips or "lessons learned" to any buyers. You definitely need a minimum of two people for assembly, two 6ft - 8ft A-frame ladders, and patience! We were completely able to assemble this ourselves but it took us a total of about 16 hours (over several different days) to get it all done. With both of us being about 60 yrs. old, the trips up and down the ladders and/or working up over your head can take a toll on knees and shoulders. The picture instructions were adequate but it sure would have been more helpful for them to include at least SOME words or helpful notes on some of the pages. I used one of those folding Allen wrench/Hex Key rubberized hand-held sets -- my hubby used a drill - guess who stripped out more screw heads? (hint --- not me!) Thankfully the manufacturer did include a FEW extra screws in each size needed. Definitely move the assembled posts with cross bar framing to the precise area you want it placed in before assembling the upper roof frame - it's much lighter at that point. IMPORTANT NOTE: You will also need a few "drift pins" or "bull pins" to help line up the pre-drilled holes, stick the pins into them at various key points, and then start putting in the fasteners. Otherwise, as you work down/across the pieces you are joining, the holes may not line up and you have to go back and loosen others so that you can "slide" the pieces where you need them. This is especially true when working with the fasteners for the individual metal roofing pieces that overlap each other AND threaded through a rubber "stopper" then on through the final frame hole (3 or 4 different holes to line up)! The numerous little metal "braces" that you have to attach to every flat section of the metal roofing pieces too easily popped off while sliding them through the roof guides but still were effective in helping lock the roof pieces down when properly aligned. The vented top cap was really easy to install (after putting the first small sections of the metal roof on first). Very thoughtful of the designers to have two of the fasteners being large screw-in hooks so that you can hang something from the hooks in the ceiling (lights or plants or whatever). Again, I really am impressed with the sturdiness (reinforcements) and design of this product. My only "complaint" were the "picture only" type directions. It really wasn't that hard to assemble --- you ALWAYS need the RIGHT tools to make things go smoother (e.g. bull/drift pins!). And, I love the way it looks and functions on our new concrete patio!
D**R
AWESOME PERGOLA!
Great Product! I read reviews prior to buying. I dismiss the 1-stars mostly as people who complain about their drinks having one too many or one too few ice cubes. I tend to look at the 2-5 star reviews. So here is mine for what is my take for what it is worth. 1) Price is reasonable for a good pergola. 2) Shipping was on-time and no damage. No dents, no dings, no scratches. Packaging was appropriate for eliminating all but the most careless handling. Use care unpacking to make sure you don't do any damage. 3) Instructions could be better, but applying a little common sense and prior assembly experience and you can do it. You must have another person for some assembling. There are some assembly videos on YouTube that may help. Lay everything out before assembly like the instructions say, it will help keep you from having to look for parts. 4) Assembly is fairly easy if you have some assembly experience or are working with someone who does. My wife and I assembled this over two days. Take three if you need too. Rush it and you will get frustrated and damage something. Don't be in a hurry to tighten anything until you are sure everything fits as it should. I did have a couple of holes that I had to chase with a 10mm die. I realize most people probably don't have one of those, but they're cheap on Amazon. Buy one in advance and save yourself some frustration. I also recommend using your own combination wrench(s) and a T-Handle Hex Wrench. They include tools, but they are not all that great. NOTE and Helpful Hints - We assembled this in two full days over an existing hot tub, so our build was a little more difficult than if you are working in open space. Take your time, read and understand instructions, fit parts before tightening (bolts go easily into nuts or it is cross-threaded). Make sure the base is square before you fit roof panels and tighten after each side is laid out with nuts hand tightened. Don't forget the rubber spacers in the ridges on the roof panels. For the three that they say to tape - don't. Tape does not hold well. Use spray contact cement to hold them in place. Lastly - Enjoy. Great addition to your home!
D**L
Excellent quality, but a few assembly hints!
The gazebo is very sturdily constructed and should last a very long time, but it takes some time and patience to assemble it correctly! It CAN be assembled by one person, but with some creative use of step ladders (6' and 8' helpful!) and painters tape. The only flaw in the instruction manual is the timing of when to add the "Outside Roof Connector", Step 11. Do this AFTER adding the Upper Roof Panels in Step 13. These Panels will get blocked by the Outside Roof Connector if it's already installed. Also, the instructions don't mention it, but you'll have to remove and reinstall some connectors as you add more parts to the gazebo. This becomes obvious when new parts line up with already installed connectors, but it's nice to know this in advance so you don't think that you screwed it up. Other helpful hints: use painters tape to secure the large panels after laying them in place. You'll need to climb to the top of the gazebo to wrangle these into the slot, and they can easily slide off and do major damage to your neck if a small breeze kicks up. Consider using an M6 tap to clean up any threads which are difficult to screw into, better than jamming or stripping the inserts. Definitely keep the C1, C62, B1, & B61 Joint Bars very loose until the roof panels are installed! These are the hardest connectors to line up and will require some adjusting with an appropriately sized Philips head screw driver shaft. Don't be shy about lining up the slots with the screwdriver shaft, everything will fall into place when the connectors are tightened. Finally, two hints about the "7#" screws and nuts. These are the ones that go in the middle of the roof panels and can be very hard to reach once most of the adjacent panels are installed. Use the painters tape to fasten the flat wrench to the nuts at the bottom of the roof so you can climb to the top of the roof and allen key in the fasteners. You can also squeeze the rubber "S" spacers to keep the fasteners from spinning so you can pre-tighten the nuts from the bottom of the panels without requiring arms like an orangutan, although that would be helpful also. Be patient and give it time and you'll get a great result! A couple of updates: a minor quibble with a solution plus another assembly suggestion. In addition to or instead of sealing the gutter system with the supplied black silicon goo, consider applying adhesive waterproof sealant tape normally used for flashing windows. An easy update that should permanently seal the gutters! And now the quibble: the hooks for the "mosquito netting" will definitely pull out of the slots when you're trying to tie back the screens. The track for the privacy screen is blocked by the gazebo corners, but the outer track is sufficiently open at all ends to allow the hooks to easily slide out. My solution was to install blocking screws at the end of each track (8 required). See photos. I used M6 by 12 screws with locking nuts and flattened washers to fit into the slots. Not a difficult fix, but maybe should be part of the hardware supplied by Kozyard and covered in the installation manual.
A**E
Wonderful gazebo!!!!!!
Sturdy structure. 12x10 is a perfect size. Construction was slightly difficult. Following directions is important. Must work slowly and methodically. Patience is required. This gazebo compliments any deck or patio. Very happy with this purchase.
L**T
bien content du résultat
Prend du temps a assembler et préférable d'être habile manuellement
Z**E
PRE-DRILLED NIGHTMARE
The predrilled holes are not very accurate, especially in the roof. It is so bad that the screws are unable to fit, so the roof is still unfinished. I’m not sure what I can do to fix this.
Trustpilot
3 days ago
3 weeks ago