We remain fully operational. Our teams are working around the clock to ensure your deliveries continue safely.

DOWNLOAD THE APP


Copyright © 2025 Desertcart Holdings Limited
DOWNLOAD THE APP

Buy anything from 5,000+ international stores. One checkout price. No surprise fees. Join 2M+ shoppers on Desertcart.
Desertcart purchases this item on your behalf and handles shipping, customs, and support to South Africa.
🔧 Upgrade your ride’s sound system in minutes — no hacks, just seamless power!
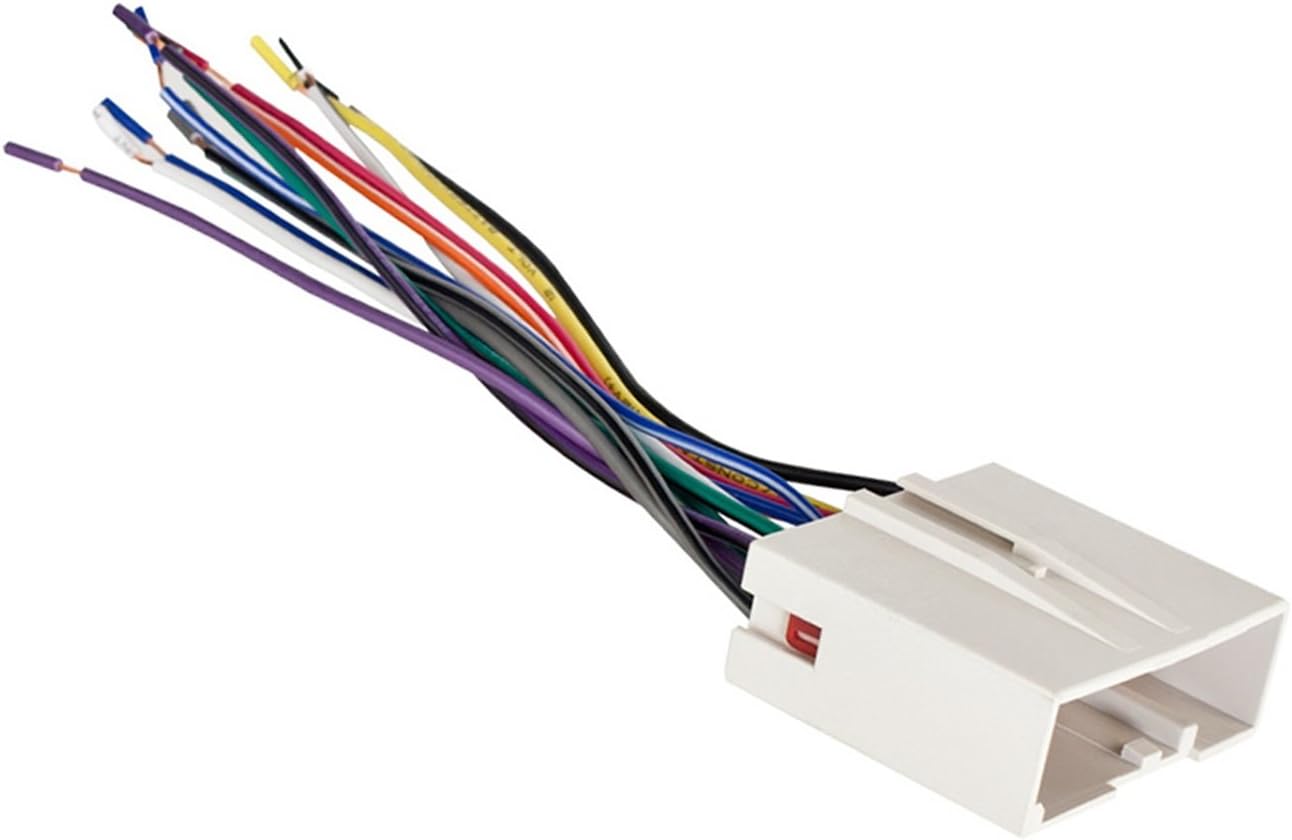
The Metra Electronics Radio Replacement Harness (model 70-5520) is a precision-engineered wiring adapter designed for select Ford, Hyundai, Land Rover, and VPG vehicles from 2003 to 2019. Featuring a 24-pin plug and color-coded wires, it enables fast, no-cut installation of aftermarket radios while preserving factory AV/DVD functions with optional accessories. Backed by expert tech support and a 1-year warranty, it’s the smart choice for hassle-free audio upgrades.

| ASIN | B0007WTF34 |
| Best Sellers Rank | #16 in Car Audio & Video Wiring Harnesses |
| Brand | Metra |
| Brand Name | Metra |
| Cable Type | Auxiliary |
| Connector Type | 24-pin |
| Customer Reviews | 4.5 out of 5 stars 5,644 Reviews |
| Global Trade Identification Number | 00086429098958 |
| Included Components | Please check specs |
| Item Dimensions | 4 x 0.5 x 3 inches |
| Item Type Name | Wiring Harness For Select 2003-Up Ford Vehicles |
| Item Weight | 9.07 g |
| Item dimensions L x W x H | 4 x 0.5 x 3 inches |
| Manufacturer | Metra Electronics Corp |
| Material | Copper (core conductor), PVC (insulation/jacketing) |
| Material Type | Copper (core conductor), PVC (insulation/jacketing) |
| Model | 70-5520 |
| Part Number | 70-5520 |
| UPC | 086429098958 |
| Unit Count | 1.0 Count |
| Warranty Description | 1 year manufacturer |
M**.
Good quality and value
Works as intended for a 2004 f150. Came pre spliced and ready for install. All wires are labeled as well which is a plus
V**N
Works great, with two small changes for the 2006 Hyundai Sonata (tl;dr: order two of these!)
I just used this wiring harness yesterday to install an aftermarket stereo on my 2006 Hyundai Sonata and I want to point out a couple of things. As others have pointed out in their reviews of this wiring harness, as it relates to the 2006 Hyundai Sonata, this harness is missing a couple of wires. It also actually has a couple of extra wires too, that won't end up being connected to anything in the factory stereo wiring harness, but those can be just capped off and ignored. But what's more concerning for those of us with a 2006 Hyundai Sonata is that it's missing a larger spade connection at factory harness location 24 for the power antenna, and also a smaller wire connection at factory harness location 19, which is the remote control ground (required if you want to have your steering wheel radio controls work on your new, aftermarket stereo). As "jasper pipestone" points out in his review, a large wire is missing for the power antenna. He mistakenly refers to this as factory wiring harness location 13 in his review, but it's actually factory wiring harness location 24. Factory Harness location 13 is the black (common ground), so don't remove that one!. You actually want to match up with the funky green colored wire on the factory wiring harness for the power antenna line, which is at factory harness location 24, on the opposite side from the big black and gray wires (black == common ground and grey == battery/constant power). I did what he suggested and bought an extra wiring harness because I knew I'd be short a couple of wires, and these wiring harnesses are cheap. I popped the red wire retainer out from both harnesses. Then I lifted the little plastic clip on the inside of the wiring harness that holds down one of the bigger spade wires and removed it from one harness and then put it into the other harness, solving the location 24 problem. Also, this harness does not have a wire that matches up with factory harness location 19, which is the remote control ground, which is required if you plan on hooking your after market stereo up to a steering wheel control interface like the Axxess ASWC that I used. To solve this problem, I removed another (smaller) wire from my second/spare harness and put it into location 19 in the wiring harness I used to install my aftermarket stereo. Then I reinstalled both of the red wiring harness retaining clips. It works perfectly! I've uploaded a REALLY helpful wiring diagram for the 2006 Hyundai Sonata car stereo factory wiring harness here: [...] After adding the two missing wires to this wiring harness, I was able to connect all of my factory wiring harness wires to my aftermarket stereo with little problem. Hope this helps somebody else out there. =:)
A**R
Works on a 2011 Crown Victoria Police Interceptor
Used this harness on a 2011 Crown Victoria Police Interceptor to install a touch screen Car Play compatible radio. It fit and works perfectly.
1**8
Honest review of a good unit
Unit arrived as expected and installation was as noted in other reviews, simple with patience and attention to detail. I also Installed a back up camera and that works well, placement is key. If you have a pick up spend the extra money and get a tail gate camera it's well worth the extra penneys. The unit responds well to finger touch, although a little slow during colder months. The Bluetooth functions well but will occasionally take a moment to connect, not enough concern to warrant a downgrade on the review. I've not been able to get the video to work as advertised, but for me not a big deal as I'm not sitting in my truck watching movies. The biggest ding on this unit is the handsfree mic, this sucks and no one can hear me clearly. It may be my placement on the instrument panel and I will move it later to see if the sounds gets better. Most of the factory units are above the drivers head..hint hint. All in all good deal for the money and direct fit for the f150 Ford.
J**N
Fit 2005 Ford Crown Victoria LX sport
Worked perfectly with my 2005 Ford Crown Victoria LX sport with factory CD cassette player. If you want steering controls beware you will need a separate part for that, but if you do not have a need for it, it is irrelevant.
B**S
Perfect as always
Perfect fit for my 2014 F150 XL. My favorite thing about these is that they make installs 1000x easier. All you have to do is connect the color coded wires to the after market radio harness and then it’s plug and play. Every color matched perfectly with my Kenwood DMX47S so connecting was a cinch. As far as quality, they’re always good. There’s a reason I’ve always used Metra products in all my installs. Definitely recommend this harness and any Metra product.
A**N
Ford Focus 2007 Installation Guide
I installed this Pioneer DEH-150MP Single DIN stereo in a 2007 Ford Focus with zero product-related issues. I used the Metra 99-5808 Single DIN Installation Kit (link below) and Metra 70-5520 Wiring Harness for the installation. The stereo comes with a remote (did not use), the stereo itself, a few screws, and the Pioneer wiring connector. The dash kit comes with 2 mounts and a trim piece. The wiring harness comes in one piece, one side is the factory connector, the other is bare wires. NOTICE: THERE IS NO ANTENNA ADAPTER INCLUDED WITH THESE 3 ITEMS. If you want to use the radio, you'll need to find the proper antenna adapter. I will update this review if I find the adapter. FOR INSTALLATION: Before going out to your car to tear it apart, first solder all the wires together. Red goes with red and yellow goes with yellow etc. There should be no surprises when soldering your wires together. The orange and solid blue wires on the factory connector will be unused. Solder and tape the unused ends. Disconnected negative battery terminal. This is a highly recommended step of caution to take. It takes all of 20 seconds. Take off the entire dash panel. Simply insert a screwdriver/knife into the edge of the panel and gently pry it off. There are connectors near each corner, it should come off easily. You may want to disconnect the cigarette lighter on the left side to give you more room. Maneuver the removed dash down and to the right to get the most room. I used a little force to get it past the shifter. Remove the 4 7mm bolts on the sides of the OEM stereo. You'll need a nut driver for this (shaped like a screwdriver with the function of a ratchet.) The stereo will now come out. Disconnect the wiring harness and antenna. Now that the OEM stereo is free, its time to put together the dash kit. First, remove the outside plastic trim on your Pioneer stereo. There are small clips on the top, bottom and sides to push out to achieve this. Next, using any sort of prying device, lift the metal tabs on the left and right sides. Lift them enough to slide the stereo out of the metal sleeve. The metal sleeve should be able to slide rearward off the stereo. Now grab your plastic mounts that came with the Dash Kit. R goes on the right side (looking at the stereo as it will be positioned when we are finished) and L goes on the left side. The flaps should be on the bottom of the stereo. Using the screws that came with your Pioneer stereo, attach the mounts via any exposed screwholes. I only used 4 screws. Now you can slide the stereo into the single DIN dash kit, and the mounts will clip into the rest of the kit. Snap the trim piece that came with your dash kit into place. It might be possible to put the trim piece on upside down, avoid this in any case. From here, simply plug in your wiring harnesses and the antenna, if you have the proper adapter. Slide the stereo and dash kit in place, replace the 4 screws, plug in your cigarette lighter if you removed it and finally replace the front panel. All done. http://www.amazon.com/gp/product/B0091V0A9U/ref=cm_cr_ryp_prd_ttl_sol_1 <---- Pioneer Single DIN Stereo http://www.amazon.com/gp/product/B0007WTFAW/ref=cm_cr_ryp_prd_ttl_sol_2 <---- Single DIN Install Kit http://www.amazon.com/gp/product/B0007WTF34/ref=cm_cr_ryp_prd_ttl_sol_0 <---- Wiring Harness
D**N
Bien
Se Ajusta bien para ford edge 2008
Trustpilot
3 weeks ago
2 weeks ago