🎨 Elevate Your Crafting Game!
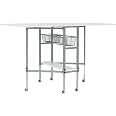
The Sew Ready Hobby and Cutting Table is a versatile and stylish workspace measuring 58.75" W x 36.5" D, perfect for a variety of creative projects. It features adjustable height, two mesh storage drawers, and a durable design, making it an ideal choice for artists and crafters looking to enhance their productivity and organization.


| Item Weight | 58 Pounds |
| Item Dimensions D x W x H | 36"D x 58.75"W x 39.25"H |
| Required Assembly | Yes |
| Finish Types | Polished |
| Color | Silver/White |
| Frame Material | Alloy Steel |
| Material Type | wire mesh and metal |
| Base Type | Casters |
T**T
Lightweight, smaller than most when folded, good color.
I recently bought two of these for my workrooms because I wanted something that folded just a little smaller than the similar Sullivan tables.So first of all, I paid US $123 per table. I think that is just *slightly* high for the quality of it. I would even go up to US$150 per table if I had to because I usually need multiples and like things to match, but I see them being sold on here for US$ 248 or more and that is insane for these guys.The frame of the tables is just a bit less robust than the Sullivan tables that have the same shape with two shelves instead of a shelf and a wire basket like these.The wheels are probably the smoothest operating that I have ever had on these kinds of tables. They glide across my workroom floors like nothing at all instead of the rattled chatter of other plastic wheels.The locks on two of the wheels are fine, but they still move a bit because the table itself is so lightweight.The basket drawers are held in place by very functional and straightforward brackets that, because of the way the table is assembled, can be adjusted for tension and ease of opening. I don't know that the baskets will be more than random catch-alls up here, but I can totally see them used for storage in a home sewing or crafting situation.The divot that holds the swinging leg in place is a nice touch. Instead of just being a bracket that stops it it is actually a kind of pin that sits into the swinging leg and holds it in place. That is nice.It came with all the pieces and hardware you need to assemble it, but they are really tight with any extras. With the quality of manufacturing here, there should really be one extra of each screw, bolt, and nubbin so that you don't have to improvise when threads aren't cut right or are out of whack otherwise. But they include *only* what you need, so if there is a problem *you* have to deal with it. I'm handy and have a workroom of parts and pieces, so it doesn't bother me, but I can totally imagine other people really finding it frustrating.The nicest thing about this for me is probably the color. The table top is a sharp white with just a bit of gloss and the body is a good grey and silver. Much better looking than the Sullivan tables or JoAnn's tables with similar configurations.I think if I were to recommend this to anyone, it would be for folks who have really tight spaces and still want to sew and craft. Otherwise, you will probably ultimately be happier with the Sullivan table rather than this one. But this one looks better and folds smaller, where that one is slightly larger folded and a little flat with its slightly off-white top and matte black finish on the frame.Either way, though, this really should't run more than US$150, so pay what you want, but more than that just seems really, really off for a table that is just *fine* and looks good but isn't particularly sturdy and durable.
V**G
How to Fix the Casters when they FAIL
Yes, this table is great. Easy to put together. Handy space-saving design and thoughtful features. All that is true. But let's be honest, the casters are the WORST. Why do manufacturers make great products but then cheap out when it comes to the wheels? I will never understand. The included casters don't roll well, to begin with, and the plastic inserts crack and allow the casters to bend. BUT I HAVE THE SOLUTION. If you want to fix the problem once and for all, allowing you to use a stronger caster and make your table sturdier and more maneuverable then here's how I did it. It was quick and easy. Here's what you need:1. A hammer and perhaps a screwdriver to help hold the insert while you hammer.2. Something to cut the plastic insert with - I used tinsnips - plus some sandpaper or a dremel or a butane lighter which you'll need to flatten the plastic inserts.3. Outwater Square Double Star Metal Caster Insert with Thread DS71-326 Thread: 3/8-16, Outside Diameter of Tube: 1", Gauge of Tube: 16/18. Amazon link below (These come in a pack of 20. You can order smaller quantities directly from the mfg website, but with shipping for the six you'll need it's about $25, or just pay $34 and get 20 from Amazon. Ignore the mfg instructions to measure the tube - I did that and ordered the smaller 3/4" DS71-245. They're too narrow and just rattle around inside the leg. This larger size will sit flush with the edge of the tube and the prongs modified slightly as I will show you will hold it tightly in place. https://www.amazon.com/dp/B076MJ8BBP.4. Nefish Stem Caster Wheels 2 Inch, 8 Pack, Heavy Duty Threaded Stem Casters, UNC 3/8"-16 x 1" Swivel Casters Set of 4 with Safety Dual Locking Wheel for Furniture and Cart or any 3/8" - 16 x " caster. I found these were the lowest price for the quantity needed, and they look and work great. https://www.amazon.com/dp/B0CXJ7MM61Step 1: Take the leg inserts off the table.Remove the height adjustment knobs and pull the black plastic inserts out of the tube. You can pull on them using the attached casters and they slide right out. There are two in each leg - twelve in all. These inserts keep the height adjustment nuts in line. If you want to keep the ability to raise and lower the table you will need to modify six of the twelve. If not you can just set them aside and ignore the rest of this paragraph - you won't need the inserts for the new wheels. If you want height adjustment, cut off the end of the insert and smooth it flat using your Dremel or sandpaper or melt it with a butane torch (that's what I used) so it will fit back in the leg with the nuts aligned with the holes. You'll want to leave just enough plastic to hold the nut in place. Once I cut the ends, I used my butane lighter to melt down the rounded plastic end so it was flat. I just heated it and then quickly pressed it down to level it out on the flat wrench that came with my casters. This end will butt up against the end of the caster insert. Then you can put the other remaining insert back in on top of it. I'd also suggest screwing the height adjustment knobs back into the bottom insert so you don't knock it out of place when you're hammering in the caster insert.Step 2: Hammer down the star prongs on the caster insert as shown so you can get it started into the tube because they are a little too wide to fit as is. You can use a screwdriver or something to help hold it while you're hammering. Once you're able to put it part way into the leg - kind of leaning as shown, then you can hammer it in the rest of the way and the prongs will hold the insert tightly in place. They aren't going anywhere! I was able to do all six inserts in about 20 minutes once I figured out how much the prongs needed to be flattened. Then screw in your casters, put the legs back in your table, and you're done. The whole job took me about 40 minutes or less and cost about $30 for the casters and $34 for the inserts. I hope that this is helpful. Cheers!
Trustpilot
1 day ago
2 weeks ago