🔗 Unlock smart control—anytime, anywhere!
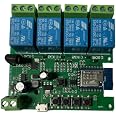
The MHCOZY 4-channel WiFi Wireless Smart Relay Switch offers versatile remote control via WiFi, Bluetooth, and 433MHz RF, supporting up to 10A current at 32V. Compatible with Smart Life app, it enables customizable operation modes, voice assistant integration, and family sharing—ideal for automating garage doors, lighting, and more with reliable offline backup.
| Contact Type | Normally Open |
| Current Rating | 10 Amps |
| Brand | MHCOZY |
| Operation Mode | Automatic |
| Wattage | 10 watts |
| Coil Voltage | 5 Volts |
| Contact Current Rating | 10 Amps |
| Maximum Switching Current | 10 Amps |
| Maximum Switching Voltage | 32 Volts |
| Manufacturer | Mic technology |
| Part Number | EE |
| Item Weight | 2.46 ounces |
| Product Dimensions | 2.95 x 2.83 x 0.62 inches |
| Item model number | EE |
| Style | Smart life app 4CH |
| Pattern | 4ch |
| Measurement System | Imperial |
| Batteries Included? | No |
| Batteries Required? | No |
N**1
Pair this with the Tuya app and you're golden
The media could not be loaded. This product was extremely easy to setup. And it uses the Tuya app, which is excellent! I very highly recommend using the Tuya app for smart device control. I have this on my Federal Signal FCM controller and scheduled in the Tuya app to do a noon blast every Saturday. It always goes off right on time, or like 5 seconds late at most.This allows me to activate my siren from anywhere in the world, without needing a radio license. Then i can just use my Baofeng 888S on FRS for radio activation at home as a backup if Wifi fails, or to access functions on the controller that can only be accessed by radio.If you're in need of a Wifi controlled relay set, this is the one you want!I use inching mode set to 2 seconds to press the button on my FC. And interlock mode so i cant press multiple at once. You just tap the button for any relay, and it holds the relay on for 2 seconds and then turns it off automatically. Then my Federal Signal FCM takes control from there. You can go down to a 1 second inch minimum.
T**I
WOW This works great
I have an AC unit in my garage and loft. The thermostat has been in the loft. I had to go up and down the stairs whenever I wanted to change the settings. When I had the house built I did have the builder run a control wire from the AC unit to the lower wall in the garage. So with this wifi switch I was able to run the wiring from both thermostats, and from the AV unit to switch, for the control to the thermostat I wanted.The needed APP works OK. Only issue is when you select all on or off then the individual switches are displayed (nice) then you have to hit the OK before you can make another selection. You actually can name each switch, but have not yet found how to change the name (or add a name) to the ALL switches. I would like to name the "All On" to lower Control etc.
E**S
Pretty good! Some minor app issues.
I took the board out of the box, plugged it in. Comes with some dinky directions. But at least the QR code on it brought me to the app store to download the iPhone app.Seems it automatically found my device when I went to device. I didn’t know what to do after that… I could check or uncheck the device in the next screen. But what was the next step?Finally got in by clicking the + by the Bluetooth device list item. It asked for WiFi credentials. Once I typed in my SSID, I clicked on the password box. It would not let me go update the SSID with my curser/finger. I had to backout, and then try again from scratch. So, app needs some work in these two respects.I added the WiFi credentials correctly. It processed the adding, and it works. I was able to switch each relay on and off.The commands do go through the cloud, and not directly on the network. I validated this by being on two different WiFi networks, and by turning off the WiFi.As with most IOT devices, I do not trust any company with my credentials one bit. I use a unique IOT wifi network that is segregated with VLANs. This device works with that solution.It powers just fine over USB 5v. Uses 50-60 mA with no relays active. Each active relay will consume about 60-80 additional mA. I did find one problem. I turned two relays on and off with the manual buttons rather quickly, and the device still used about 120 mA, with all relays off. The iPhone app reported the relays were still on. (they were not on, I heard them click off, and LEDs were off). I did some more manual button presses, and the power consumption was back to normal 60 mA, and the app reported correct state. Seems there was a potential bug there. I didn’t investigate too much.Appears if you press the “M” button changes the device to momentary mode. Where after changing to the momentary mode, using the manual button or on the app, it will only turn the relay active for 1 second. This is not documented in the included directions, or app, that I could find. It remembers this setting after power loss.Boot up time till it works on WiFi after power loss is very brief. Less than 5 seconds.The network indicator LED appears to go off once it’s on the network. I see a second LED, not sure what that does. Would be nice if it was green when working, red when error. Flashing red when finding the network. Something like that.Appears little effort has been made to isolate the relay/high voltage side from the low voltage side of the board. There’s no optocoupler, the board isn’t routed out between sides, and two of the relay’s common leads go much closer to the low voltage ground plane than I’d like to see.There’s an un-labeled header on the board. Not sure what its supposed to be used for. It’s not for hooking up manual buttons. One of the four pins is 3.3v and other is gnd. The other two go to an unlabeled chip.Added to Samsung SmartThings fine. The Tuya app guided me through it. I had to go to SmartThings app, add device, find TuyaSmart, enter my TuyaSmart credentials. It looked like it wanted a phone number, but I used my email to sign up originally. So I entered my email address where it had the +1 for phone number, and it worked. The login screen probably should be fixed there. It added the four switches, a master 4ch (for all on/off at once) and some backlight switch to SmartThings automatically. The individual and master on/off works in SmartThings, not sure what the backlight one does.As soon as it was added to my SmartThings account, my Echo/Alexa automatically added all the items that were added to smart things. They all worked fine. Shockingly flawless.
B**T
It just... works! Easy to integrate into projects too
I mounted this in an old sprinkler controller enclosure and wired it to the 24vac transformer that drives the valves. I tested running the board itself off 24vac and it worked great but ended up using a USB cable and wallwart that was already in the enclosure from my last project for no good reason.This board worked right away, boots up super quickly, and I've replaced an old sprinkler controller with something I can either control directly with my phone or via my mail sprinkler controller because there's an easy to use API (Aymkdn/tuyacloud-php on github is one, there are others) that lets me write software to control this.It can practically be used as a sprinkler controller out of the box, just add a 24VAC power source, an enclosure, and a little bit of wire to string it all together and now you got yourself a stew going.Will buy again soon to replace yet another sprinkler controller.
D**O
Smart Life app compatible
The media could not be loaded. Wired this to the touch panel of my Maxxair Maxfan in my travel trailer. I can now control it via wifi using the Smart Life app or a 4 button 433mhz key fob. Using the "inching mode" I have on/off, forward/reverse, speed up, and speed down. Super easy setup in the Smart Life app.
A**R
Not that simple to flash Tasmota
They put DIY but they put crappy Tuya firmware on it. There is a USB port on the device but its ONLY for power. If I wanted to use the cloud to control my thermostat I would of gotten an beautiful Ecobee. You have to solder wires for a flasher to flash Tasmota and am waiting for that to arrive I will follow up but as it stands its not really worth the price. My board is a CB3S and you need use CEN pin 3 to ground to pin 9 turned on first and pin 15 UART1_RXD and pin 16 UART1_TXD an power 3.3v is pin 8.Update got the flasher was unable to flash tasmota maybe I am an idiot or Windows 11 ended up ripping a bunch of pads trying to get the device off the board to try to flash it maybe I can salvage part of the board with the relays but main and maybe just cut half of the board off with the other logic. Such a shame this board doesn't offer a direct ability to flash it since it has a USB port on it...
Trustpilot
1 month ago
1 month ago