🧼 Clean Prints, Happy Hearts! - Say goodbye to clogs and hello to vibrant prints!
The Printer Cleaning Kit is designed for a wide range of inkjet printers, including popular models from HP, Brother, Epson, and Canon. It features a powerful enzyme-based cleaning solution that effectively dissolves dried ink and impurities, ensuring smooth ink flow. The kit includes all necessary tools for easy operation, making it a must-have for anyone looking to maintain their printer's performance.
Compatibility Options | Compatible |
Special Features | Wide Range of Compatibility |
Compatible Printer Models | Epson Expression Premium NX-515, Epson Expression Photo XP-8600, Epson EcoTank ET-4750, Epson Expression Home XP-310, Epson EcoTank ET-2650, Epson Expression Home XP-430, Epson EcoTank ET-2550, Epson WorkForce WF-7620, Epson WorkForce WF-3640, Epson Expression Home XP-330, Epson WorkForce WF-2750, Epson EcoTank ET-4450, Epson Artisan 1430, Epson Stylus C68, Epson WorkForce WF-2650, Epson Expression Premium NX-430, Epson Artisan R2000, Epson Expression Premium XP-810, Epson Stylus C88, Epson Expression Premium XP-830, Epson Expression Premium XP-610, Epson Expression Premium XP-630, Epson Expression Home XP-434, Epson Artisan 1400, Epson EcoTank ET-3750, Epson Artisan P600, Epson WorkForce WF-7710, Epson Expression Home XP-200, Epson Artisan P400, Epson Expression Home XP-440, Epson Expression Home XP-340, Epson Expression Home XP-424, Epson EcoTank ET-3700, Epson EcoTank ET-2750 |
Color | 1-PACK |
Page Yield | 1 |
Compatible Devices | Printer |
Ink Colour | White |
E**.
You Can Do It!
It worked great on my Brother Inkvestment printer - which I don't think was listed as compatible.BE PATIENT and STAY THE COURSE! It's worth it to fix your broken, clogged-inkheads-printer!It took me a long time to even work up the nerve and find the time to try this, but I finally did. FIRST, I READ THE INSTRUCTIONS ALL THE WAY THROUGH - that's so important! Then I watched several youtube videos, trying to find a printer that looked kind of close to mine. On my first attempt, I was certain I had broken my printer in five ways - but as it turned out I didn't.I had to repeat the process somewhere between 12 and 15 times. Little by little my printheads became unclogged after sitting for 18 months unusable.I read several other reviews before settling on this product. Some of the reviews have good advice and clear guidance for fixing your printer. Here are some of those tips I found most helpful:1) Buy blotter paper to absorb the solution under the printhead. For my printer, I cut the blotter paper into thirds and wrapped a half-sheet of paper towel around it. TOTALLY NECESSARY.2) Put a towel under the printer. For me, this turned out to be an unnecessary step, but having the towel down relieved some of my stress - I didn't want a bunch of inky solution running all over my floor. That never happened, but that towel was nice insurance - gave me security.3) Go SLOWWWWW! Don't overfill your printheads. Heat the cleaning juice by placing your filled syringe in a cup of hot water. Then, when you inject the cleaning solution, let it sit in there for an hour at least. Go do something else for a while. I did that over the course of two days. Boy, was it rewarding to be able to print perfectly in color after those two days.4) DON'T LEAVE THE CLEANING JUICE IN THE PRINTHEADS OVERNIGHT!!! By design, this stuff slowly leaks out and is absorbed by the papertowel and blotter paper. Don't let it sit too long. I think I left it sit once for 2.5 hours - there was a lot of juice! If I had left it longer, I may have had a mess.5) Set up good lighting - I had a clamping lamp shooting straight at my ink nozzles so I could see clearly as I tried to fit the syringe attachment into the nozzle - NOT EASY! I also wore my husband's strong reader glasses to help me have the clearest possible vision and a little magnification.All in all, I say GO FOR IT! It's a fair pain in the butt to resuscitate your printer, but totally worth it - and this is the right product!
J**.
Worked on Brother printer
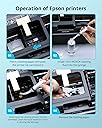
From what I know, dont worry about the brand, this works on any printer where the ink is stored in one location of the printer, and moves through hoses to get to where it is put onto the paper. On my printer the ink is stored in the front right.Essentially all I did was take the syringe and little hose (threw away all of the extra pieces that didnt apply to me) filled the syringe with fluid, keep air bubbles out, take ink out, use needle nose pliers to push the other end of the little hose onto the port where the ink goes is (near the bottom of the ink for me). Now uptop open your printer to see its innards and jam paper onto the sensor switch to tell the printer oh yea this lid is closed, then begin a head cleaning, this causes the moving part to unbuckle and move about the cabin, then oncw it does BAM you unplug the printer. use your hands to gently slide the moving part into the middle and put a strip of paper towel under it, fluid will come out here from that syringe, youll wana use the gloves. Gently push fluid into the system, you dont want pressure, and letting the fluid sit and work is a good idea. How long? idk long enough to play teenage mutant ninja turtles arcade game until you beat the level with all of the fire. I probably waited 10 minutes. do not push hard. Now You may want to do all of the colors while youre at it, unless this is stressing you out, in which case just go for good enough to work. When done, remove the paper towel, plug the printer in, run a head cleaning and repeat.You should see NO air in the little hoses going to the moving peice (carriage) if so, flush more to remove all air.Now you can print that thing you needed to print months ago!
D**N
It works, but may take more than 1 round
I had not used one of my printers (reserved for photos) in about two months. The first time I tried to print something there was a really bad streeking of colors and the black ink was fading. I tried multiple times to clean the print heads, but I couldn't get a decent printing sample. I did some research online and found out that ink feed to the print heads most likely dried out due to lack of use. I ordered the WOKOK cleaning kit to tackle the dried feed lines. The kit is very simple. It consists of a cleaning solution, syringe, tubing, two different flexible connector heads (printer-specific), and plastic gloves. Cleaning can get messy. I followed the directions and flushed out three of the five color cartridge ports. I let it sit overnight and printed a couple of sheets. There was an improvement over the initial test page, but it still wasn't back to "normal". The instructions advised that depending on the degree of dried ink, more than one round of cleaning may be necessary. I repeated the cleaning procedure and waited until the next day. I had to run about 4 test pages before the colors were at full strength. If you need to flush out feed tubes, it will take time and some patience. There is more than a sufficient amount of solution to clean your printer multiple times. It doesn't require very much solution per cartridge port. I used about 1/8th of the cleaning solution, so I have quite a bit remaining for future cleaning if necessary. Lesson Learned - don't let your printer sit unused. Run a test page every now and then. I had 100% success with cleaning my printer. For me, this kit worked. I recommend it.
Trustpilot
5 days ago
1 month ago