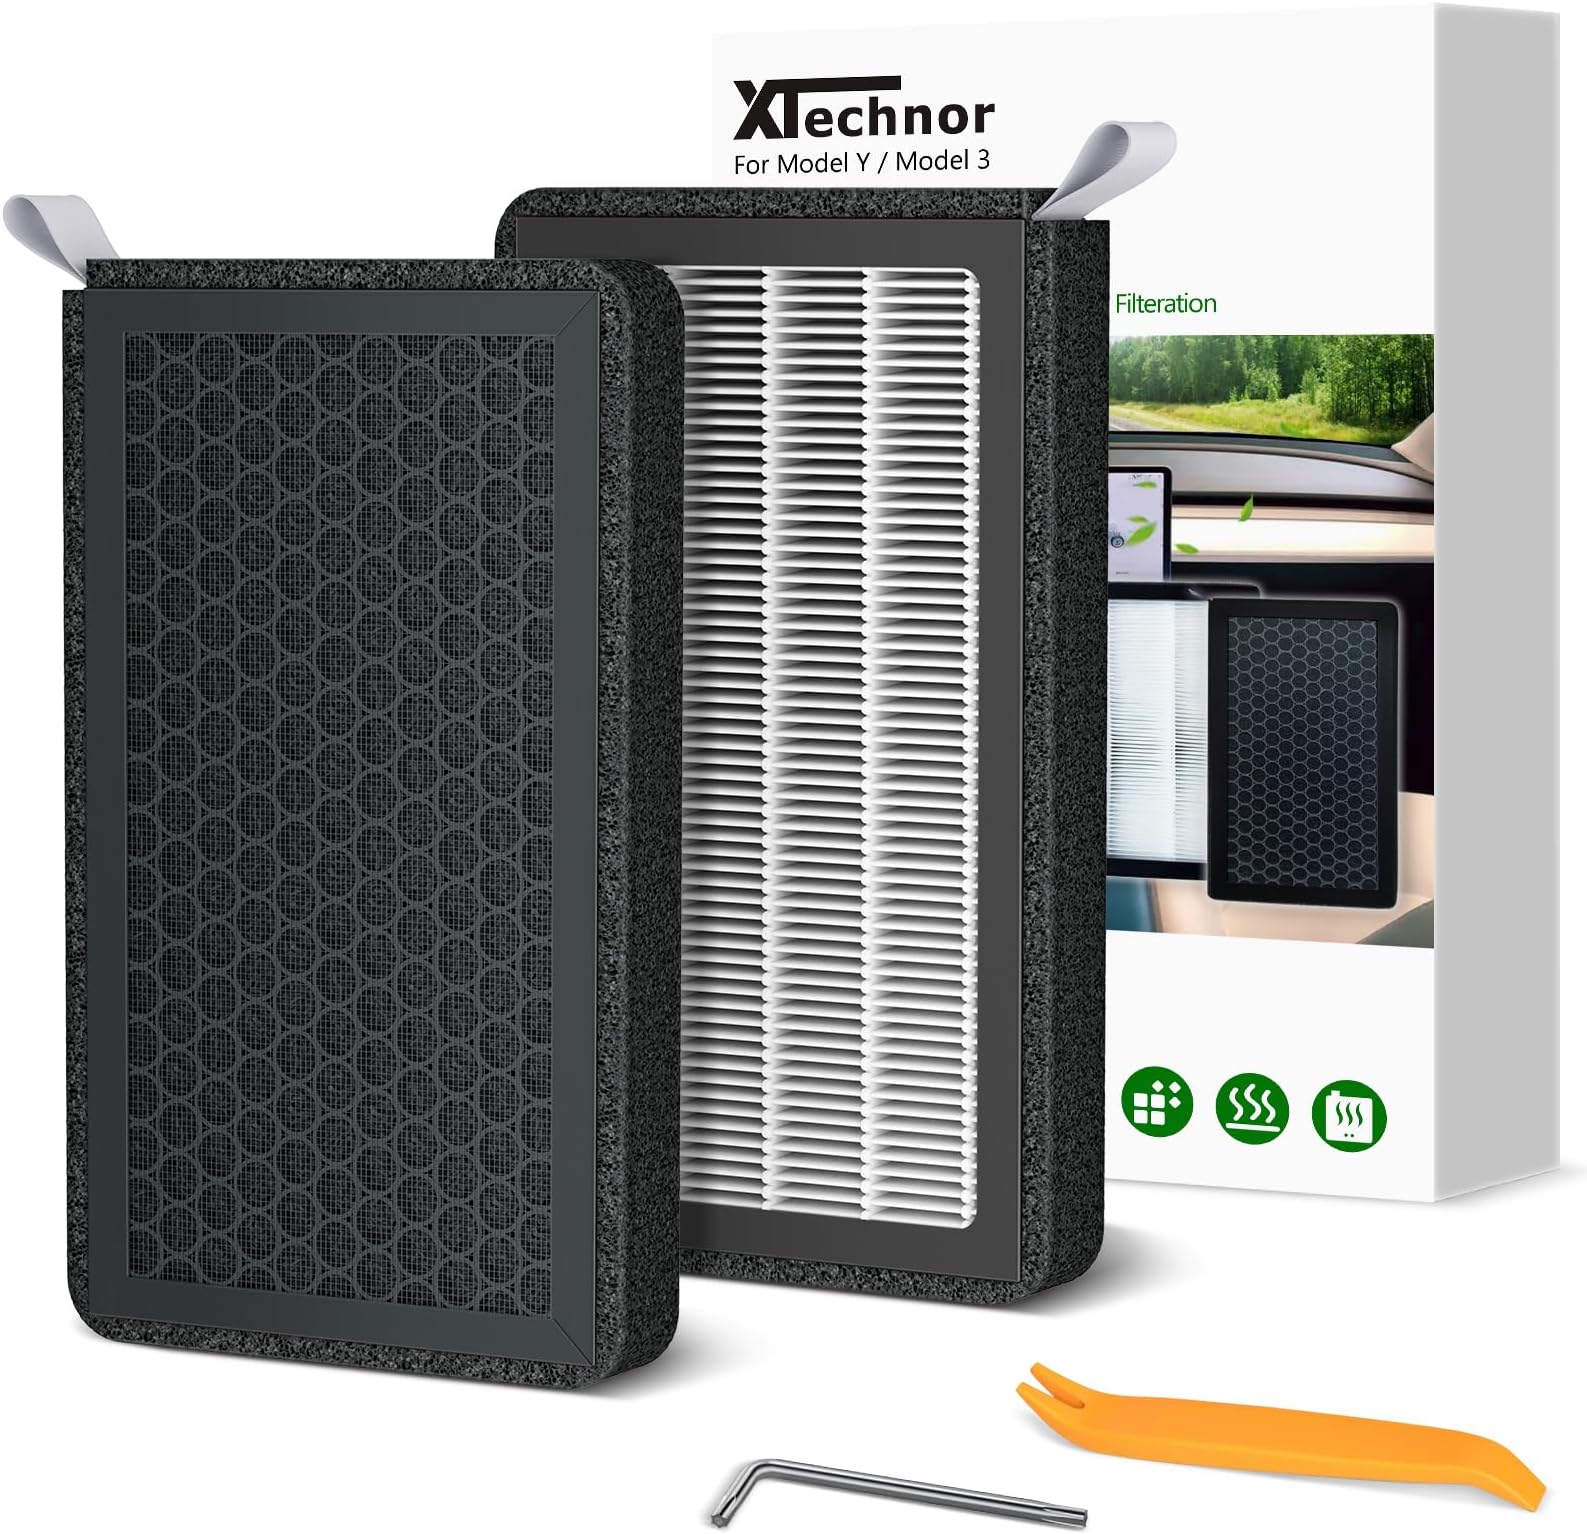
🚗 Breathe Better, Drive Smarter!
The HEPA Air Filter for Model Y and Model 3 (2016-2025) is a premium cabin air filter designed to effectively capture harmful particles and gases. Featuring a multi-layer construction with a melt-blown electrostatic layer, HEPA filter, and activated carbon, it ensures a clean and healthy environment for passengers. Recommended replacement every 8-12 months or 12,000 to 15,000 miles, this filter maximizes filtration area while maintaining optimal airflow.
Manufacturer | XTechnor |
Brand | XTechnor |
Model | Model 3 Model Y |
Item Weight | 15.2 ounces |
Package Dimensions | 10.71 x 6.65 x 2.91 inches |
Country of Origin | China |
Item model number | Model 3 Model Y |
Manufacturer Part Number | XT-gen2 |
S**Y
Helps with smell of model 3
Takes care of the smell of the model 3 you have to change yearly as opposed to every 2 months for stock filter - obviously a design flaw for the car! Great product , second time I ordered it.
P**I
Car smells musty? Try this. It’s not horrible but need patience
I really liked that this product came with instructions although I had watched a couple of YouTube videos before even ordering this product. I did not realize that it came with the torx screwdriver. That L-shaped tool is super handy. All of the videos from others complain how hard this process is without it and this product contains it. Also that little orange tool is so handy. I’m a female and well my nails aren’t super long I do like to keep them manicured. No need to worry about breaking a nail with that orange tool.To get this accomplished took me about 45 minutes. I am fairly sometimes handy around the house but this wasn’t horrible. I did have to contort my body in a number of undignified positions. I do feel like I basically did yoga with Elon musk and perhaps had a little bit of an abdominal workout as well. I used the floor mat underneath my knees when I was getting those clips out under the glove box. Then to pull the side panel out I did the same thing. I did have to put my head where my feet normally go and my feet were the head part is and make sure to fully recline and push back the passenger seat to get this accomplished with the torx screwdriver. Another tip is before you use that screwdriver you do have to unclip the wires and the split part of the plastic tool is incredibly handy for that. I don’t know without that leverage that most people would have the strength in their fingers to do it. When you pull those filters out the first one pulls out easily and I even use the prying tool to get it out because it was a little tough. The second filter had to be lifted up and out by the tab. When I put everything back together it’s really important not to skip the step to reattach the wires to the clips because otherwise you will hear your rattling. In total I feel like I actually accomplished something and the source of the smell in my car was the cabin air filter. Supposedly the HEPA filters only need to be changed every three years but we shall see. We had a rather damp spring where I live and I’ve only had the vehicle about a year and a half. These were original filters which supposedly need to be changed every two years. I’m a 5 foot six female and I do feel sorry for guys who are taller. You really did need to contort your body to get into the right position to do this. I will say it’s not the fault of the manufacture of these air filters but just the way the car was designed. I really do like that they included two very helpful tools to accomplish this project.
A**.
Smells good
Great air filters, the stock ones included with the Tesla smelled like mildew really fast within the first month of purchasing the car. Thought it’s not really the air filters fault, rather the way Tesla’s air filtration system works. Overall very easy to install and love the toolsIncluded too!
A**X
Sufficient Filter - Bad Build Quality
Decided to change my filter for the first time in a year and a half as the air had a bad smell when the AC started blowing. This filter seems to have gotten rid of the odor, though it has it's own odd odor (only noticeable at startup), kind of like new plastic smell. Either way, its an improvement, and hopefully the smell from the filter will go away soon.While the filter seems to work, I did feel I should mention quality. Because of the stupid way Tesla decided to place the air filters, you have to stack them on top of each other and use tabs to pull the filters out. My first complaint is that the glue used to hold the tabs on these filters is very low quality, my guess is they used just a drop of super glue as the entire side started peeling off as I was replacing the filters. Comparing to the original filters, they appeared to use a very strong epoxy. This would definitely resolve my problems with this.The second complaint is the sponge foam along the outside, if you aren't careful, it can snag on the metal grate that sits adjacent to the filter position. When trying to drop the first filter into the hole, it got stuck, this led to me discovering the first issue. Because the tab was too weak, the only way I could free it was pushing it away from the grate with a long screwdriver. I think to resolve both problems, I would highly suggest using a rubber material found on most high quality filters, this would prevent snag and should make the filters structurally more rigid than the current design.Overall, its a filter, I'm not super impressed, but it gets the job done. My main worry is if I'll be able to get the bottom filter out in the future since the tab is barely hanging on.
S**N
These are the filters you are looking for
Bought my 2022 Model 3 with 13k miles. Noticed the stink smell as I drove it off the lot. Shame on you Tesla for selling me a relatively new car with horrible first impressions. Was just going to have Tesla fix the issue but the smell was unbearable.Ordered these with the HVAC cleaning spray- now it smells amazing and just like a newer car should. Will be using these every annual filter change from now on. Installation isn't difficult if you're a tech/former tech. If you're a newbie- pop the kick panel, drop the glovebox panel, disconnect the speaker, the light and just dont drop the screw. I removed the older filters, reinstalled the filter access cover, sprayed half the HVAC cleaner down the intake(frunk area) with the AC running full blast(WINDOWS DOWN!!!) for 5-10 mins. Then removed the filter access cover and sprayed all over the AC evaporator(its blind so do your best to get it all over). Reinstalled filter access cover and ran the AC for 5-10 more mins(no filters). Removed filter access cover, installed these new filters and reassembled the rest of the car. Ahhhhh the peace of mind of not breathing in mold. Amen.
R**L
works well, got rid of the smell, study the videos out there to make installtion easier.
works as advertised. look at videos on installation, will save a bunch of time.
Trustpilot
3 weeks ago
3 weeks ago