


Buy Esky EC170-20 4.3-Inch Rear View TFT-LCD Monitor with 135 Degree Waterproof Car Camera: Vehicle Backup Cameras - desertcart.com โ FREE DELIVERY possible on eligible purchases Review: Great inexpensive option. - I got this for my nissan nv200 van. The van has no back windows and im a mirror driver so i was really missing the rearview mirror. The van comes with a backup camera but i didnt want to monkey around trying to figure out how to change the camera so that it could be on all the time, plus the camera shares the navigation screen. I stumbled upon this little gem while looking for a gps for someone else. I figured it was hard to go wrong for the price. The camera and screen came well packaged and the directions were clear enough. I have installed these types of units before so it was pretty clear to me. Now my installation was far from easy but that was because i had to find a keyed power source that was always on provided the key was on. Turns out in the nv200 you have 2 choices. Under the hood terminal block or the ciggy outlets. Ugggh that made life more difficult because they are at the front of the van. So the included power wire was no where long enough for my application but will probanly be long enough for most applications. The video wire was routed thru the van body and ended up being 2 ft. Short. This was because i took the long way around and came up the side of the van then crossed to the center console then back under the dash to the side and up around the dash and back to the center. Wow that was a lot of work and i was miffed at myself for not planning better. Well a male to female connector and a bit of old vid cable had me back in biz. The camera work very well and has a nice sharp picture but will tend to wash out in bright light (greens will take on a pink hue). This is a notorious fault of the cmos chips. Night vision is excellent and headlights dont really wash out the picture as bad as i expected. My real issues are when the rising or setting sun hits the camera. The picture will wash out almost completly. Cant really blame the camera for that. The camera range is pretty good. I can easily see 200 ft.behind me. The guidlines are bold and accurate enougn. I elected to leave them on as i also tend to use the unit as a backup camera. View is easily 135 degrees. The monitor is a bit small for my 50 yr old eyes but i knew that when i purchased this. The picture is clear and sharp when i wear my glasses. Without them, well lets say i can see the cars behind me, but struggle with the make and license plate number. No i am not required to wear my glasses when i drive (yet). The angle of the monitor doesnt work on my sharply slanted dash area but a little plexiglass and a few cleaver homemade risers and that problem,was solved. All in all i really like this unit and have given serious thought to getting another one for my subbie outback as it does not have a backup camera at all. Just a quick update. The unit has survived to winter so far. Of course the camera get gunked up pretty easily but so does every rearview camera. I have found the the monitor interferes with my radio signal when im in fringe areas but I can easily unplug it from the power outlet. My van was broken into and they didnt take the monitor which was a blessing and im sure it was because it was hardwired. Picture is still clear and unit has survived the heat of summer and the cold of winter with zero issues. Review: I was pretty much done in 5 hours - No hassle purchase. Seems to work ok. The ease (or difficulty) of installation depends entirely on your vehicle and the quality of your installation, not the product. For my installation, the license plate is on the rear hatch of a SUV. I had to remove the door liner and secure the provided wiring to the existing harness in the door for security of installation - clearance from door handles and locks etc. I didn't want it flopping around in a hatch that is opened and closed often. I used tie-wraps every 3 to 4 inches. Then for environmental proofing, I ran the wires through the existing conduit's and rubber boots in the transition from the door to the vehicle body. After that it was quick to finish the hook-up to the back-up light harness (soldered splices with shrink wrap) and the video cable to the run to the front went quickly for me too. After placing nylon reinforcing spy-wrap to protect wiring around sharp edges, I was pretty much done in 5 hours. I had to add a length of wire to the existing power wire for the camera due to the need to run the wiring all the way around the large rear window, up to the ceiling through the conduit, and back down to the back-up light wiring. However, the Video cable was long enough to go all the way to the front. Edit: Camera clouded up at the first rain - and I live in a desert! Also, the screen extend spring action stopped working, but the latch still works. So now it's a two handed operation to open the screen. One to hold the latch open, and one to lift the screen. It works well enough for my needs, but I probably wouldn't recommend this.
| ASIN | B00P8N7N0Y |
| Brand | Esky |
| Compatible Devices | Monitor |
| Customer Reviews | 3.9 out of 5 stars 394 Reviews |
| Display Technology | LCD |
| Installation Type | Surface Mount , Dashboard Mount |
| Item Weight | 0.01 Ounces |
| Manufacturer | Esky |
| Mfr Part Number | FBA_EC135-56 |
| Real Angle of View | 170 Degrees |
| Screen Size | 4.3 Inches |
| Voltage | 12 Volts |
A**R
Great inexpensive option.
I got this for my nissan nv200 van. The van has no back windows and im a mirror driver so i was really missing the rearview mirror. The van comes with a backup camera but i didnt want to monkey around trying to figure out how to change the camera so that it could be on all the time, plus the camera shares the navigation screen. I stumbled upon this little gem while looking for a gps for someone else. I figured it was hard to go wrong for the price. The camera and screen came well packaged and the directions were clear enough. I have installed these types of units before so it was pretty clear to me. Now my installation was far from easy but that was because i had to find a keyed power source that was always on provided the key was on. Turns out in the nv200 you have 2 choices. Under the hood terminal block or the ciggy outlets. Ugggh that made life more difficult because they are at the front of the van. So the included power wire was no where long enough for my application but will probanly be long enough for most applications. The video wire was routed thru the van body and ended up being 2 ft. Short. This was because i took the long way around and came up the side of the van then crossed to the center console then back under the dash to the side and up around the dash and back to the center. Wow that was a lot of work and i was miffed at myself for not planning better. Well a male to female connector and a bit of old vid cable had me back in biz. The camera work very well and has a nice sharp picture but will tend to wash out in bright light (greens will take on a pink hue). This is a notorious fault of the cmos chips. Night vision is excellent and headlights dont really wash out the picture as bad as i expected. My real issues are when the rising or setting sun hits the camera. The picture will wash out almost completly. Cant really blame the camera for that. The camera range is pretty good. I can easily see 200 ft.behind me. The guidlines are bold and accurate enougn. I elected to leave them on as i also tend to use the unit as a backup camera. View is easily 135 degrees. The monitor is a bit small for my 50 yr old eyes but i knew that when i purchased this. The picture is clear and sharp when i wear my glasses. Without them, well lets say i can see the cars behind me, but struggle with the make and license plate number. No i am not required to wear my glasses when i drive (yet). The angle of the monitor doesnt work on my sharply slanted dash area but a little plexiglass and a few cleaver homemade risers and that problem,was solved. All in all i really like this unit and have given serious thought to getting another one for my subbie outback as it does not have a backup camera at all. Just a quick update. The unit has survived to winter so far. Of course the camera get gunked up pretty easily but so does every rearview camera. I have found the the monitor interferes with my radio signal when im in fringe areas but I can easily unplug it from the power outlet. My van was broken into and they didnt take the monitor which was a blessing and im sure it was because it was hardwired. Picture is still clear and unit has survived the heat of summer and the cold of winter with zero issues.
A**Y
I was pretty much done in 5 hours
No hassle purchase. Seems to work ok. The ease (or difficulty) of installation depends entirely on your vehicle and the quality of your installation, not the product. For my installation, the license plate is on the rear hatch of a SUV. I had to remove the door liner and secure the provided wiring to the existing harness in the door for security of installation - clearance from door handles and locks etc. I didn't want it flopping around in a hatch that is opened and closed often. I used tie-wraps every 3 to 4 inches. Then for environmental proofing, I ran the wires through the existing conduit's and rubber boots in the transition from the door to the vehicle body. After that it was quick to finish the hook-up to the back-up light harness (soldered splices with shrink wrap) and the video cable to the run to the front went quickly for me too. After placing nylon reinforcing spy-wrap to protect wiring around sharp edges, I was pretty much done in 5 hours. I had to add a length of wire to the existing power wire for the camera due to the need to run the wiring all the way around the large rear window, up to the ceiling through the conduit, and back down to the back-up light wiring. However, the Video cable was long enough to go all the way to the front. Edit: Camera clouded up at the first rain - and I live in a desert! Also, the screen extend spring action stopped working, but the latch still works. So now it's a two handed operation to open the screen. One to hold the latch open, and one to lift the screen. It works well enough for my needs, but I probably wouldn't recommend this.
E**R
works-greatprice
Works as advertised-great price. I like that the screen can be folded down. The details My new Camry has a backup camera system. I like it and wanted to put one on my Toyoda pickup truck. I went to best buy and got an installation service price of 200.00 plus the camera 79 dollars and the console monitor with radio/dvd/USB/ blue tooth/stereo 400 dollars. So 700 dollars for the total system. I did not need the radio/dvd/โ stereo or the blue tooth -I already have that. The USB audio would be nice too but I donโt really need that either. So I just decided I just wanted the backup camera and monitor. Best buy would charge about 350 -400 dollars for that installed. I check amazon and found I could buy the hard wired camera monitor kit for 35 bucks. They have a wireless for about 70 bucks but from the YouTube and amazon reviews- the wireless doesnโt work well. So I decided to buy the 35 dollar kit. The kit comes with everything except the splices. So I installed it yesterday and it works as advertised and at a great price. The effort- One hour searching you tube videos on how to install it. 2 hours to install and 3 hours to put all my equipment & tools away. It also took two trips to the auto parts store: one for the Scotch lock Splices ( the photo with the blue splices) and the other for a plug to connect the monitor power leads to the cigarette lighter outlet. The easiest thing was to run the TV cable from the cab to the rear license. Installing the camera on the rear bumper easy too. One of the YouTube videoโs showed how to get the video camera cable through the Toyota cab by using an existing cable hole in the Tacoma cab. Good no drilling. The problem I ran into was splicing the power cables for the monitor and camera and finding out which wire to splice into. The camera power leads spliced into the wires located on of tail light fixture. I selected wires used for the back up light. For the monitor I connected it into the cigarette lighter outlet. I didnโt have a plug to use so I went to the parts house, bought an extension cord for the outlet and cut off one of the two receptacleโs and used the plug and cord instead. That worked find. The important thing to know is that the power wires on the camera and the monitor are black. I use and ohm meter on the cigarette lighter plug to determine the ground wire. The backup camera system works. It also made me revisit my time jerry rigging devises as a electronics technician student in college. Boy I am slow now. but back in the day (1958) it would have taken 15 minutes but the cost of the camera and monitor would be 15,000 dollars and it would be impossible to fit it in my truck plus I would need a large five kilowatt inverter too. LOL I Have used this system for one month- I was not happy with the cigarette lighter hook up for monitor. I change that by using a add a fuse circuit instead. I used the same fuse location as the cigarette lighter- much cleaner installation. The mystery tiny button on the camera cable will only display the guide lines. I found that the monitor does not give a mirror view- other than that everything works great.
P**O
Works, but.........
I bought this for my 1997 F150 for the sole purpose of having a camera when I am hooking up my travel trailer. I kenw that I didn't want a wifi model as they tend to freeze. So I began looking for a hard wire unit that I could install. I also knew that I didn't want a screen that would have to be plugged in to a cigarette lighter all the time. I eventually found this product on Amazon and decided to order it. The installation was easy. However, it didn't come with the clamps to hook the camera or the screen to the power supply. So I had to go buy these. (not a big deal). After the unit was installed, I realized the picture was amazing. No freezing and clear as day... Exactly what I wanted. However, when I put my hitch in, I realized, that the camera didn't angle down far enough to see the ball. THAT WAS FRUSTRATING!!!!!! So I had to take wire cutters and cut the back of the camera so it can angle down far enough. That didn't solve the problem. Eventually, I had to use a rubber wedge behind the license plate screws to assist the camera angle down far enough. This worked. So for every day use, it points straight out to assist in parking. when I hook up my trailer, I just angle it down. This should solve all my problems. If I had to do it again, I would have bout the tailgate camera. But as of now, I can see my hitch and it does what I need it to do. But took a lot of extra work!
A**N
Awesome value! Can't beat it
I keep telling my friends what an unbelievable deal this is! I have this installed on a 2008 Mazda 3 manual transmission (hatch), and it sits perfectly on the dash. It comes with a sticky double-sided square to secure the monitor, power cables for both monitor and camera, and a long video cable that connects them. I ended up connecting the monitor power to the cigarette lighter that's powered by key acc, and the camera to the parking lights instead of the backup light. Since it's a manual transmission I can roll backwards without being in "reverse" and I wanted the camera to be able to be turned on without being in reverse, plus the backup lights are in the hatch door and would have taken more effort to route wires through the door. The only downside is the monitor will be on at night when my lights are on, but I can close the screen (not sure if the screen knows it's down to cut power. I have yet to try it at night). The plastic housing for both definitely feel cheap and light. Time will tell if they hold up. The camera quality and video picture are great and all you would ever need for checking behind your car. You can adjust the direction (up or down) of the camera. The monitor is spring loaded when shut, so pressing the button on the front will pop the screen up. Hopefully this will hold up over time too. It looks like you can wire sound to the monitor (white cord) but not sure why you would want to do this. Maybe an external mic so you can year outside your car?
A**R
Cheap product
Very disappointed... screen works (comes on) only 60% of the time. Very unreliable. Had the system professionally installed... so connections were verified Update: Amazon replaced the product and the original problem is corrected. Thank you Amazon ..they care about their customers. Now the replacement unit screen image is reversed.... Let to right - right to left. The enclosed User Instructions referred to a "Mode Button" to change the image and other functions, etc.. But there was no obvious button. I wrote to the seller - Thousandshores and questioned them about the button that was mention in the user instructions. Thousandshores reply: "As I just checked with our product consultant, this camera version doesn't have one button control function, so that's why you couldn't find the button. I'm very sorry about it! Would you please try to adjust the monitor to check if the screen could be normal? Thanks a lot! " There is no screen adjustment either!!!! (Which I had asked about and they reply about the camera.) The instructions are completely FALSE and MIS-LEADING. I am very did-satisfied with Thousandshores and this product. I am waiting for them to make this right as stated and sold.
D**S
Installed on 2014 Beetle Convertible
For my wife's 2014 Beetle with the RCD 310, I wanted to add a rear view camera. I decided against the mirror mount as the Beetle has an extremely small mirror, and the mirror screen also washes out in bright light, which would be a problem with the top down. So I ordered this license plate bracket camera and 4.3" flip up dash mount screen: http://www.amazon.com/Esky-EC170-20-.../dp/B00P8N7N0Y I chose to not do a wireless setup, as those can be problematic. And running a single wire from the back to the front of the car isn't really that difficult in a Beetle. I didn't take pictures along the way, but it's a pretty straight forward process if you've ever done anything minor with electrical on a car: In the rear of the car, the camera wire runs up through a small notch I made in the license plate light. I snaked those wires through the rear center of the trunk pan vent. The power from the reverse signal is a light blue striped wire at the driver's side tail light. For the ground I used the center bolt on the plastic trim piece for the trunk latch. Up front for the video display, I enlarged one of the holes in the top of the dash under the rubber placemat, and fed the power and signal wires through to the opening above the gas pedal area. Getting those wires through was the most time consuming. I initially fished a coat hanger through the dash, but ended up getting lucky by feeding the wires down and I was eventually able to grab the end. In the fuse panel by the driver's left knee, I used an "add a fuse" to a 10 amp circuit that only comes on with the ignition (no idea what the circuit is, as I couldn't find a fuse diagram online or in the owner's manual). A lighted 12v circuit tester was handy for this and also finding the hot reverse wire. I used a bolt to the left of the fuse panel for the ground. There was plenty of wire for the video feed from the front to the back, and it is hidden nicely. The video signal wire simply snakes along through the trunk along the side of the rear seat, and tucks in along the plastic rocker panel up to the front of the car by the dead pedal. I used a few small pieces of 3m double sided tape to adhere the screen to the rubber placemat. The image comes on only in reverse. It has guidance lines, but I found those to be of minimal use. So I turned those off (a button near the rear view camera controls the guidance lines on or off). The flip screen pops up with the push of the center button, but needs to be manually folded. It works fine so far. It's supposedly waterproof, so we'll see how long it lasts. For only $30, it's not a large investment if it craps out. My wife is thrilled, and now it's time to drink some cold beer! I will update later to report on longevity and usefulness.
D**N
Technical details learned from installation
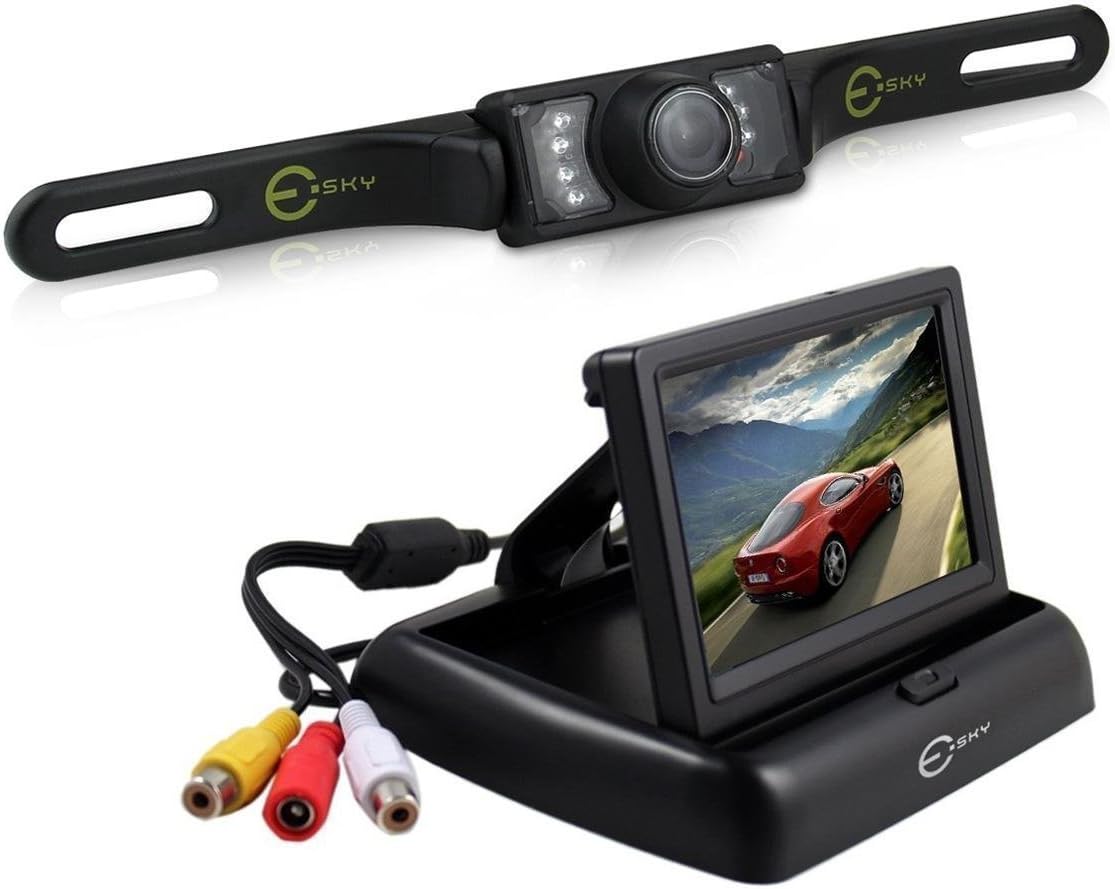
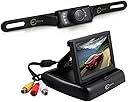
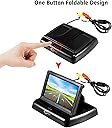
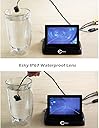
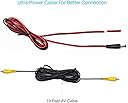
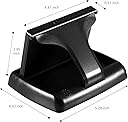
Just installed 2 of these so no longevity info yet. All in all seems like a great value for the price (< $30). Some observations that may not be totally clear from the listing... Camera: Definitely not a fish-eye lens like a factory unit (can't see the rear bumper, even when pointed down as low as possible - can only see the ground about 2 feet behind the bumper). Good video clarity. Easy to wire to the backup light. It does stick out a bit, so if your license plate has a single central bulb above the plate, this will reduce the nighttime marker plate illumination (I guess only police would care?). As mentioned by some other reviewers, they have changed the design to have a single small button to control all aspects of the camera image (grid lines - on/off, image orientation - right/left/up/down (mirrored image or not), image system - NTSC/PAL, guide line style- straight,curved, guideline width, guideline position height). Unfortunately, the method to select/change these options relies on a button clicking timing method that requires practice and patience to get right. You have to click a certain number of times as just the right speed to select the option, then pause just long enough, then click at the right speed to toggle the option. It works but it is not completely intuitive. The camera can be tilted up/down - only friction holds it. In my case I angled it down as far as possible, but otherwise I would be worried that its position may not stay over time. Display: Pops up with the press of the button on the top front. You have to push the screen back while pressing down to re-fold it. The white connector is not used for a standard installation (2nd video feed). Note that these connectors will likely be sitting on your dashboard as the cable is a bit short to run it to a less obtrusive location. It does come with an adhesive pad to permanently stick it to your dashboard, but I opted for a non-slip pad to make it removable instead. I installed 2 of these, and in one case, the image does show a bit of "snow" when the engine is running, but not when it is off, so I guess some cars have "noisier" alternator power than others. Also, keep in mind that due the pop-up design of this unit, it does angle back a bit and has no "visor", so in certain direct sunlight conditions, the image can get washed out. I chose this design however because I had no place to mount the display unobtrusively and I have used and been disappointed by the image brightness of mirror units. One install tip - Pretest it on a bench with a 9-volt battery so that you don't waste time ripping the car apart if the unit is bad and you can preset some of your desired settings. All in all, I am pleased. Hopefully it hold up over time.
T**R
5 days in and im happy
It is now installed and working in my car. The video quality is good overall and there are guide lines that pop up too. I think they make it sound easier to install than it is. Sure- if you are experienced with cars and advanced do-it-yourself work then you can probably look up the specifics of how to wire this to your unique vehicles electrical system. I looked up all the details and knew the jist of how to do it myself, but realistically if you want it do be done reliably and properly you should pay someone to install it for you. The costs for installing a system like this can range anywhere from $100 to $400. I decided to have my dealership do it because I trust them, they know my specific vehicle very well, and their prices were only slightly higher than the regional average. Most shops in the area said 2-3 hours at $90/hr to $130/hr. My dealership did an amazing and professional job, they said it ended up being more difficult than expected as they don't normally install these but it cost about $380 took them 2.5 hours. And mind you i've used this dealership a long time they have never lied or cheated me. So now that I had it professionally installed i am very satisfied. My car has very bright rearview lights so at night the video quality is good, though if you didn't have bright rearview lights I think the visibility could be quite limited. Rained many times, appears to be weatherproof.
B**R
Four Stars
monitor works great--need a specific place to place it.connecting wires hard to hide.
M**T
It serves its purpose and works very well. Good value.
**Update December 2. I will take this opportunity to praise the vendor for customer service and follow-up. **** Camera is very good in daytime and ok to good at night. Could benefit from a wider angle. Still it serves its purpose of not hitting things directly behind you in vehicles where visibility is limited. I connected the camera's power supply to the reverse lights. Connecting the red wire to the blue wire on a Hyundai Sonata 2011 and the black to black. Use of a voltmeter comes in handy during setup. I also soldered the connections as the wires are very thin and fragile. The monitor only comes on when the vehicle is in reverse (when the camera receives power). During setup I periodically tried the camera/monitor to make sure that I would not have surprises upon the complete installation. I will note though that it is better than a camera setup I purchased at one of the major auto supply chains and my wife liked it. Display unit is convenient and good. Placing it so that you have a good viewing angle is important. Camera is good during the day and acceptable at night.
J**S
Need to get a Cigarette Lighter Plug !!
The product is easy to be installed. However, I am not informed I should get a Cigarette Lighter Plug when I buy this product. That causes me trouble and I have to wait another day to finish my installation. That is not a big issue with the product but I am a little disappointed. Hopefully, this will be solved.
A**R
Great little Camera
Great little camera ... easy to install. I placed it in the console tray (I didn't want it on the dash) and rarely fold it closed - I just glance at it while reversing. The wire between the camera and the monitor is thin and easy to tuck under carpeting so you don't see it.
Trustpilot
3 weeks ago
1 month ago